Alerts
The Alerts section is divided into two subsections: the Quick Launch tab and the Alerts tab. Shown below:
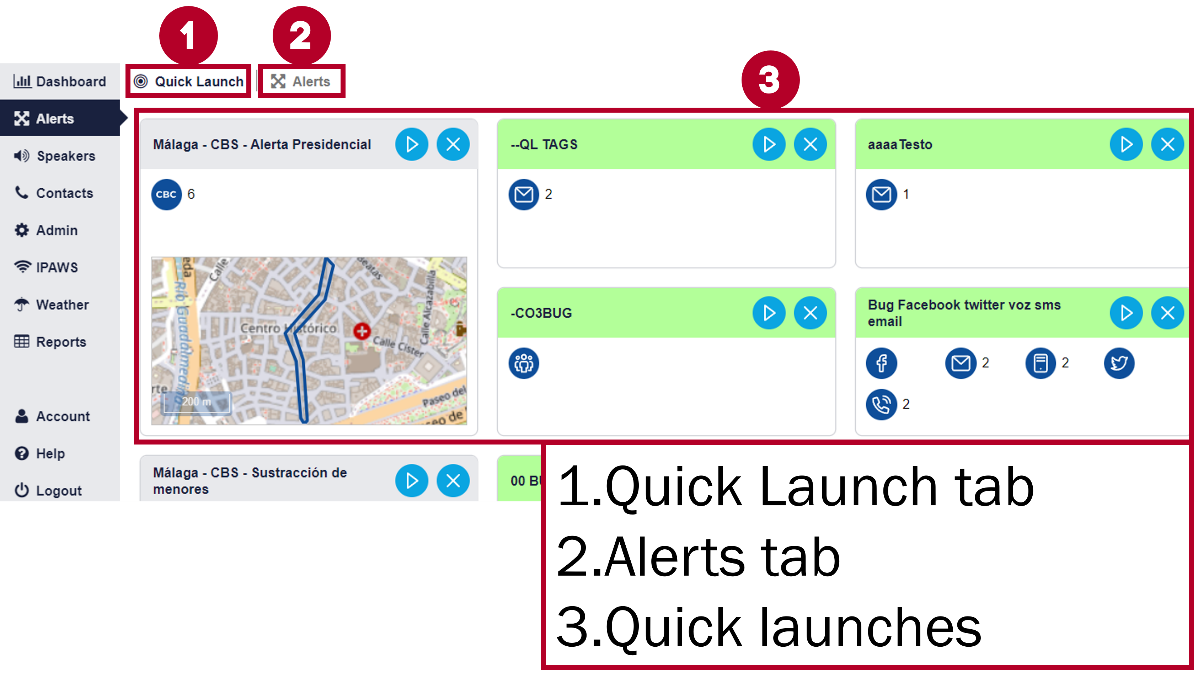
Quick Launch and Alerts tabs
Quick Launch Page
The Quick Launch tab contains predefined templates. These templates allow faster responses to recurring emergency situations.
To create new quick launches, you must first create a Template in the Alerts tab and then convert it into a Quick Launch (Described in more detail in the Alerts page).
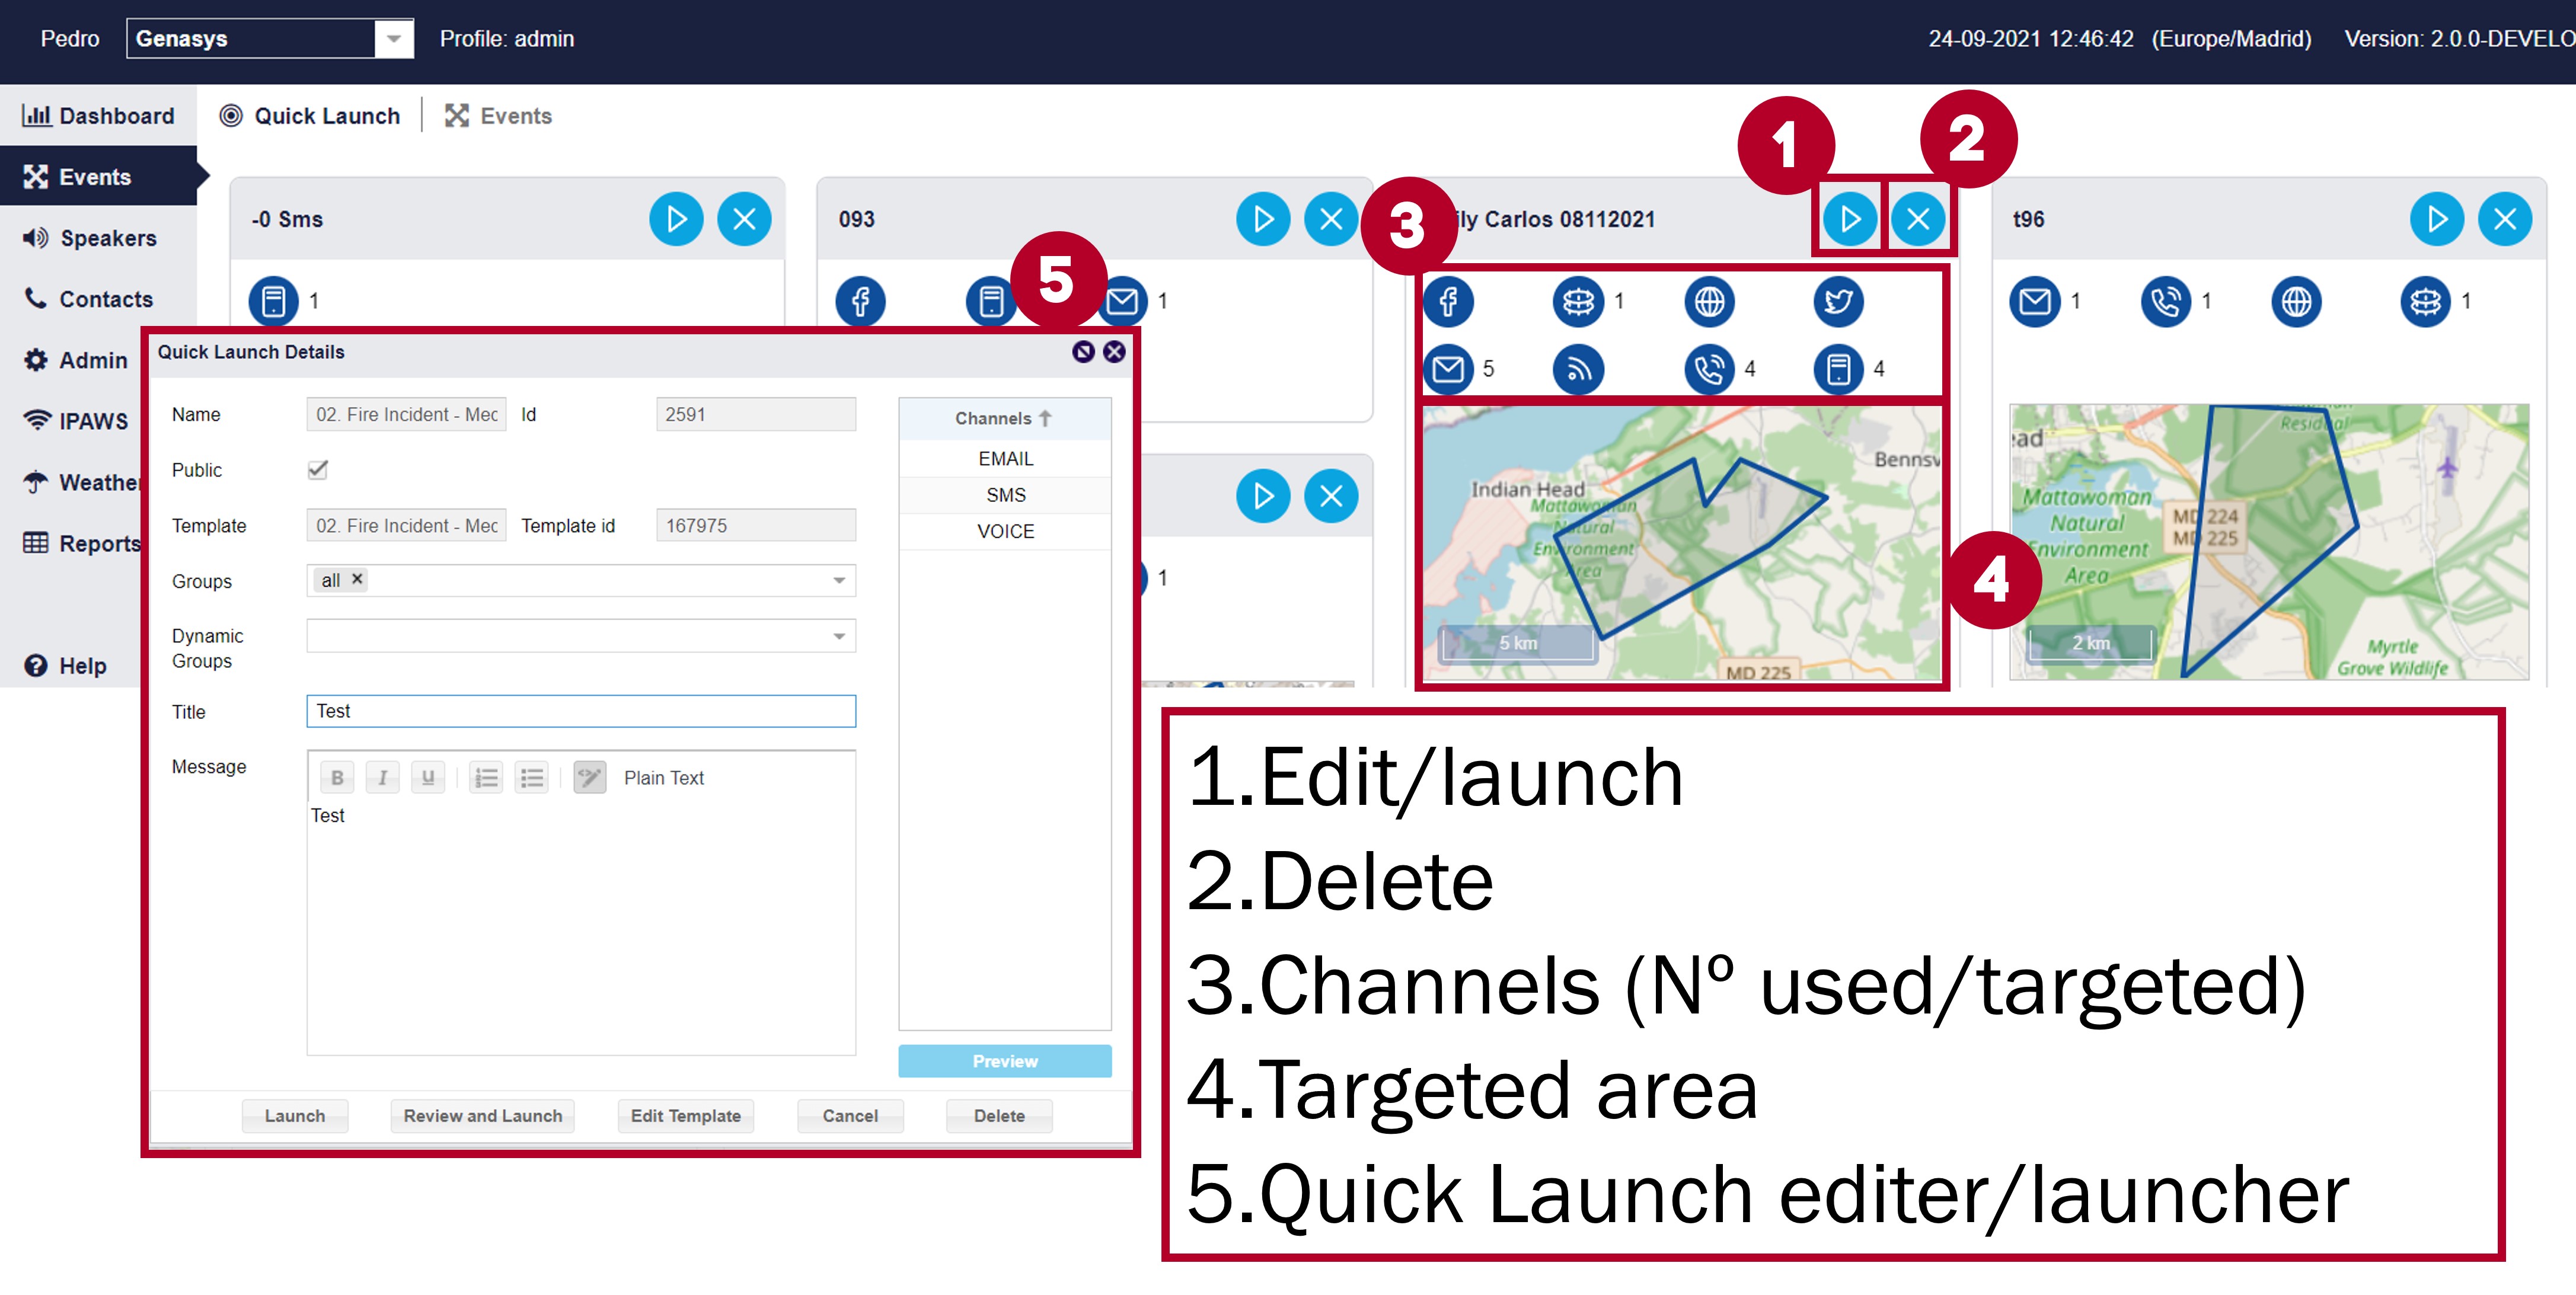
Quick Launch Page and Quick Launch Details
The templates are listed alphabetically below the Quick Launch tab.
When a template is selected, a window will appear showing the Quick Launch Details window for the selected template.
Users can select the following options for the template:
Launch: Initiate the Quick Launch template’s designated communication.
Review and Launch: Go to Alert screen with all Quick Launch details ready to review/edit with the option to launch once finished.
Edit Templates: Takes you to the Quick Launch's corresponding template so that you can edit it.
Cancel: Deselect the Quick Launch template.
Delete: Erase this Quick Launch template.
Quick Launches can also be converted into URLs/QR Codes. To do so you must mark a Quick Launch as Public when creating. To create a Quick Launch you must use the  button with a template in the Alerts tab, (this is described in more detail in the Templates subsection).
To get URL you must hover your mouse over the URL button in the Quick Launch page:
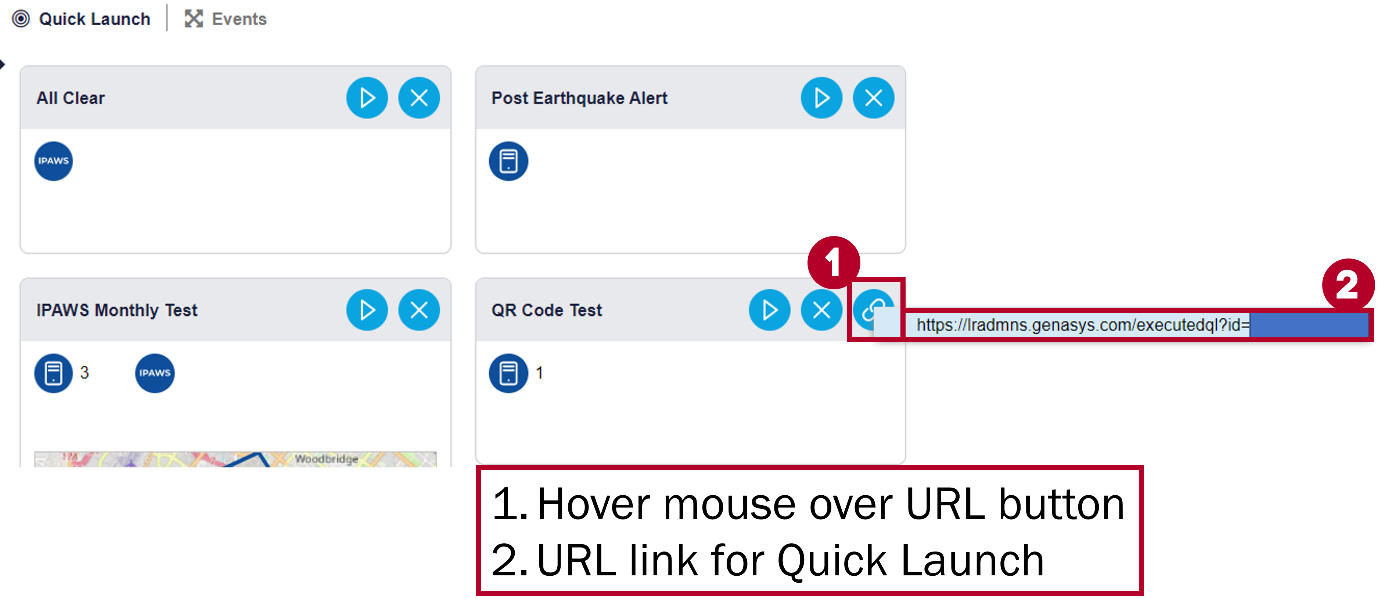
Quick Launch URL
Finally, the URL can be converted into a QR code. When someone scans the QR code it will trigger the corresponding Quick Launch, this way clients can place QR codes in specific locations so that if an emergency occurs in the area people can quickly ask for help and notify GEM users through the QR code. For example, a university could have QR codes located in various parts of the campus so that if a student scans the QR code it will alert security that help is needed at the QR code’s location.
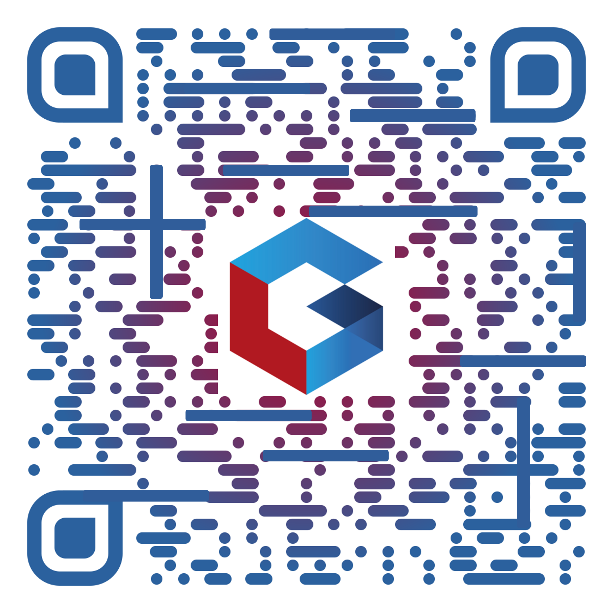
Example QR code (tampered with to not function)
These QR codes will lead to a customizable Quick Launch page.
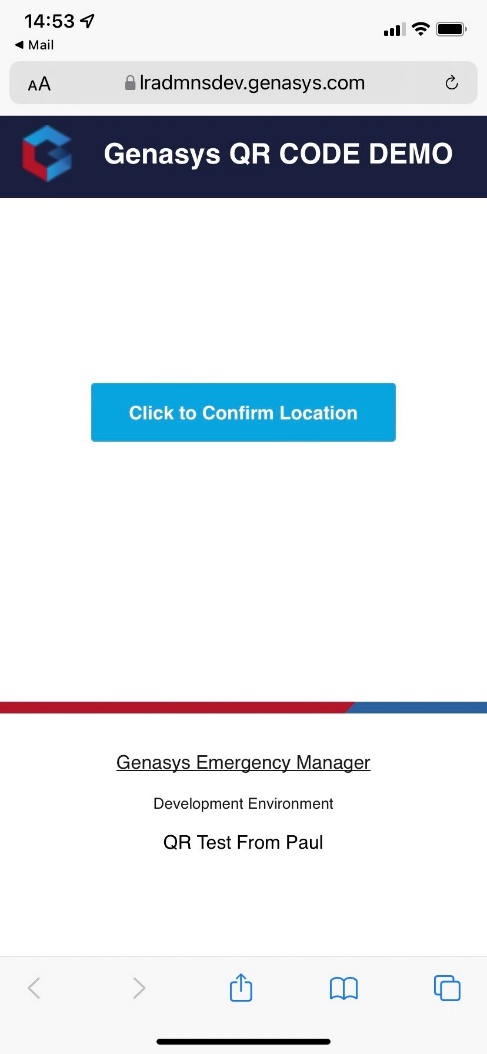
Example of customizable Quick Launch page
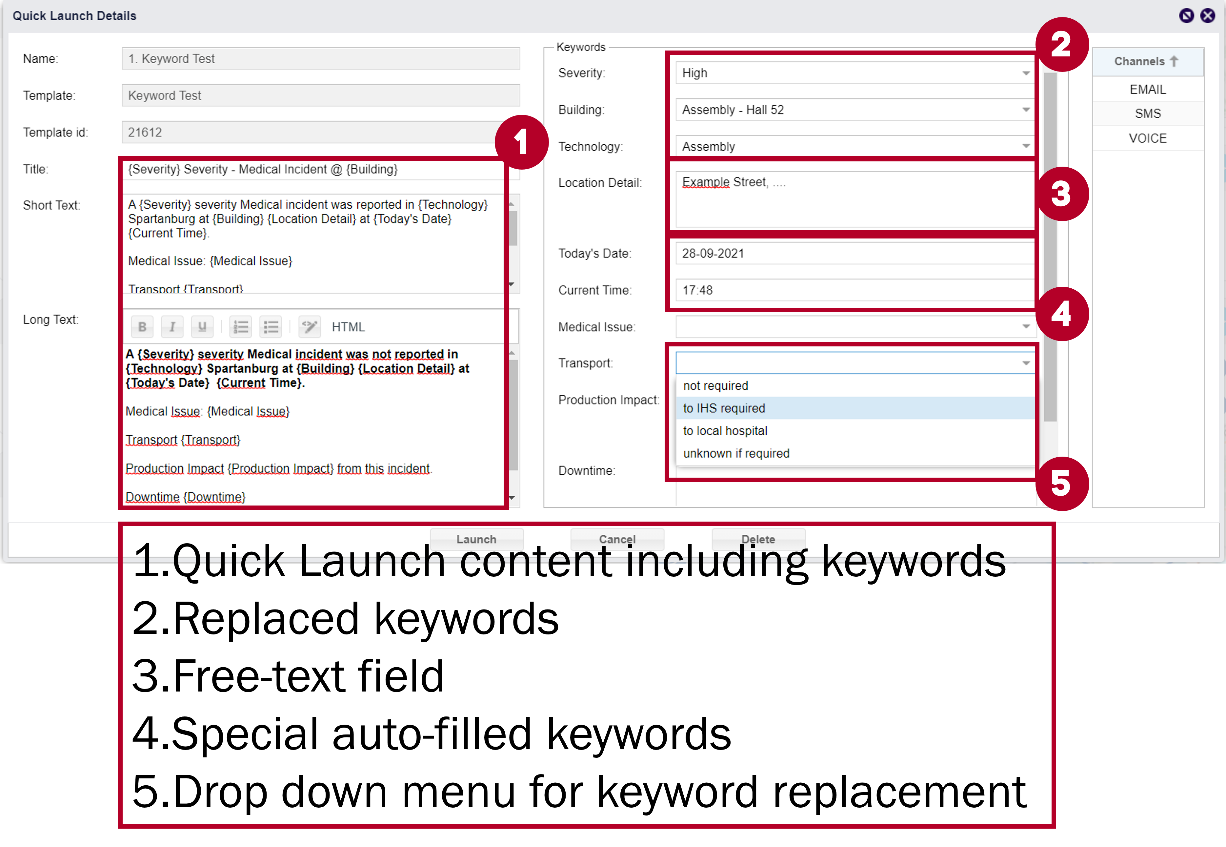
Quick Launch Keywords
Quick Launches also feature a Keyword functionality. A keyword is text found within a Quick Launch that can be replaced when sending out an alert.
Quick Launch Keywords
To use the keyword function, you must place your keywords between curly brackets {Example} in the alert template prior to converting the template into a quick launch.
There are three types of keywords:
- Free text.
Any text can be entered from the quick launch panel
- Drop down menus
Lists of possible options to replace a specific keyword. These options are defined from the Admin panel in the menu.
- Special keys for current date and time.
E.g. {Today's Date}, {Current Time}
The figure above serves as an example. You can see the keywords {street name}, {Current Time} and {Today’s Date} in the text. The user will change {Street Name} to the corresponding location for this alert, in this case Sherman Street, meanwhile special keywords with specific commands configured will automatically change such as the time and date.
Keywords can also have associated groups, so that when a certain selection is made from a keyword drop down menu a set of groups are selected simultaneously. For example, a keyword called “buildings” could have a set of options associated such as “Assembly Hall 50”, “Assembly Hall 51”, etc. Each of these Assembly Halls could have groups that work within so that an alert that targets a specific building can target those who work there even if they are not currently within the confines of the targeted geographically selected area. To learn how to associate groups with a keyword go to the Keywords subsection that falls under the Administrators section in the manual.
Previewing a Quick Launch Alert
Before launching a Quick Launch alert you can preview the contents before sending them. To do so you must click on the Preview button shown in the figure below.
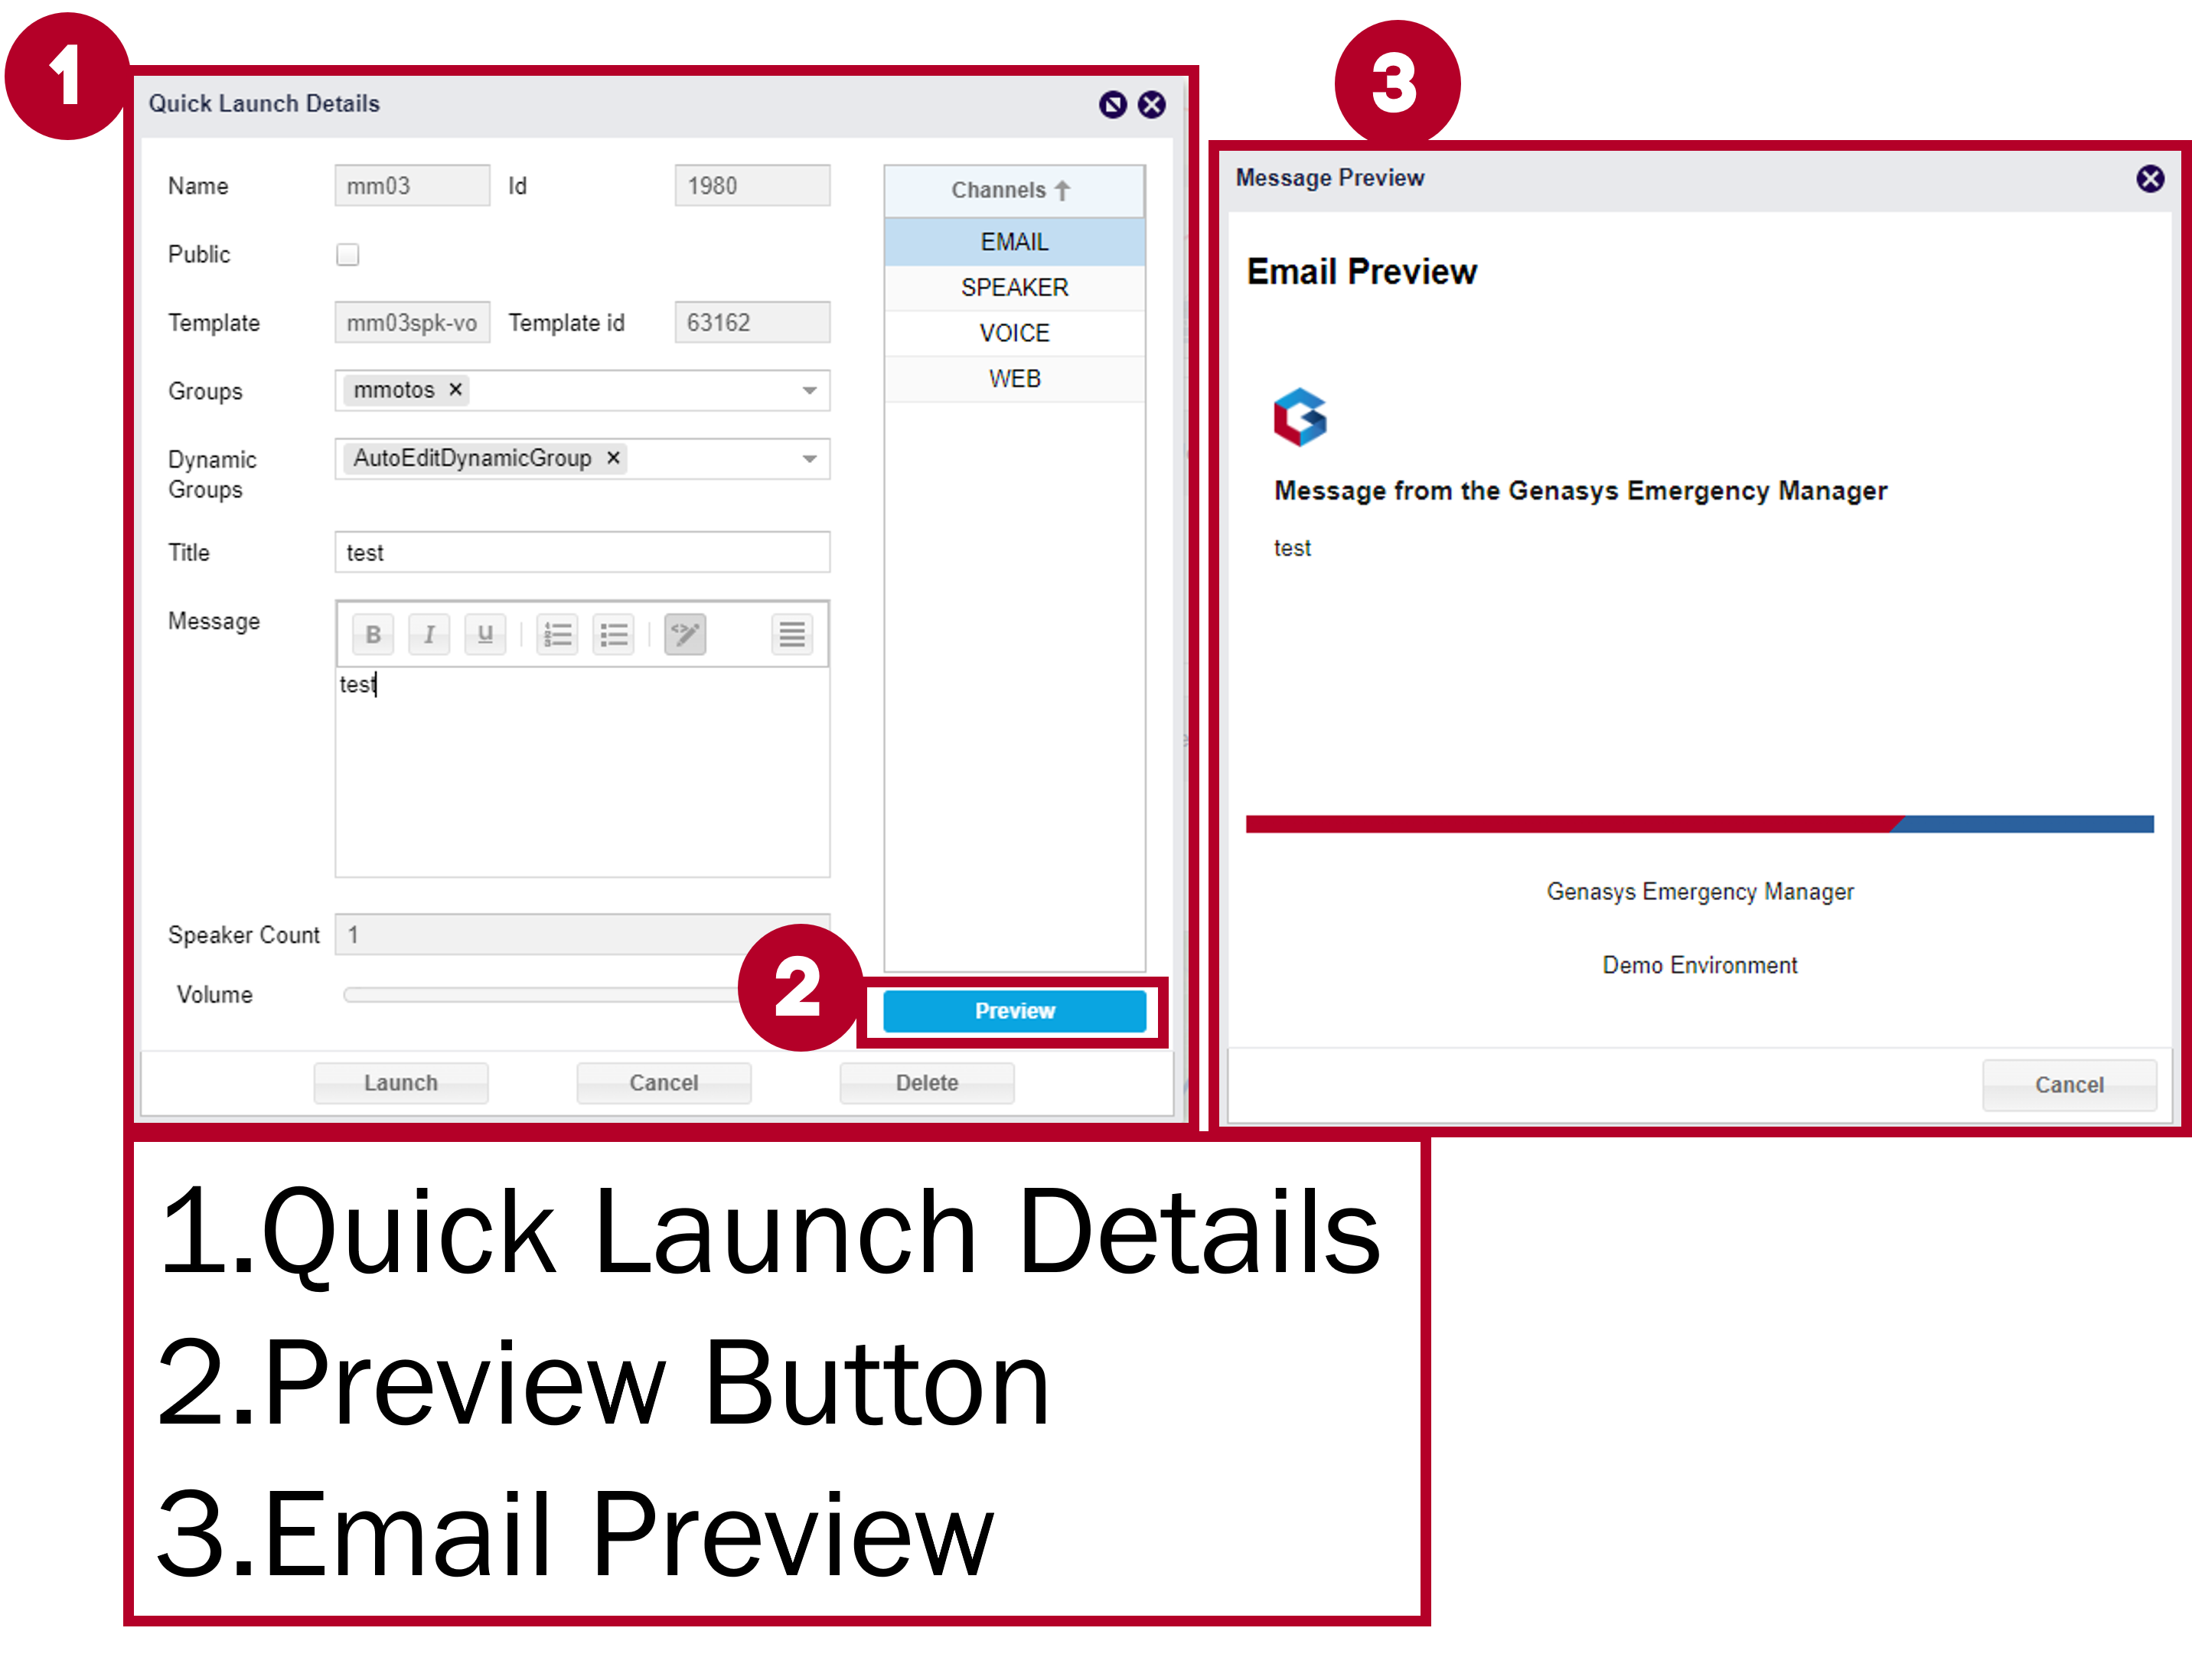
Quick Launch Preview
Note that the Preview button will only show you the contents of the currently selected channel. Be sure to select the desired channel beforehand. In the example above the Email channel is selected meaning the Preview button will only preview the way the Email will look. If you do not have a channel selected the Preview button will appear as a light color and will not work.
Alerts Tab
The Alerts page is where you create, edit, revise, and organize alerts. Upon clicking the Alerts tab, you will see a table containing important information on the different alerts that exist in GEM.
Organizing and Filtering Alerts
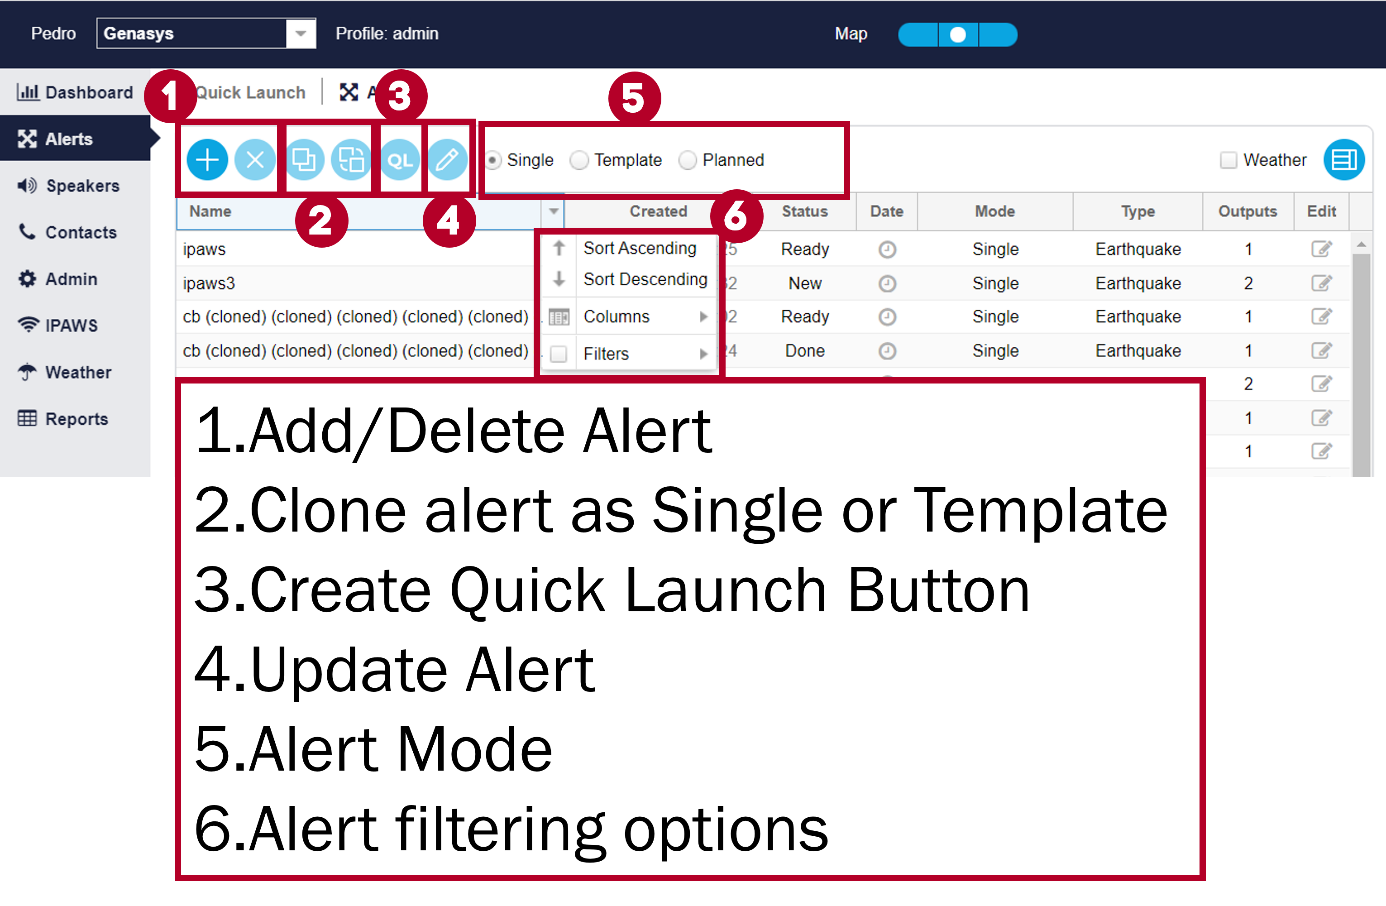
Column filtering and organization options.
At the top of the Alerts page, you will see a row containing various buttons (to be detailed shortly) and different terms. These terms represent the various modes that are used to organize alerts.
Mode: Deployment purpose and plan for a given alert.
Single: A unique alert for one-time use.
Template: A partially completed alert for faster creation of future alerts in situations where there may be recurring or expected disasters.
Planned: A full completed communication campaign which is scheduled to initiate at a later date and time. This is useful when there is an expected emergency.
Selecting one of these modes will filter the Alerts page accordingly, only displaying alerts that correspond to the selected mode.
Once the desired mode is selected, you can use the following columns to filter and search for specific alerts:
Columns: Alerts Page
Name: The name used to refer to the alert.
Created: Time at which the alert was created.
Status: The processing level of an alert.
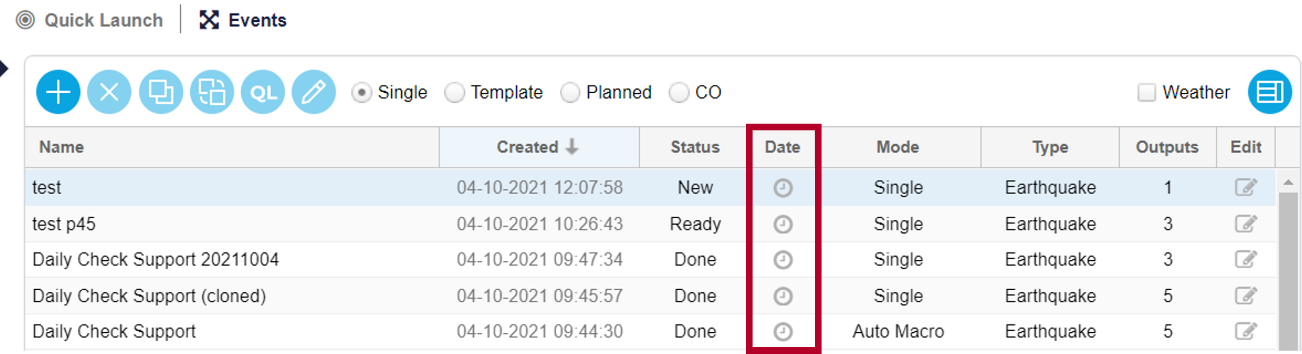
Date: Scheduled deployment of the alert.
Click on the clock icon to schedule an alert.
Mode: The purpose and plan for the alert.
Type: The type of emergency which has prompted the need to create this alert.
Type is defined by the client and cannot be modified by administrators.
Targeted contacts can choose what types of alerts they want to receive.
Incident: A more specific tier to group alerts.
Ex.) A wildfire may require multiple alerts within the single wildfire incident, like notifying people in the area to evacuate, notifying people on the border to avoid going in the area, and notifying staff and responders to take various actions.
Incidents are written in manually or selected from a list.
Outputs: The number of communication channels used to send out alerts.
Click once on one of the options to sort in ascending order, click a second time to sort in descending order.
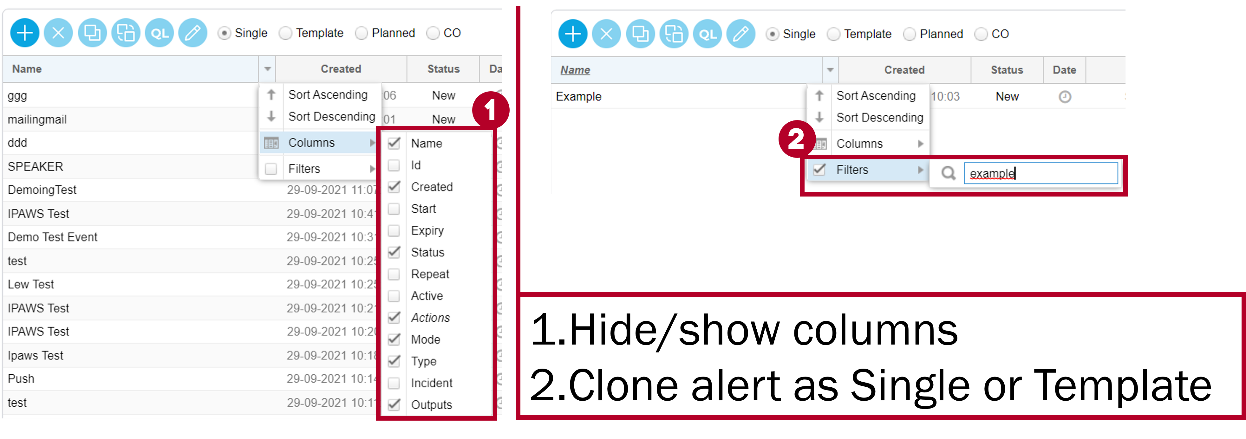
Advanced column filtering options.
If you place your mouse over one of the options a small arrow pointing down will appear, as shown above, on the right-hand side of the option. Click on this arrow to access more advanced options. You can activate or deactivate different columns or you can search for something specific.
Finally, we have Edit, which is the column furthest to the right. Edit is not used to filter results but can be used to change/complete an alert or view its details if it has already been launched. It is the same as double clicking an alert.
Add a New Alert
To the left of the modes are various buttons. Select the Add a New Alert button (![]() ) to create a new alert. Upon selecting this button, the Add a New Alert window will appear on the screen.
) to create a new alert. Upon selecting this button, the Add a New Alert window will appear on the screen.
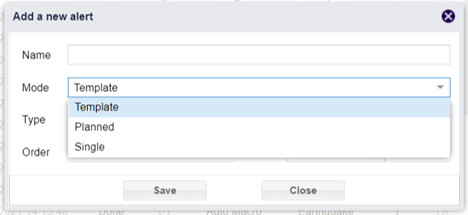
Once here, you must designate a name*, incident, mode*, type, order* and expiry*, for the newly created alert (details marked with * are mandatory).
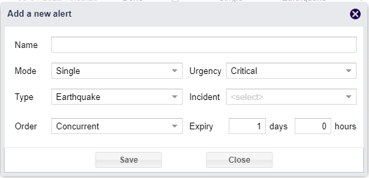
Add a New Alert Window
- Name: Name of the alert
- Incident: The incident which led to the alert
- Mode: Type of alert being created (Single, Template, Planned)
- Urgency: The level of priority that this alert and its corresponding emergency has. If Urgency is set to Critical iOS devices will receive it as a critical alert, meaning mute and do not disturb is ignored to ensure targets are aware of the alert. Additionally, if multiple alerts are being executed simultaneously, the targets from an alert with higher level of urgency will be processed first.
- Type: Type of e,ergemcy. Eg. Earthquake, wildfire, flood, etc.
- Order: How alerts will be sent out.
- Concurrent – GEM will send all alerts simultaneously.
- Sequential until success – GEM will send alerts through one channel at a time, only moving to the next channel after finishing the previous one, but if it successfully sends out an alert to a specific contact on one channel it will skip said contact in the next channel in order to save time. (More details below the next figure).
- Expiry: Date and time at which the alert stops sending alerts. GEM does not only send alerts to people in a selected area but also to people entering that area throughout the alert’s duration.
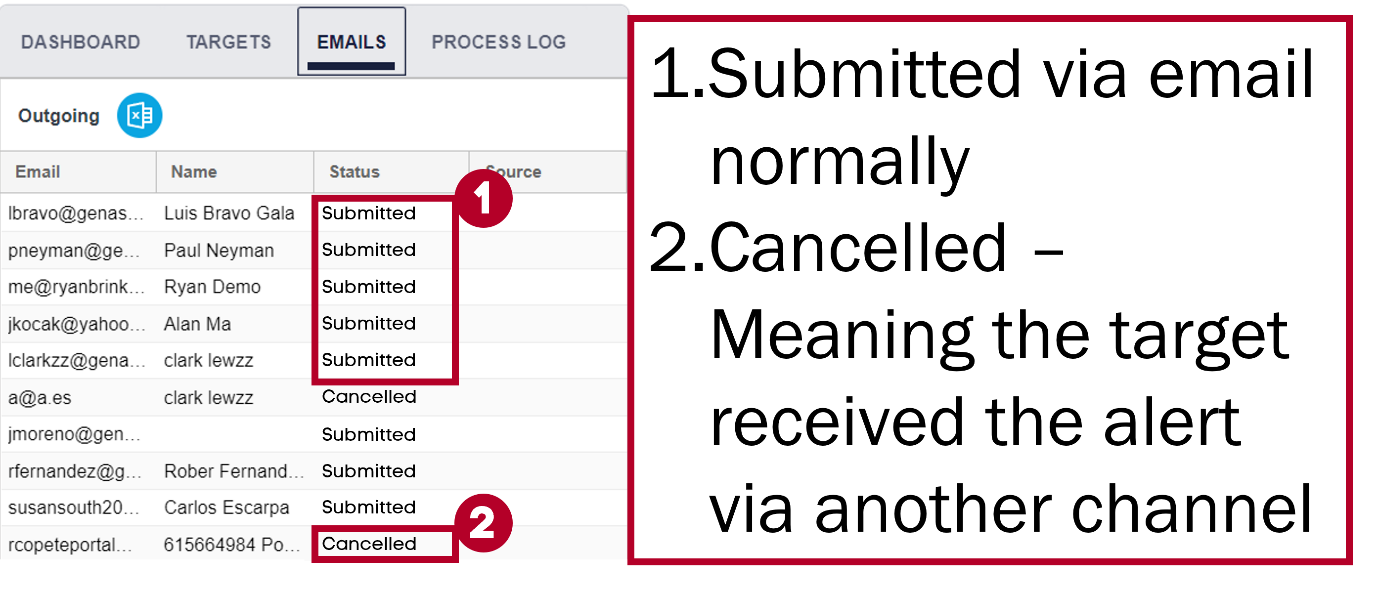
Regarding the Order field, if a contact receives an alert through one channel first and thus does not need to receive it through a different channel because the Alert is set to Sequential until success the status for said channel will be ‘Cancelled’.
Alert Cancelled
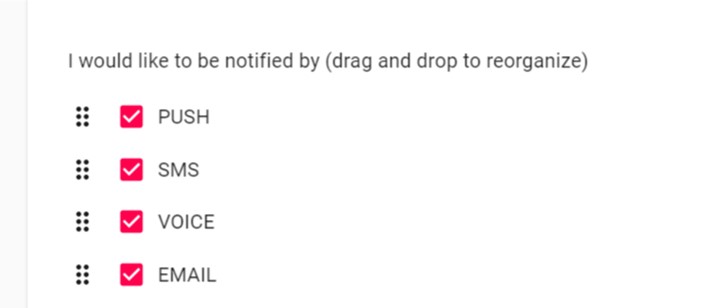
Sequential Until Success Details - As mentioned above this feature allows a message to be delivered to several output channels sequentially and only passes onto the next channel if the user does not confirm message receipt within a configured time. This can lower traffic and thus speed up alert delivery times. Users can define the order in which they want GEM to send messages to their corresponding channels. For example, a user may select Push and SMS as their preferred channel leaving email as the final channel. This way GEM is more likely to receive a response in the allotted time and thus speed up the global alert sending process.
User's preferred notification channel order on the Registration Portal
Administrators can change the time it takes for GEM to start sending the notification through the next channel in the Administrators section, Config Params tab. The value indicates the time in seconds, in the example below 300 seconds.
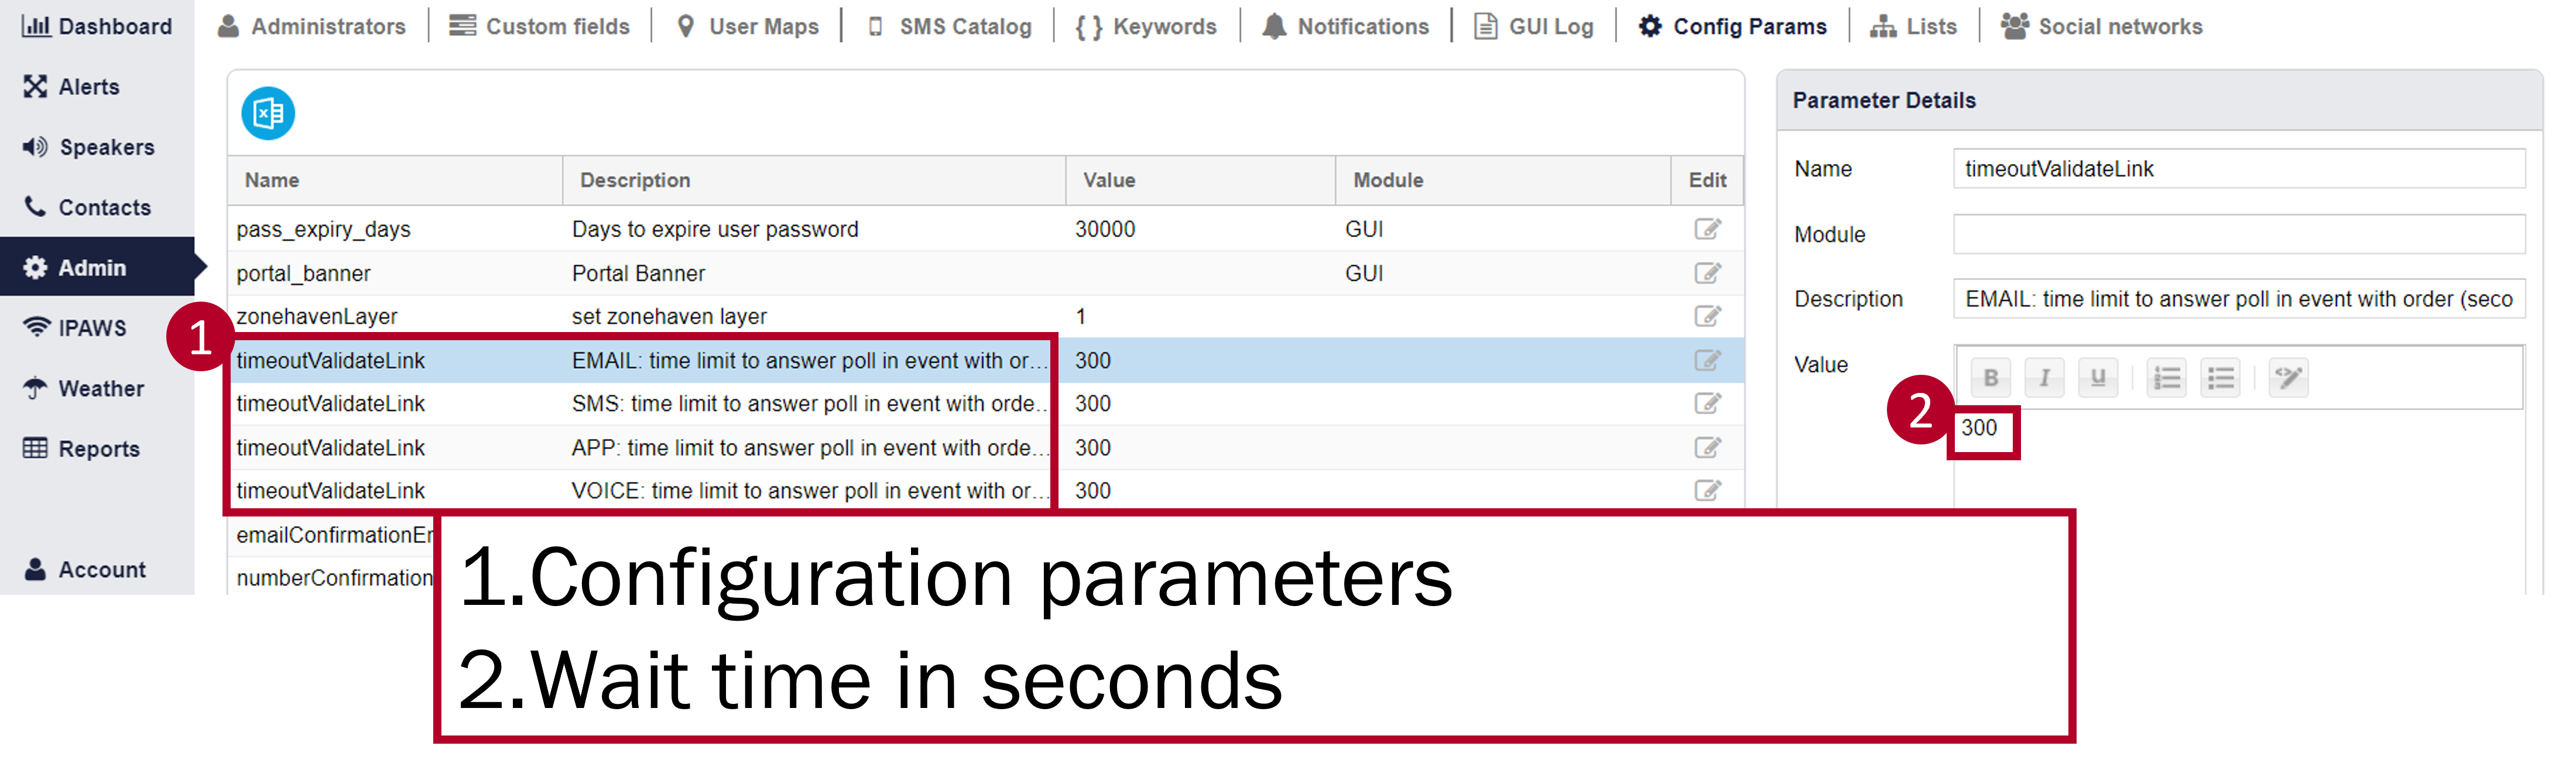
Control over time between sending alerts to different channels (Sequential until success)
In the example below you can see a user set up their preferred channel order as Push, SMS, Voice, Email. Once the receiver replied to the message indicating they have received the notification GEM proceeded to cancel the following notifications.

Sequential until success example
Editing an Alert: Alert Details
After an alert is created, you must edit and fill out the alert’s details to make sure it reaches the correct targets with the correct message. You can also edit an existing alert. To fill out the alert details, double click the alert, or click the alert’s Edit button (![]() ), found on the far right of the alert’s row. Doing so will bring you to the Alert Details screen. To go back to the Alert’s main page, where all alerts are found, click on “Back to alerts list” found at the top right of the screen.
), found on the far right of the alert’s row. Doing so will bring you to the Alert Details screen. To go back to the Alert’s main page, where all alerts are found, click on “Back to alerts list” found at the top right of the screen.
Alert Details Screen
Output Channels
Output channels are the different communication channels that GEM uses to broadcast messages and alerts. The available output channels are listed in Section 2 of this manual. For an alert’s message to reach the target audience, it must have one or more output channels to broadcast the message. Available channels include:
- SMS
- Voice calls
- Alertus
- Apex
- App
- CBC
- Speakers
- IPAWS
- WEB
- RSS
- CO
- Deaf Link
- Dektop alerts
- Microsoft Teams
- Genasys Protect App
- TTY (Teletypewriter for the deaf)
- CAP_RSS
Double click on the desired output channel(s) to use them in an alert. Active channels will be shown as blue, once a channel is ready it will turn a darker blue (almost black), inactive channels will be greyed out, and currently selected channels will be highlighted with a lighter blue.
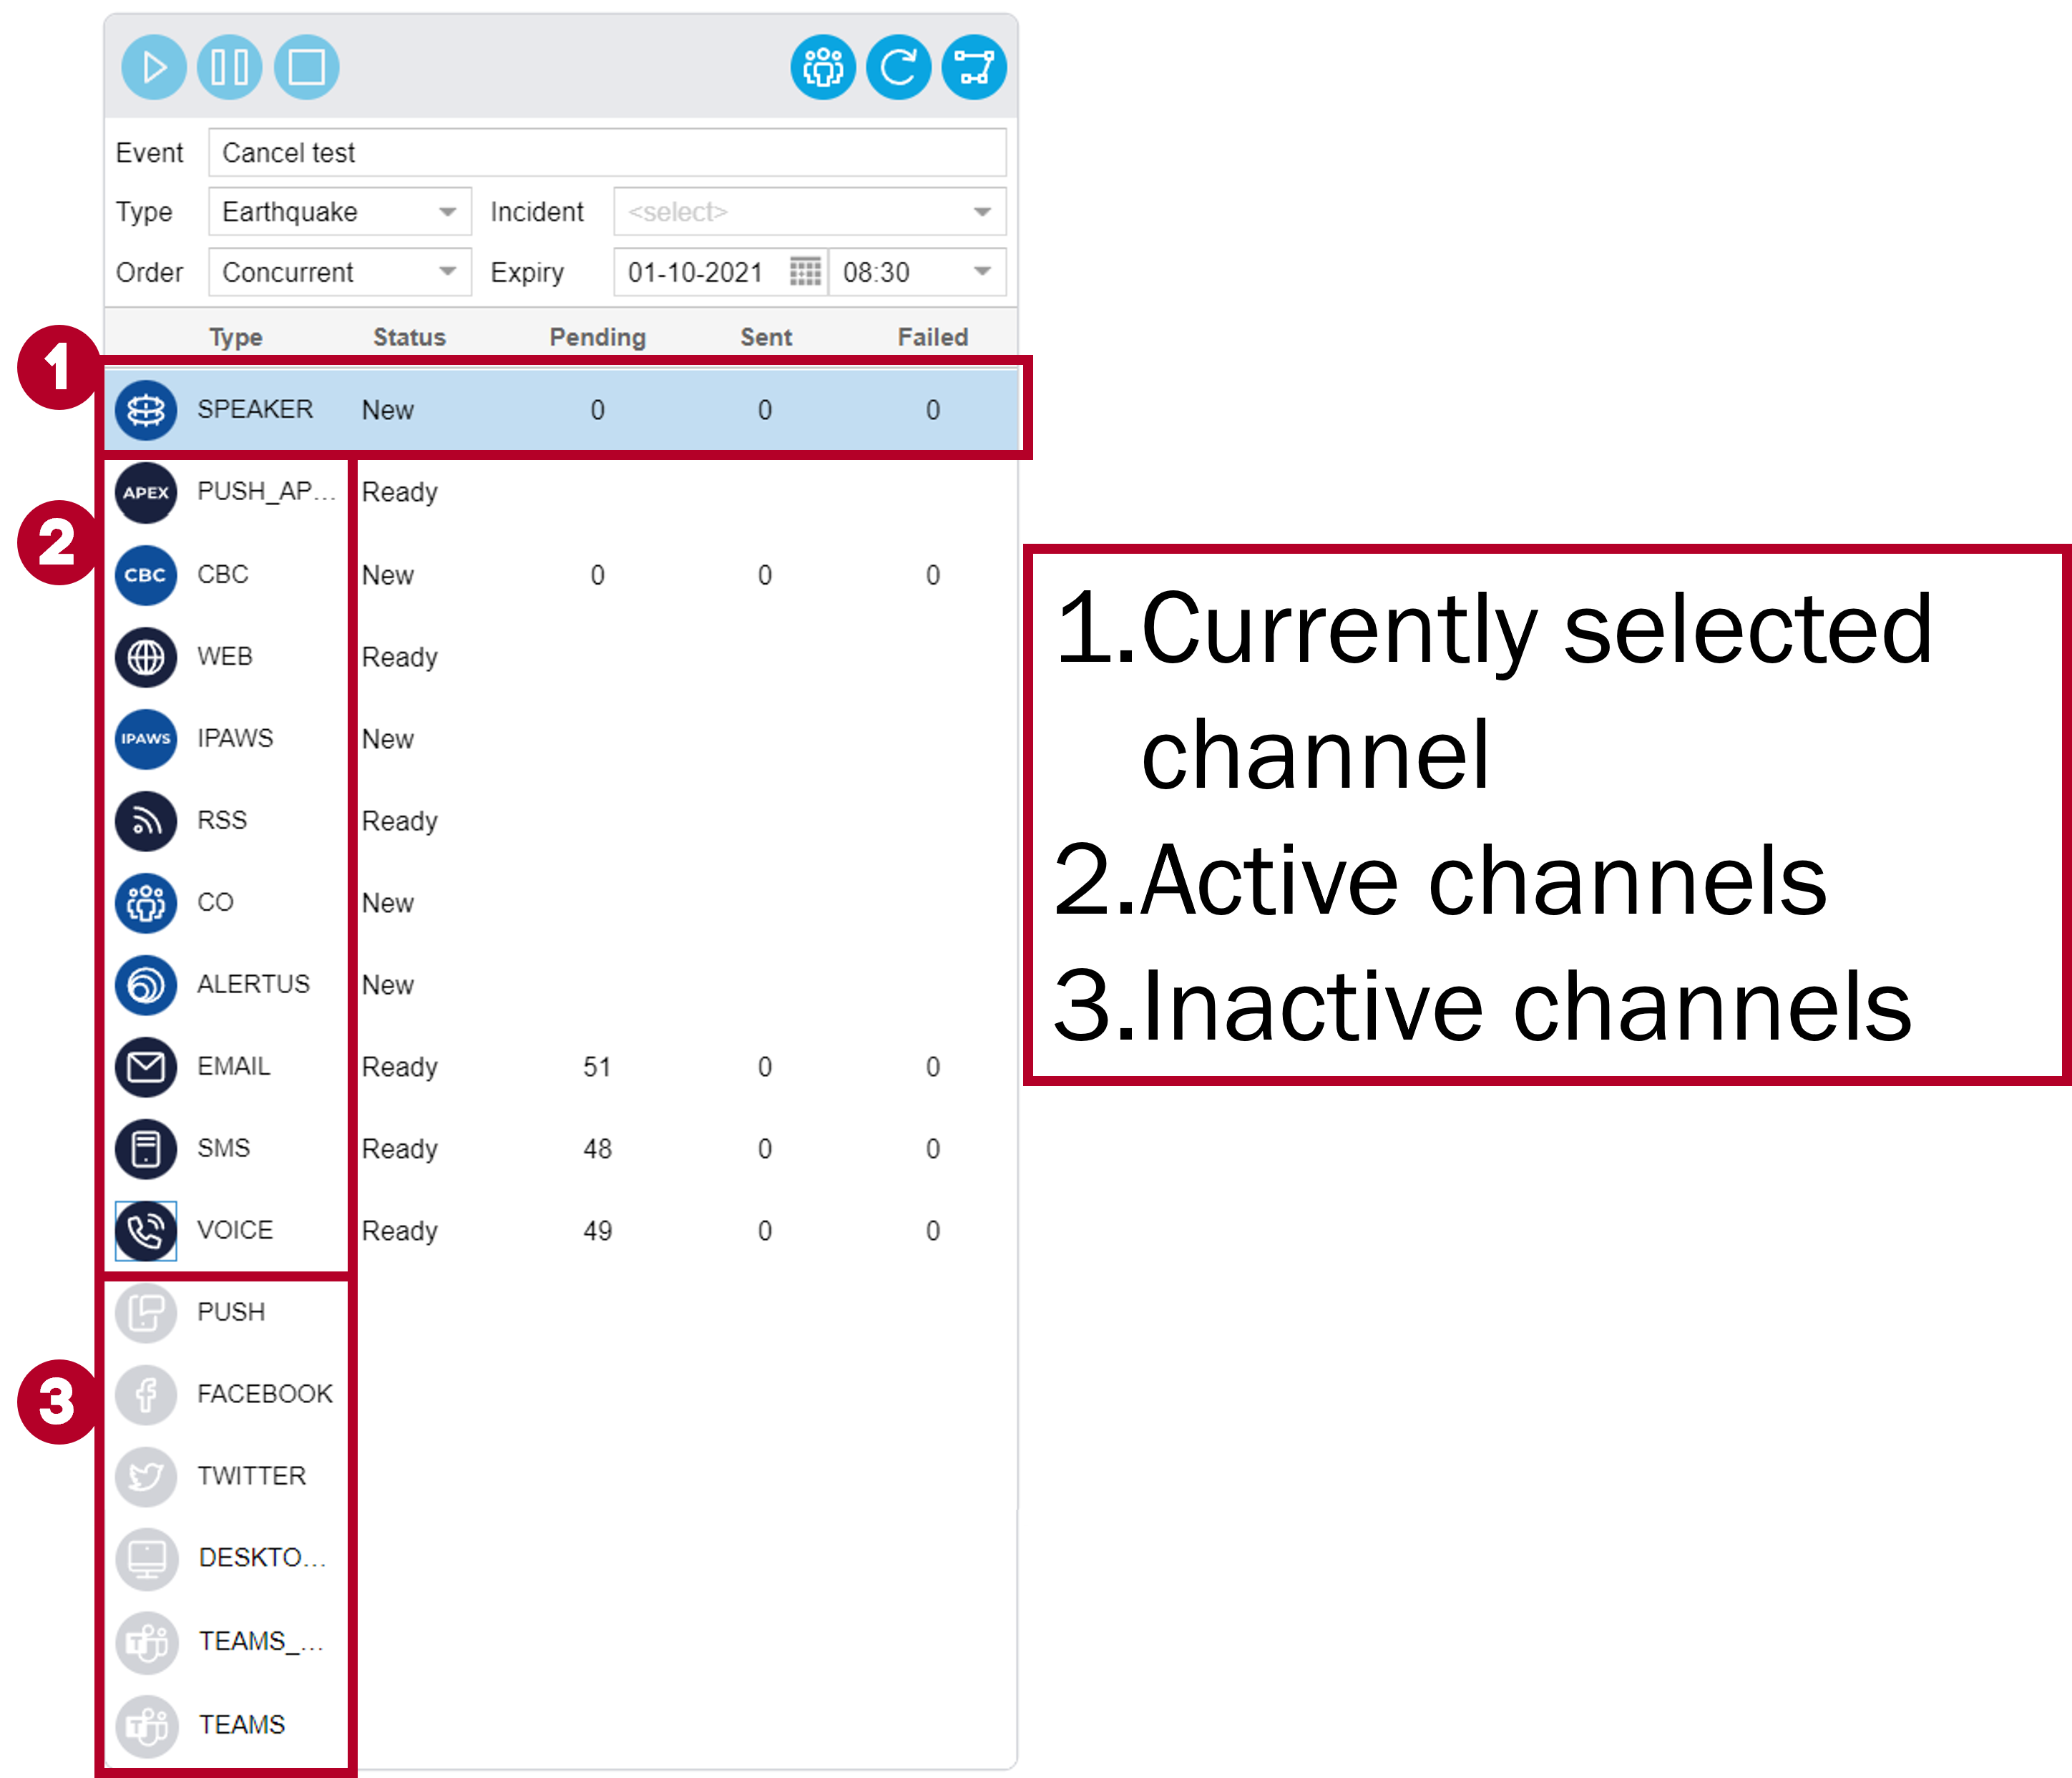
Output Channels Window
To use the CBC channel a connection to a phone network-operator or the Genasys CBC Demo network is required. The same is true for the Alertus and Speaker channel; these will need specific hardware (LRADs or Alertus equipment) to be used by a user.
Deaf Link
As well as these output channels Deaf Link is also integrated into GEM. Deaf Link provides ASL (American Sign Language) videos for emergency warnings. They receive alerts from GEM by monitoring a specific RSS Feed, manually generate a video, then use the GEM External API to launch an alert to contacts that have a custom attribute of ASL=true. The video URL is sent as part of the alert message.
Deaf Link can also be integrated into a quick launch through the config params tab in the admin section. To do so you must create a parameter named “deaflink_ql_id” and then insert the quick launch's ID number as the value.
Contents
After output channels have been selected, you must choose the content (the message) that will be broadcast from each output channel. The content that is broadcast will depend on the selected output channel.
- For example, the speaker output channel can only broadcast audio, the SMS channel can only broadcast text of 3000 characters or less, and Email can broadcast text, images, and videos.
Click each output channel and fill in the desired contents. The Contents window will vary depending on the selected output channel.
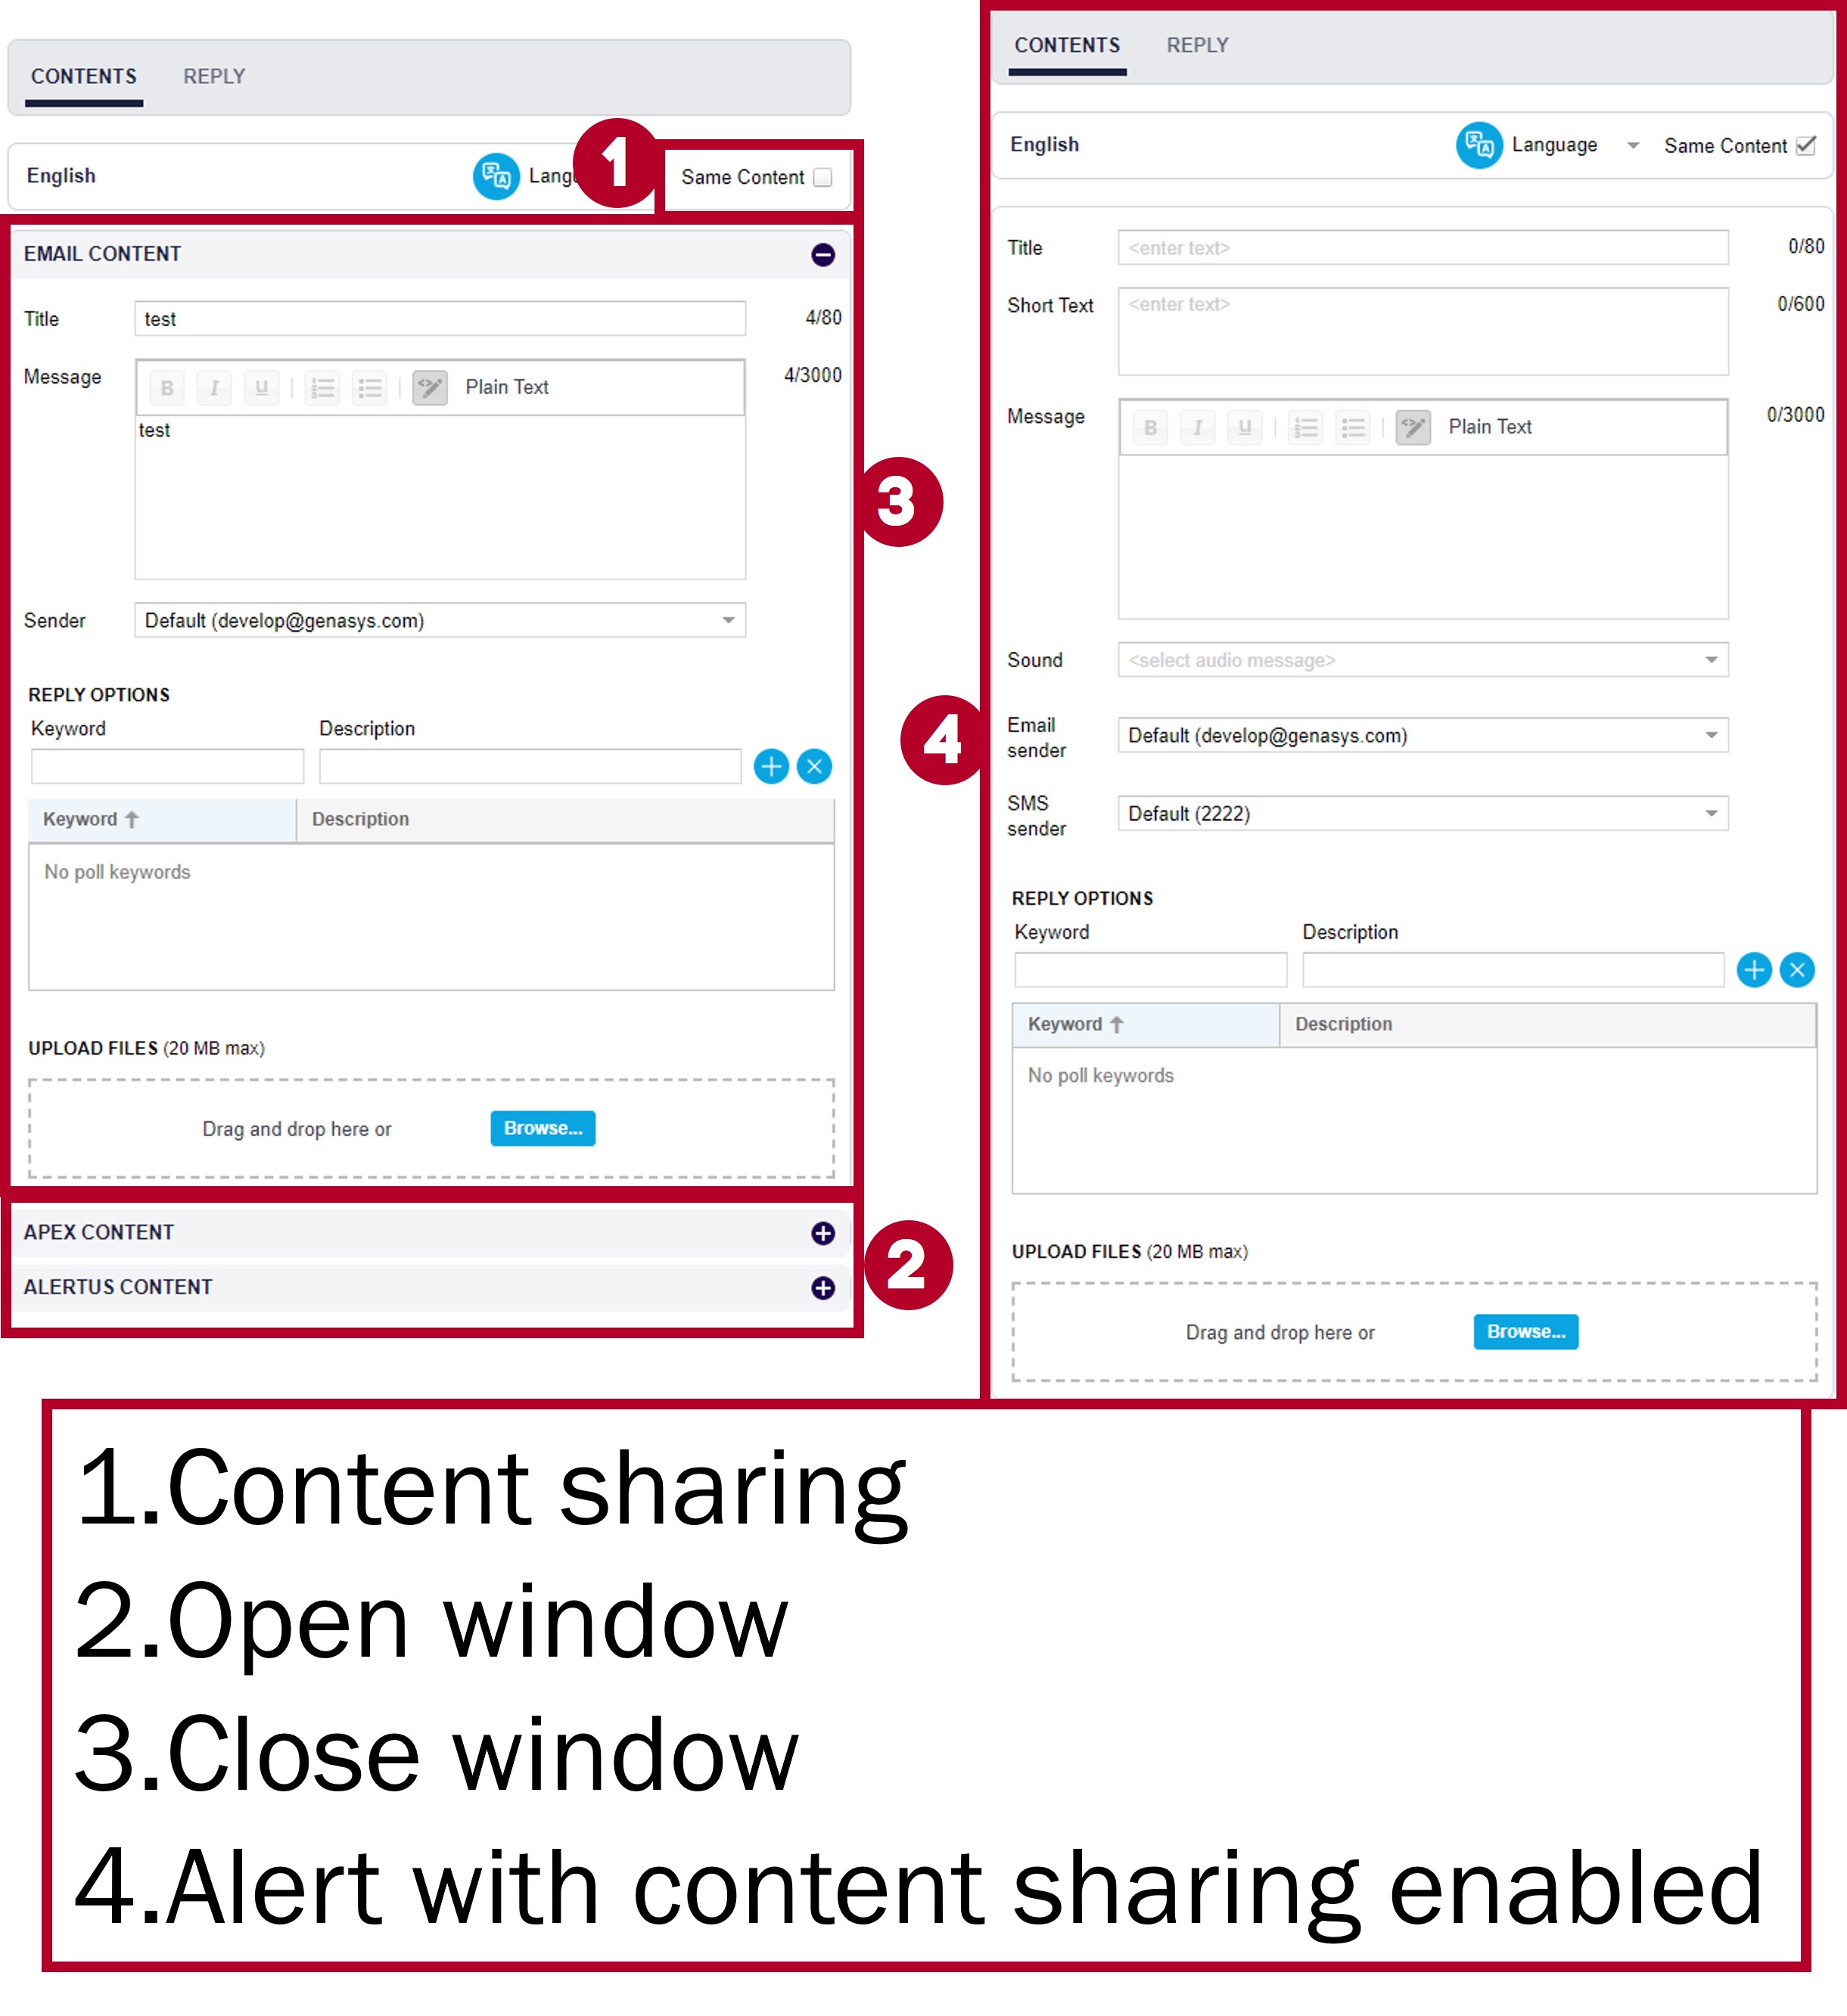
However, if you click the Same Content tick box content will be shared across all channels. When you input a sound channels which use sound will use this file, however, if you leave this blank GEM will use its text to speech functions. You can upload additional files. Accepted file types are: JPEG, JPG, PNG, GIF, PDF, MP3, WAV, MP4.
Channel Contents Windows
The content defined in one output channel will automatically be copied to all other output channels that share the same broadcasting option(s) if you have the "Same Content" tickbox activated as shown above.
- For example, if the "Same Content" tickbox is active, typing “Avoid driving during blizzard” in the SMS Message broadcasting option will automatically copy “Avoid driving during blizzard” into the Email Message broadcasting option.
If it is not selected you will be able to write different contents for each channel.
NOTE: For voice calls, if a sound file is selected, the voice call will play that sound. If there is no sound file and a message is defined, the voice call will use a text to speech converter to read out the message.
When using the Voice communication channel, you can either select a sound like you would for a speaker or press the record button ( ) to record a custom message.
Sorted Sending
In this mode, if a target does not respond within a predefined time, a notification is sent to the next contact in the list. The process halts when one of the contacts acknowledges reception.
To activate this mode, Confirm Reception and Enable Sorting must be activated as shown in the figure below. Channels that can use this feature are: Email, SMS, Voice, TTY, APP, Microsoft Teams
The target order can be changed by dragging and dropping contacts in the list.
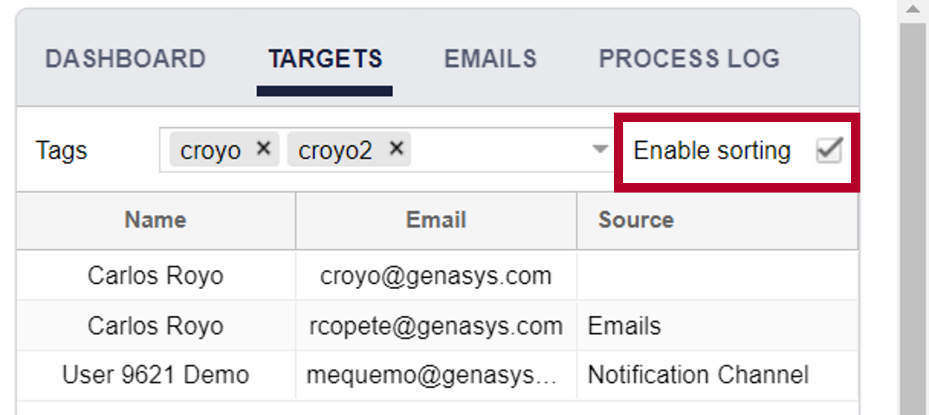
Activate enable sorting mode
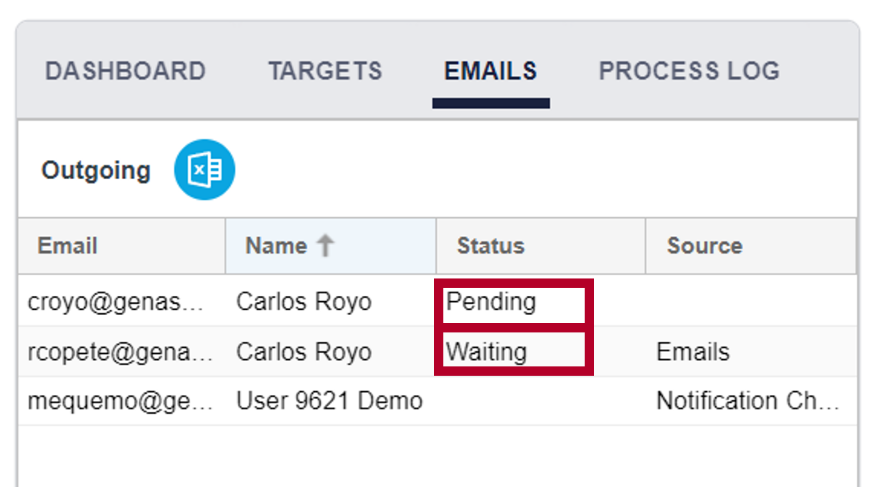
While waiting for a contact to acknowledge an email, the Status is shown as Waiting.
Acknowledge receipt status
Other possible satuses for emails are:
Bounce Permanent ---> Bounce
The recipient's email provider rejects your email with an SMTP 550 5.1.1 ("Unknown User") response code. Amazon SES generates a bounce notification and, depending on how you set up your account, sends it to you in an email or sends a notification to an Amazon SNS topic.
Bounce Transient ---> Automatic responses
The recipient's email provider accepts your email and delivers it to the recipient’s inbox. The email provider sends an automatic response, such as an "out of the office" (OOTO) message, to the address in the Return-Path header of the email, or the envelope sender ("MAIL FROM") address if the Return-Path header isn't present.
Complaint ---> Complaint
The recipient's email provider accepts your email and delivers it to the recipient’s inbox. The recipient decides that your message is unsolicited and clicks "Mark as Spam" in his or her email client.
Suppression List
Amazon SES generates a hard bounce as if the recipient's address is on the global suppression list.
All Fields
There is an additional option to show all fields for all the output channels at the same time. To do this, check the “All Fields” box to the right of the Contents Tab. In the “All Fields” configuration, you can fill in all contents at the same time, automatically copying content to shared broadcasting options.
The figure below displays the contents window when all channels are selected. Usually, it will be shorter.

Contents Tab (All fields and Channels)
Personalized Alerting
When writing content that requires personalization, GEM offers a list of placeholders that will reference contact info and display corresponding contacts' information. The list of placeholders is as follows:
|
contact:general:firstname |
contact:locations:index:name |
|
contact:general:lastname |
contact:locations:index:line1 |
|
contact:general:lang |
contact:locations:index:line2 |
|
contact:general:profile |
contact:locations:index:city |
|
contact:general:externalid |
contact:locations:index:zipcode |
|
contact:general:email |
contact:locations:index:state |
|
contact:general:country |
contact:locations:index:country |
|
contact:general:phone |
contact:locations:index:lon |
|
contact:general:zipcode |
contact:locations:index:lat |
|
contact:general:groups |
contact:custom:baseblock |
Through this functionality you can write send out a notification that makes reference to each individual contact's personal information as long as said information is found within the system. For example, a notification may say:
Dear Customer,
This notice is to inform you that XXXXX is issuing an official curtailment order of your interruptible gas service to balance available gas supply and to meet all Firm Service Customer requirements due to {curtailment reason}.
Account Name: {{contact:custom:account name}}
Account Number: {{contact:custom:account number}}
Address: {{contact:locations:1:line1}}, {contact:locations:1:line2}, {{contact:locations:1:city}}, {{contact:locations:1:state}}, {{contact:locations:1:zipcode}}
Any gas usage above the base block of {{contact:custom:baseblock}} therms is deemed unauthorized and will be assessed $10.00 per therm.
At this time we do not have an estimated timeframe for restoring service. Restoration notice will be posted at https://www.XXXXX.com/GasTransportation/Status. Please click HERE to monitor NW Natural’s system status updates.
This email is the official curtailment notice being provided by XXXXXX per the Customer Emergency Contact List.
Thank you for your time.
The email each customer receives based on this information will change to display their name, account name, number, and all relevant information.
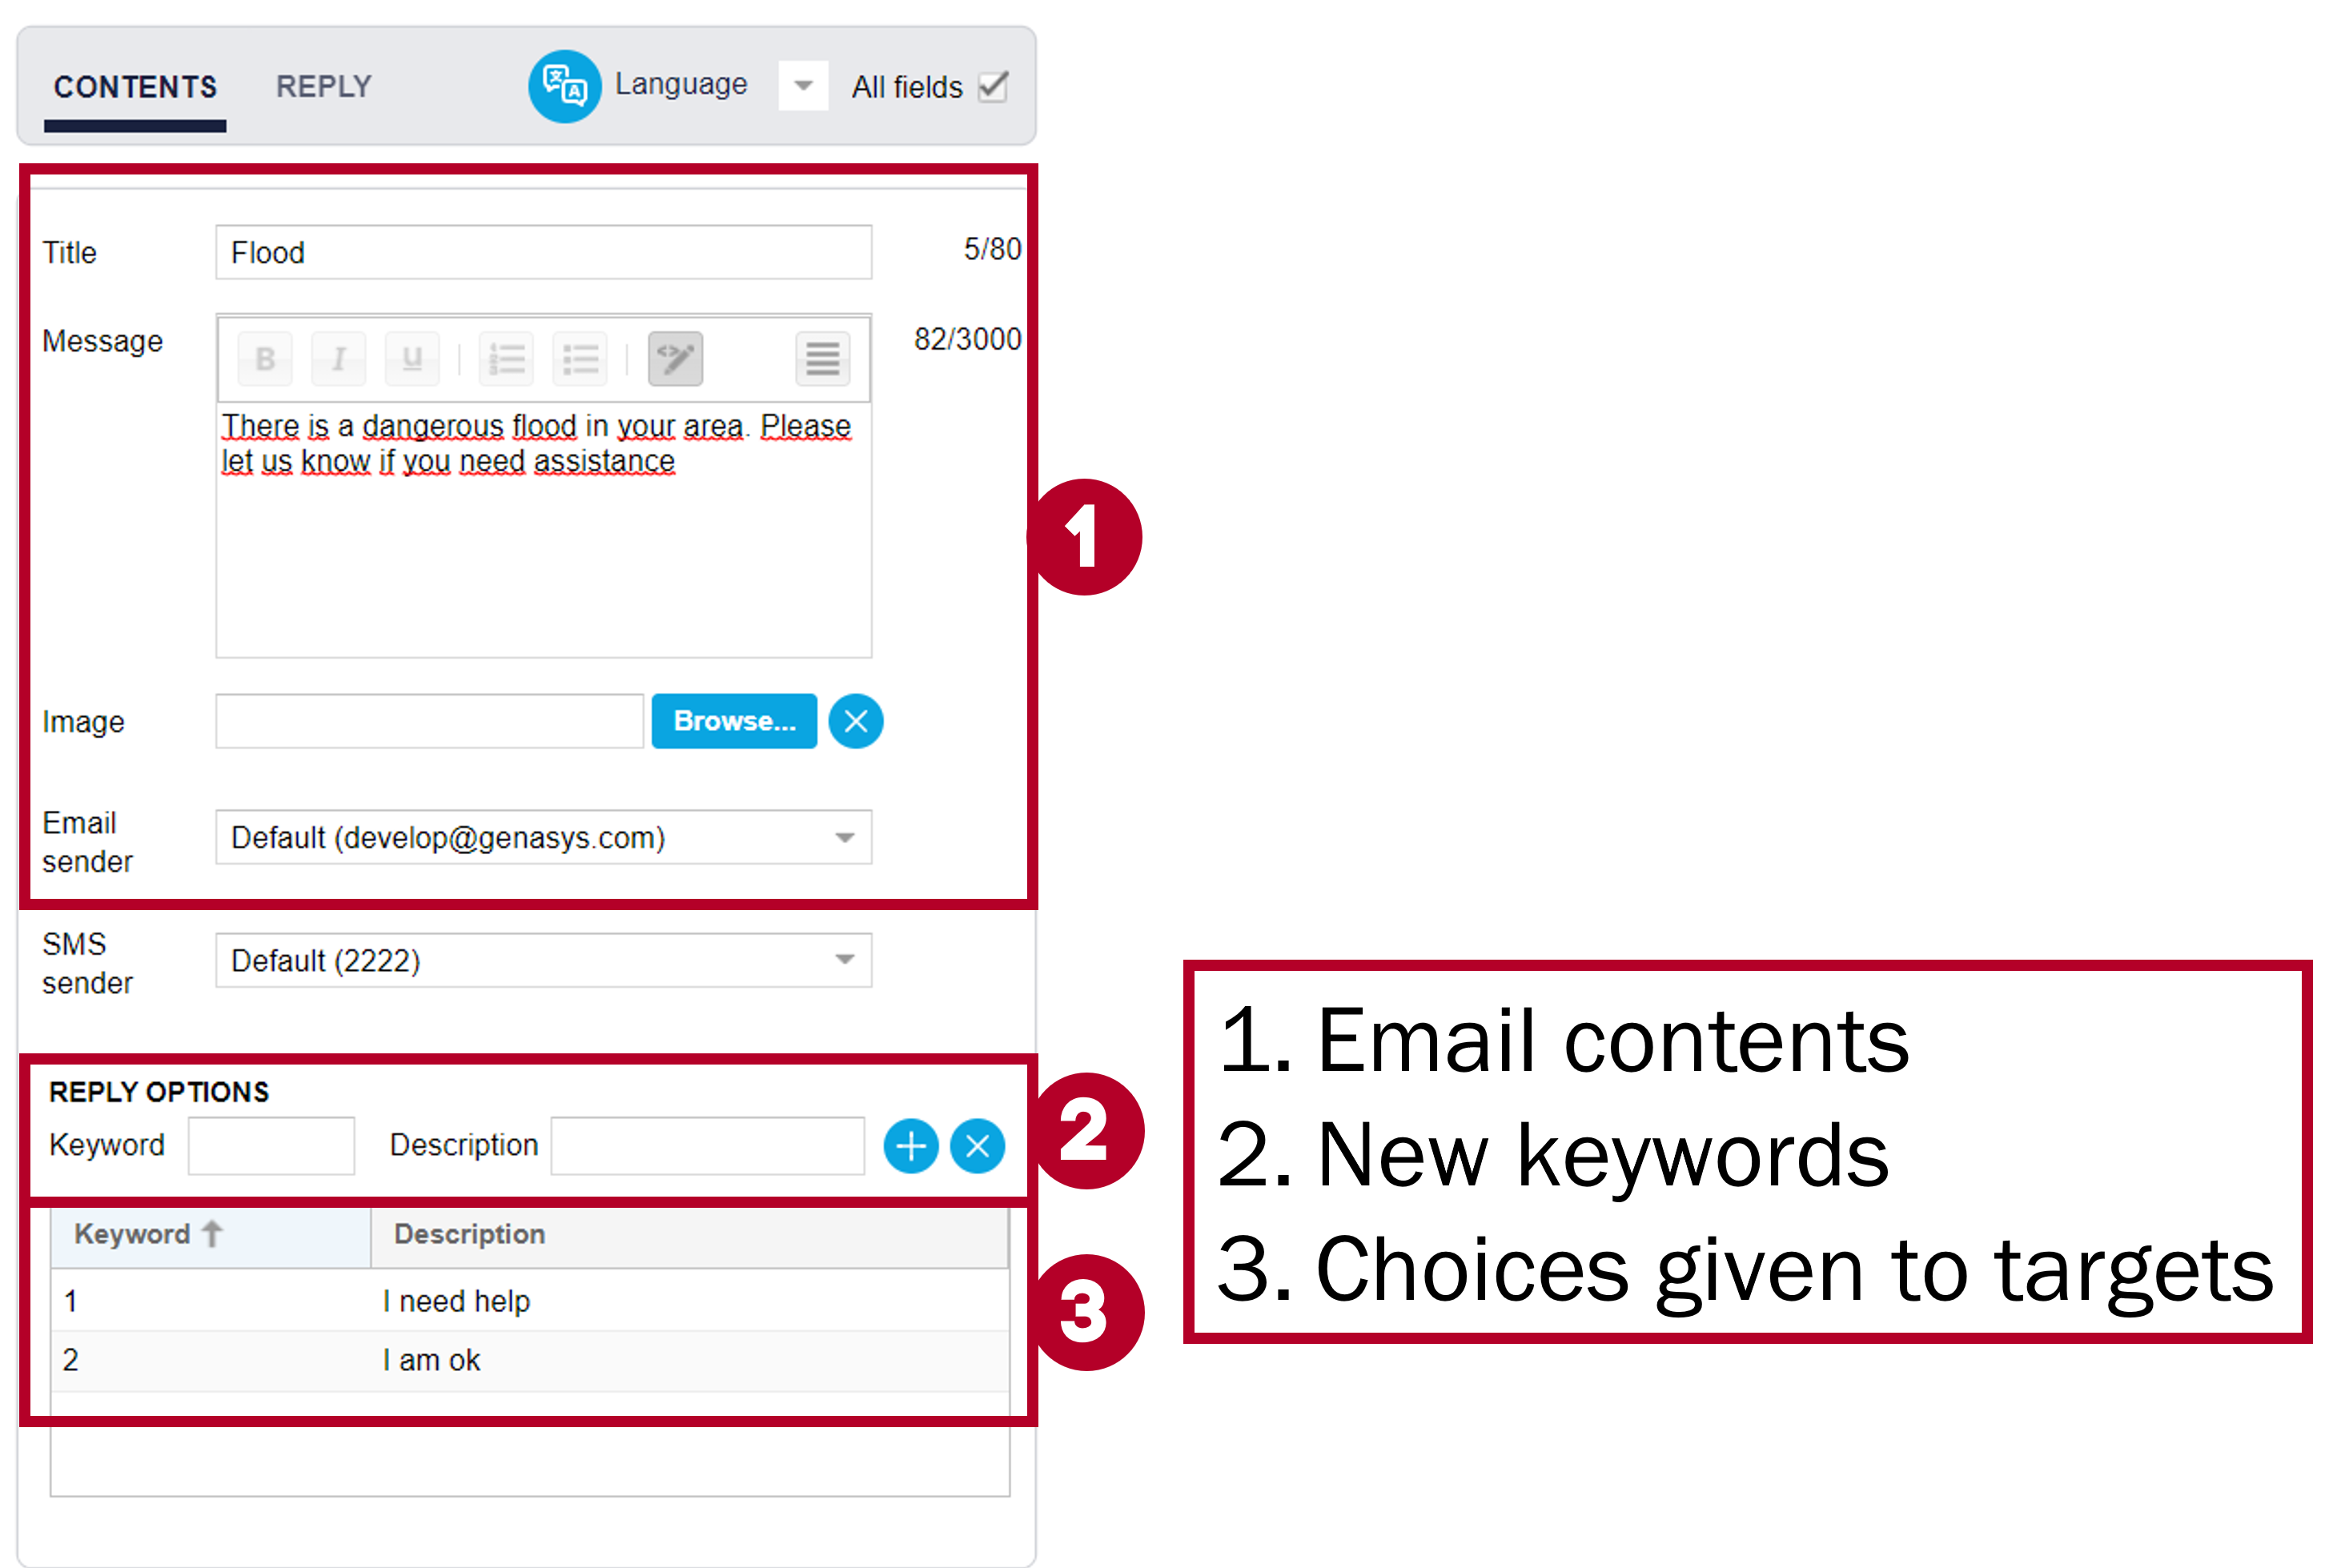
Reply Option Configuration
In the figure above that the SMS Contents tab contains a section called “Reply Options”. This feature can be accessed through the email, voice, push and SMS output channels and allows targeted receivers of SMS notifications to respond and communicate with GEM administrators.
Reply Option example
To use this feature, enter a keyword and a corresponding description of the keyword’s function.
- Eg. Create two keywords, one called “1” and another called “2”, and the description as “I need help” and “I don’t need help” for the corresponding key word. When targets receive this message, they will be able to choose between both options so that emergency managers know if they need help or not.
The reason you want to keep the keyword short is because, when replying through SMS, contacts will have to type out the keyword so that GEM registers their reply properly. This means that a long or complicated keyword could cause mistakes to happen when people are faced with an emergency and need to respond quickly.
NOTE: For more information on SMS keywords and reply options, see the corresponding section.
Reply options appear as text buttons in emails while the replies appear in the channel details panel, showing the status and replies. Selecting a Reply option opens a browser to show the reply confirmation.
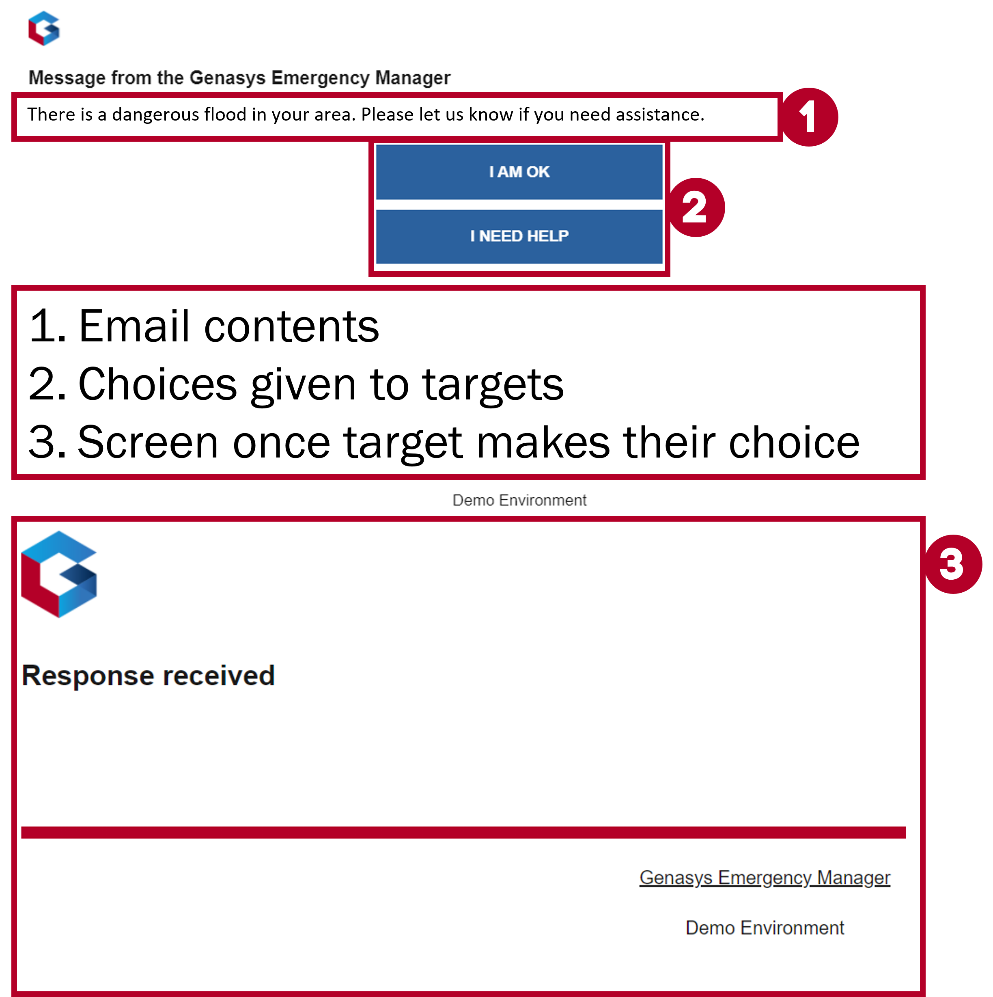
Emergency Email reply options and answer.
In this example the response status shows “Answered” while the reply value shows “I need help”.
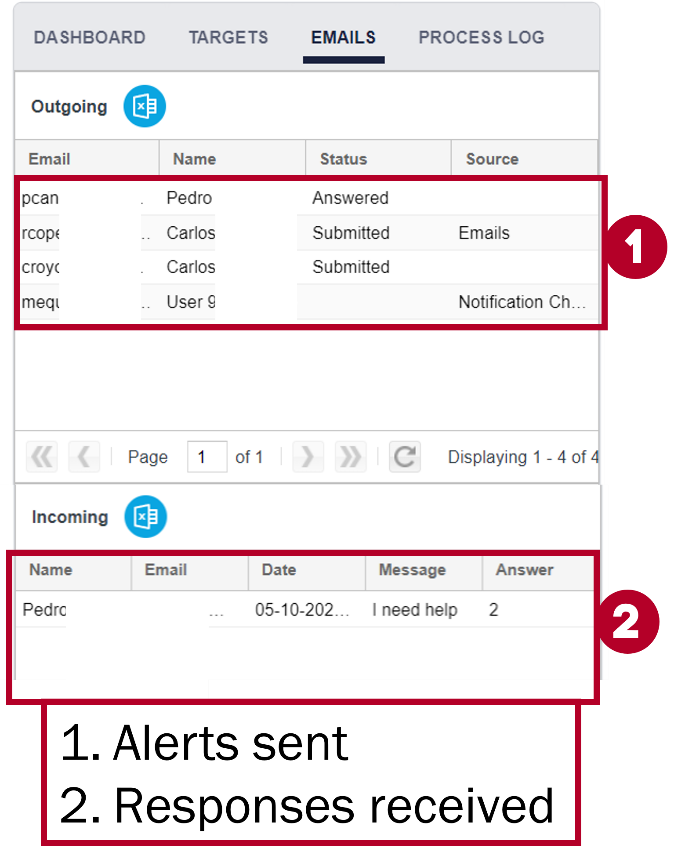
Reply example results
When using multiple communication channels it is possible to see all replies regardless of channel through the consolidated Reply tab located next to Contents (Note that this cannot be accessed until the alert has been sent out):
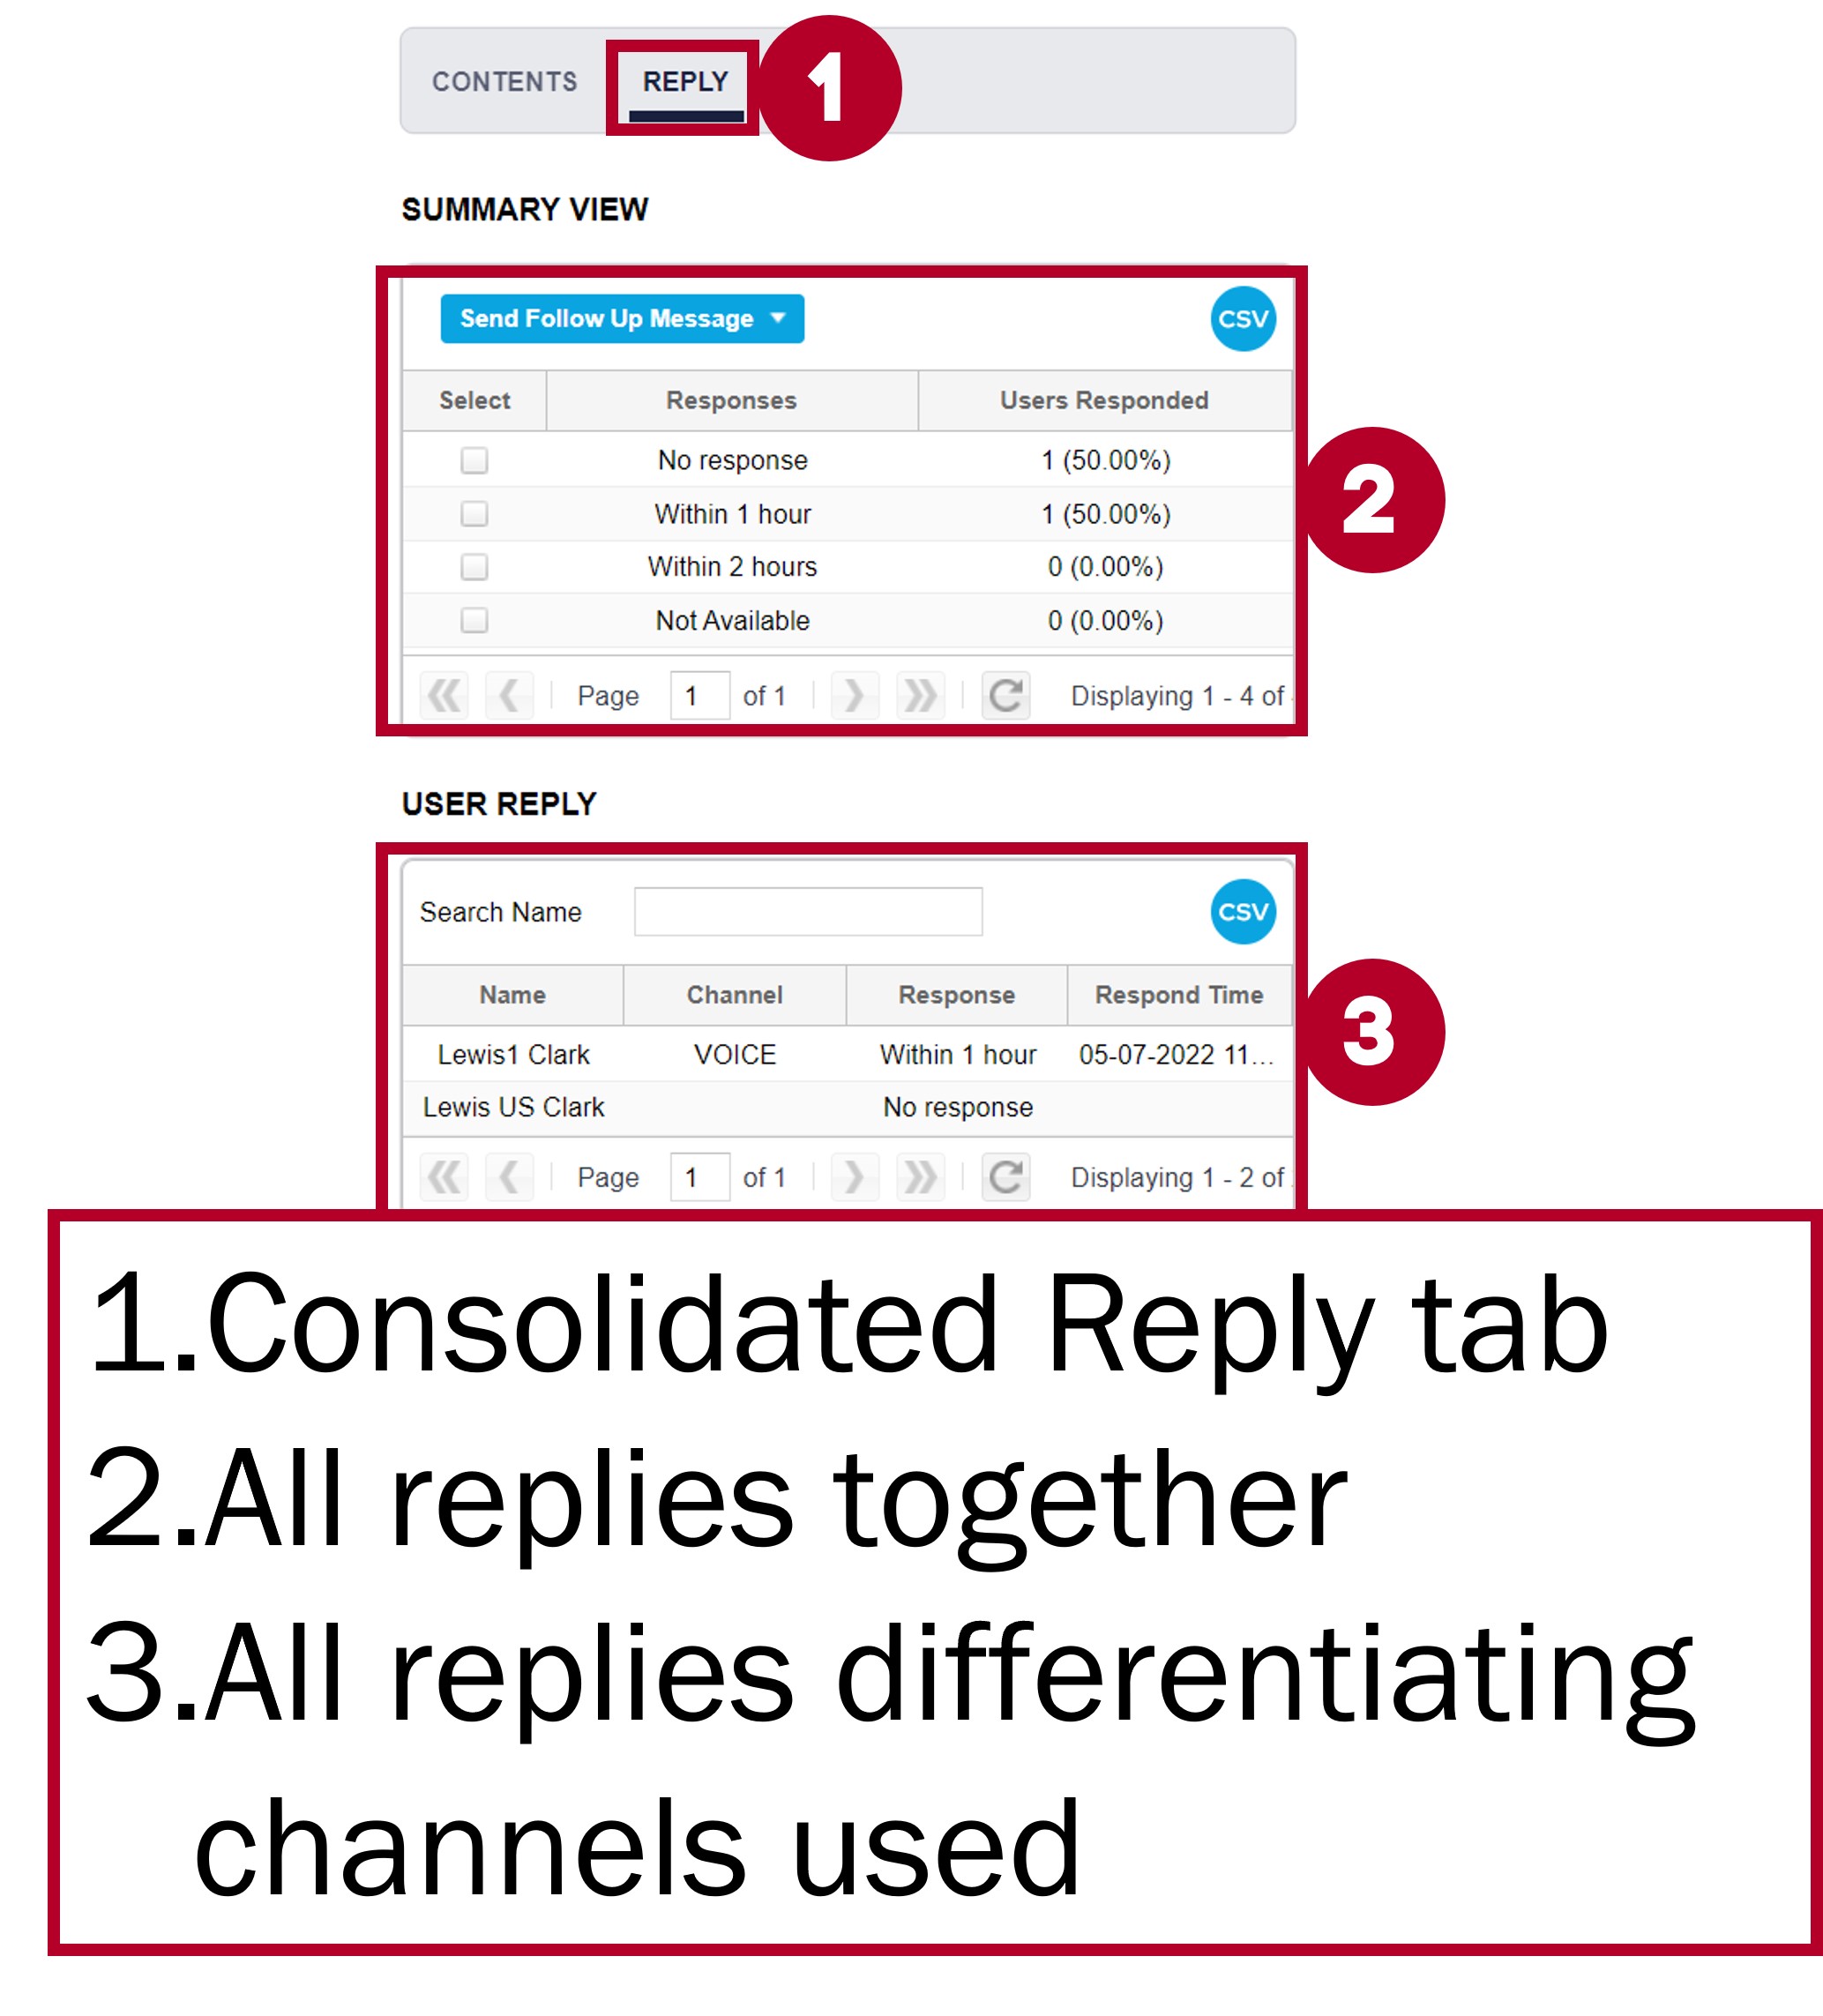
Consolidated Reply Tab
The Summary View displays all replies regardless of the communication channel being used to reply. The User Reply section displays all replies while also differentiating between channels. E.g. how many replied through SMS vs email or voice channel.
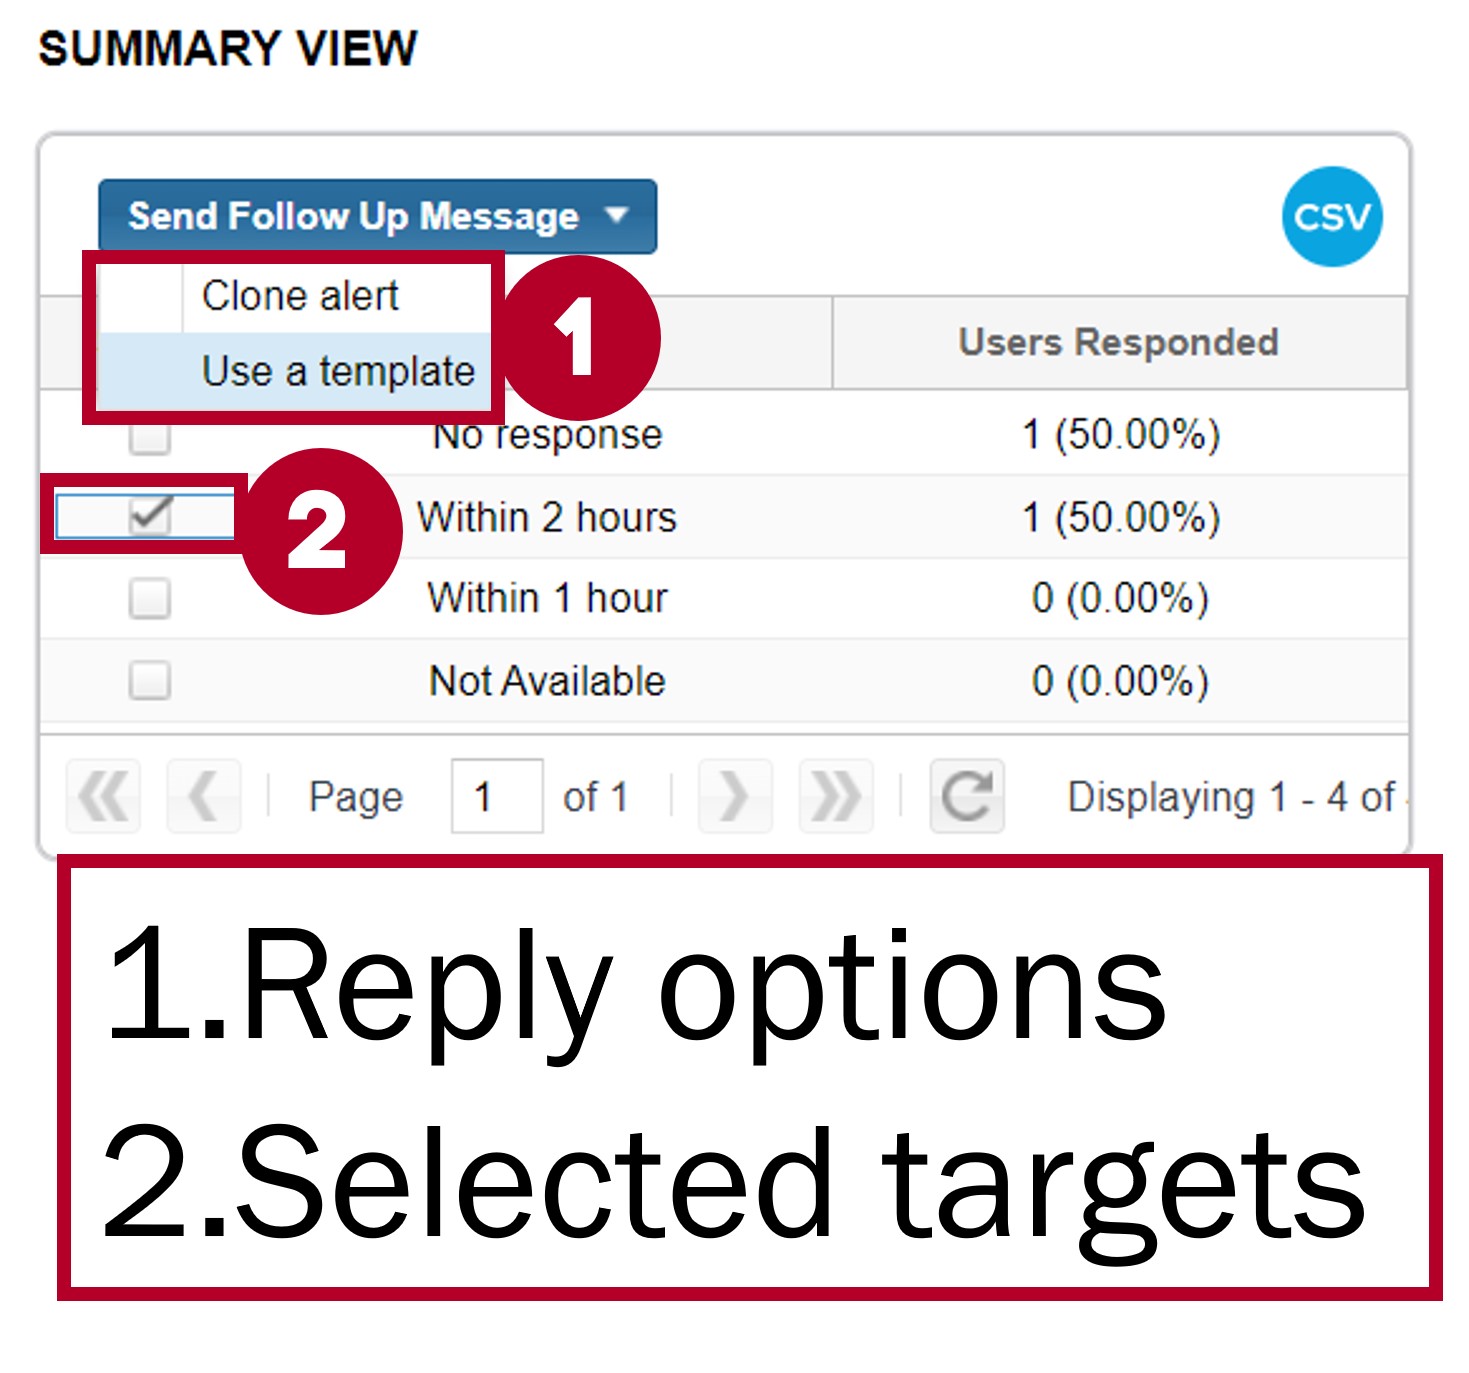
Send Follow Up Message
After sending an alert with Reply functionalities you will have the option to send a follow up message from the consolidated Reply tab.
Follow Up Message
Follow up messages will be sent to the targets whose reply corresponds with the selected option. E.g. A follow up message can be sent to targets who have not replied to the original message.
You will be able to clone the alert or use a template for your follow up message. Regardless of which you choose this function will create a new alert with the corresponding information and list of targets filled in. Cloning the alert will send an identical copy of the original and will usually be used as a follow up for targets that have not answered the original. If you select the template option a new window will appear; from this window you will be able to select from the list of templates available. Upon confirming your template selection said template will open the same way a template would normally open but it will include the corresponding targets from the previous alert.
Follow Up Message Template Window
Language
The default language for GEM is English, but this can be changed upon request by an organization. Additional languages can be selected using the Language drop down menu, found at the top right of the Contents tab.
Users can translate messages from one language to another using the Translate button
( ), found directly to the left of the language drop down menu. This way the alert will be sent in multiple languages with contacts receiving the alert in their preferred language.
Voice Conference Call
Voice calls can optionally be established as a conference call by selecting the conference check-box.
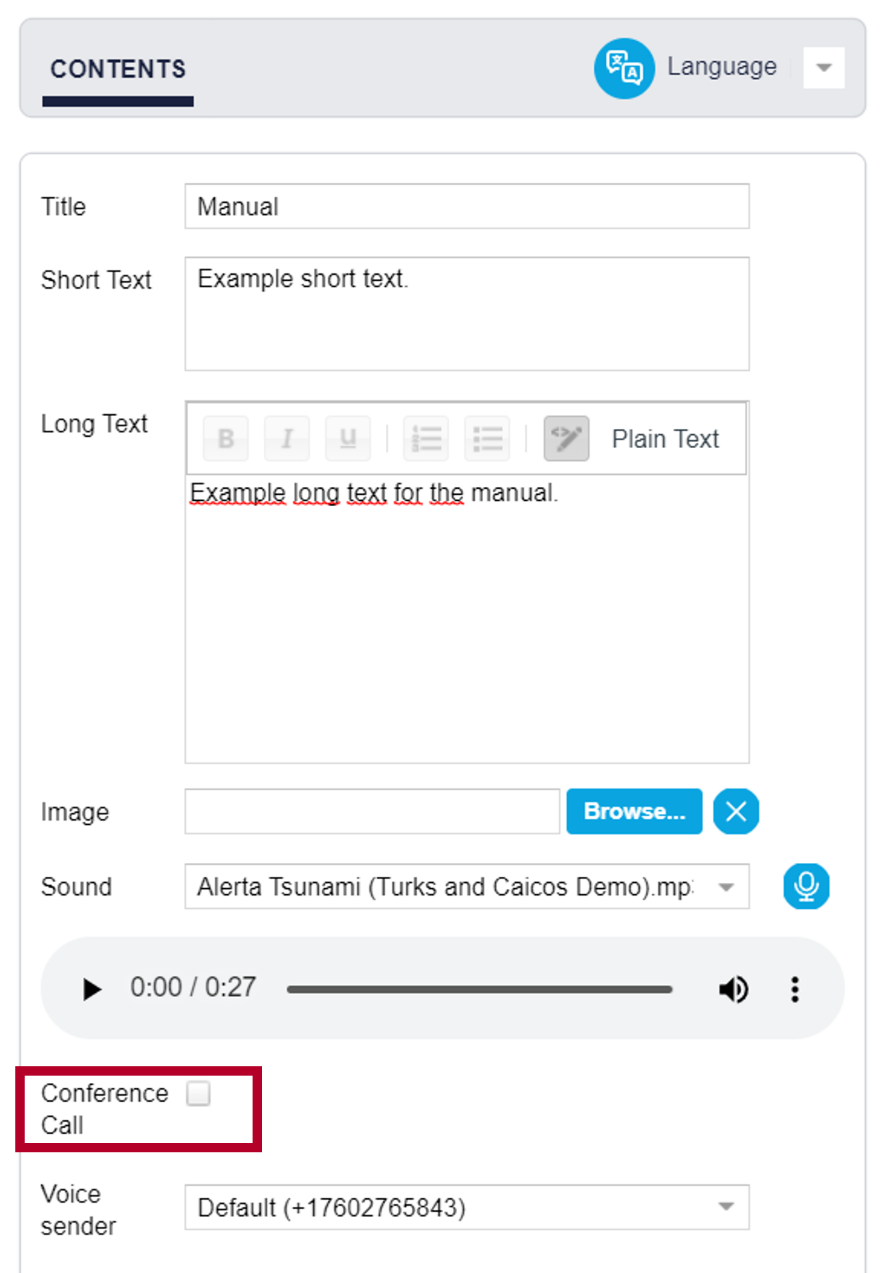
Conference call check-box
In this case the channel state changes to “Ready” without the text or sound fields being entered.
When the alert is executed, each of the targets will be called to join a conference call. The first person to answer the call will hear music as they wait for the second person to answer, at which point the conference begins.
The same retry parameters that are used in normal voice calls are applied, with the default values of 3 minutes between retries and 2 repeat calls.
An additional column in the reports section indicates that the voice-call was a conference call. The targets that join the conference call are marked with the “Received” status while those that don’t are marked with “Error”.
Set Sender for Email, SMS and Voice Calls
This change allows the sender to be set per alert for SMS, email, voice and Push channels.
Default values appear in the GUI.
For email, SMS and voice calls, a selection menu has been added below the text content fields which display the valid sender values. These values are established per client during the provisioning process.
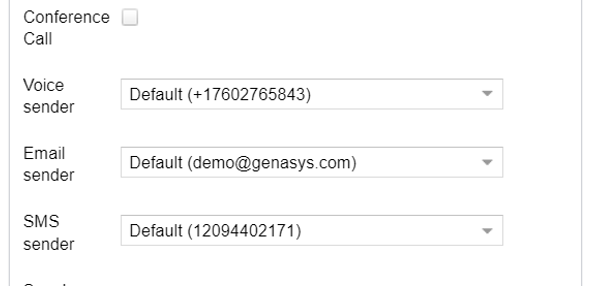
Sender value field
Targets
After completing the contents section, the targets (contacts) for this alert must be selected. There are two options for selecting targets.
- Draw Emergency Area on the Map
- Select Individuals or Groups
Draw Emergency Area on the Map
To draw an emergency area on the map click on the icon located at the top right of the alert control panel seen in the figure below.
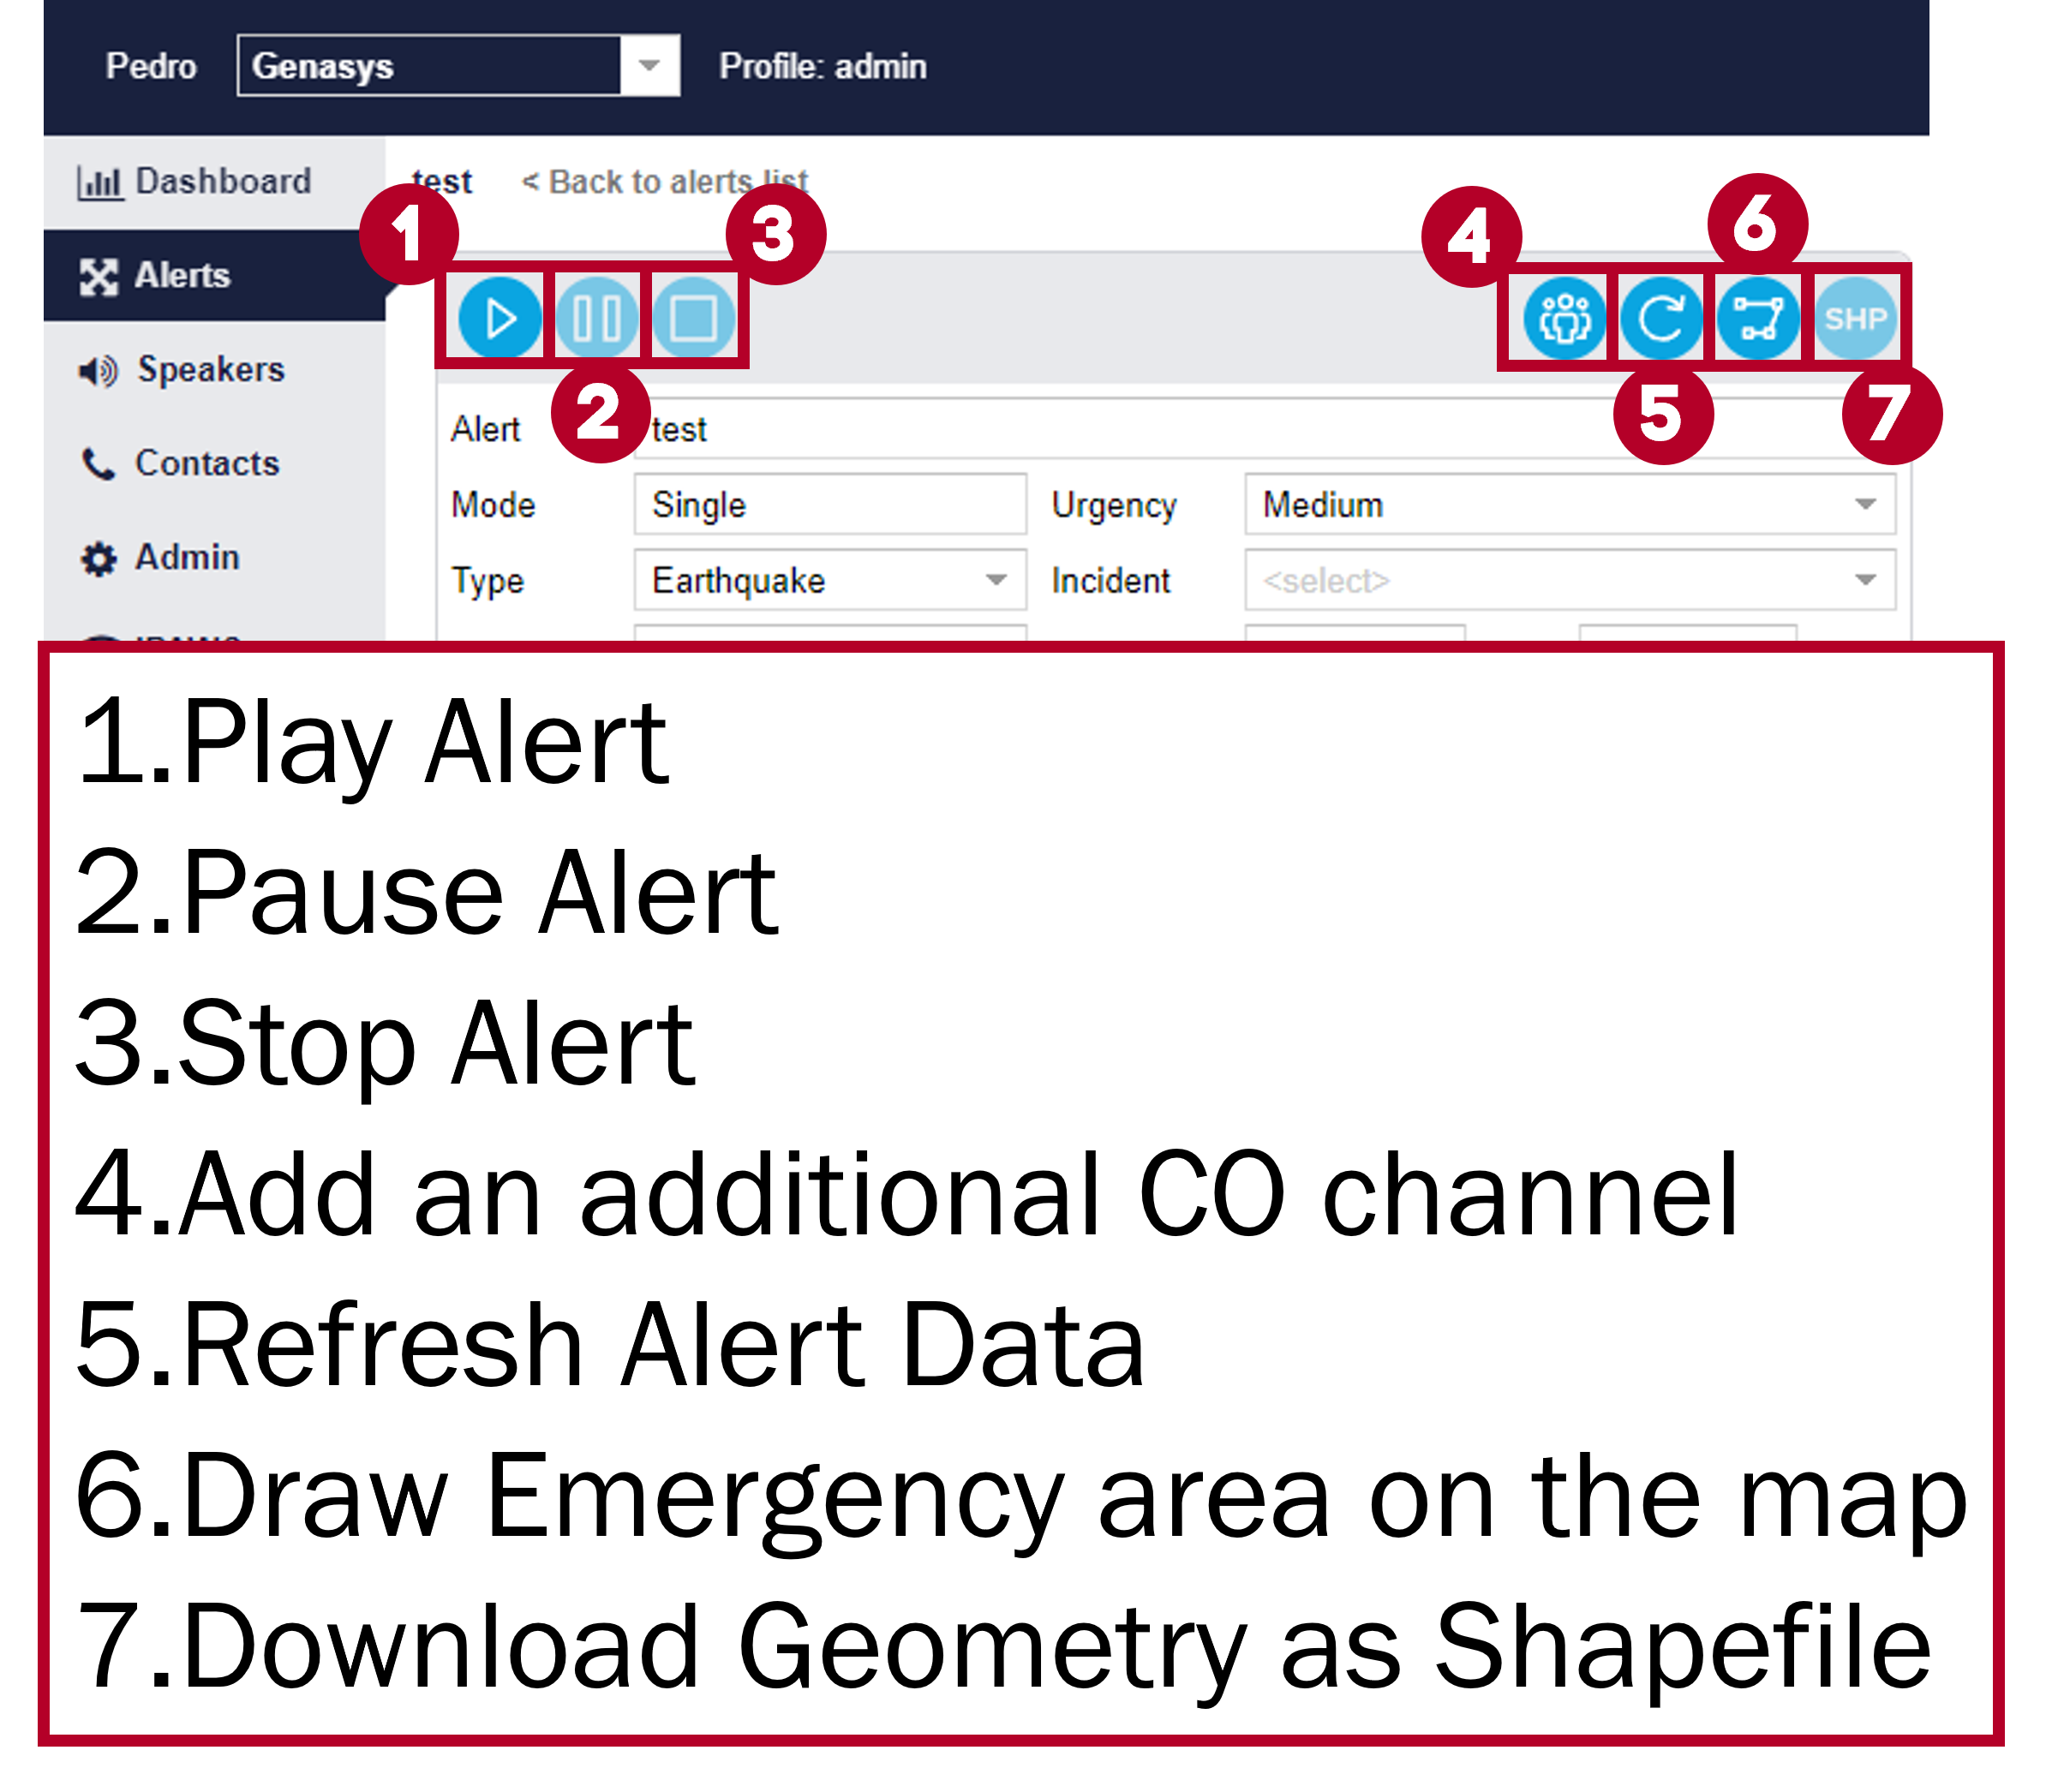
Mapping button
Once you create a shape on the map you can then download it as a Geometry Shapefile to be used in other mapping applications, however this function will only work once you have finished drawing your emergency area.
After accessing the mapping window, three options are available to create an emergency area:
Select: Allows you to select individual speakers in the map (click normally if you wish to select a single speaker, hold the shift button to select multiple speakers).
Polygon: Allows you to draw a custom Polygon.
Circle: Draws a circle on the map using the number to the right as its radius (measured in km).

Emergency area creation buttons: select, polygon and circle.
Predefined areas are chosen from a drop-down menu option to the right of the toolbar (number 9 in the figure above). This centers the map and allows the area to be selected as an emergency polygon. An area that was chosen in the drop-down menu will be highlighted green, to select it as an area for an alert you must then click the ‘Select’ button to the left and click the chosen area. Once properly selected the area will be highlighted blue.
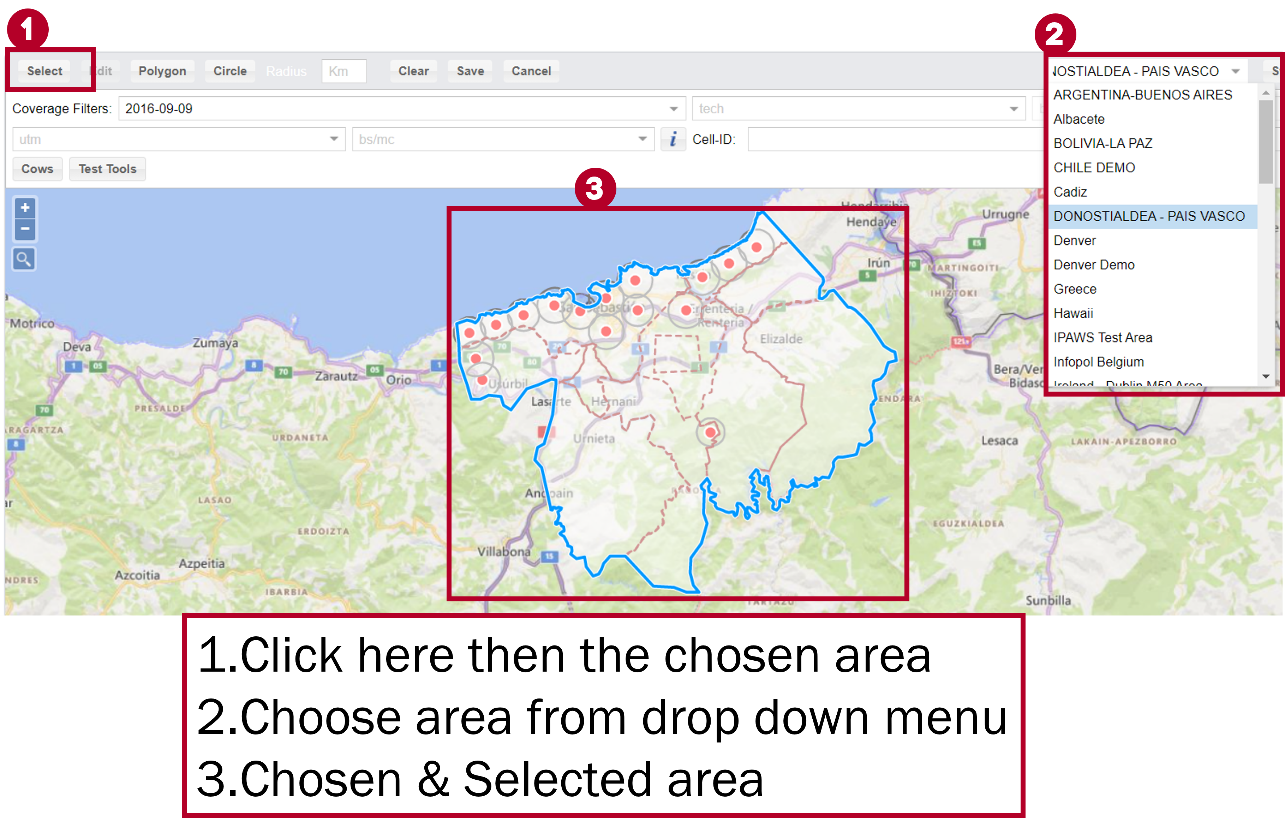
Predefined area drop-down menu
These predefined areas are managed from the areas tab in the speakers section.
Areas panel
Additionally, GEM is connected to Zonehaven, meaning users can select areas found in Zonehaven if the filter option is selected.
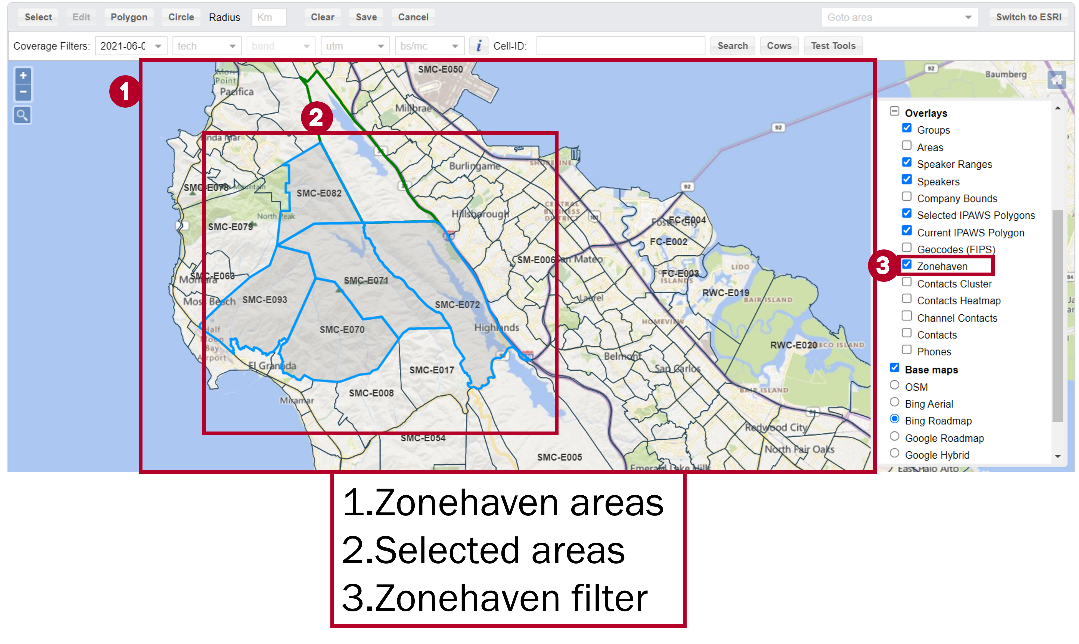
Zonehaven filter
After the areas have been selected if the IPAWS output channel is being used, with the WEA (Wireless Alert) option selected, areas selected (via zonehaven, predefined areas, or ESRI map tools) will be merged to reduce their vertex count to below 100. This is because IPAWS is managed by FEMA and has set this requirement for IPAWS alerts.
Regardless of the method used, alert notifications will reach all targets within the designated geographic area.
If you are in ESRI map mode (seen in more detail in the Map section), you can press the “Map Image” button to screenshot the map and save it into the image contents. This way when you send out your alert, through channels that can send out images, it will include an image of the map.
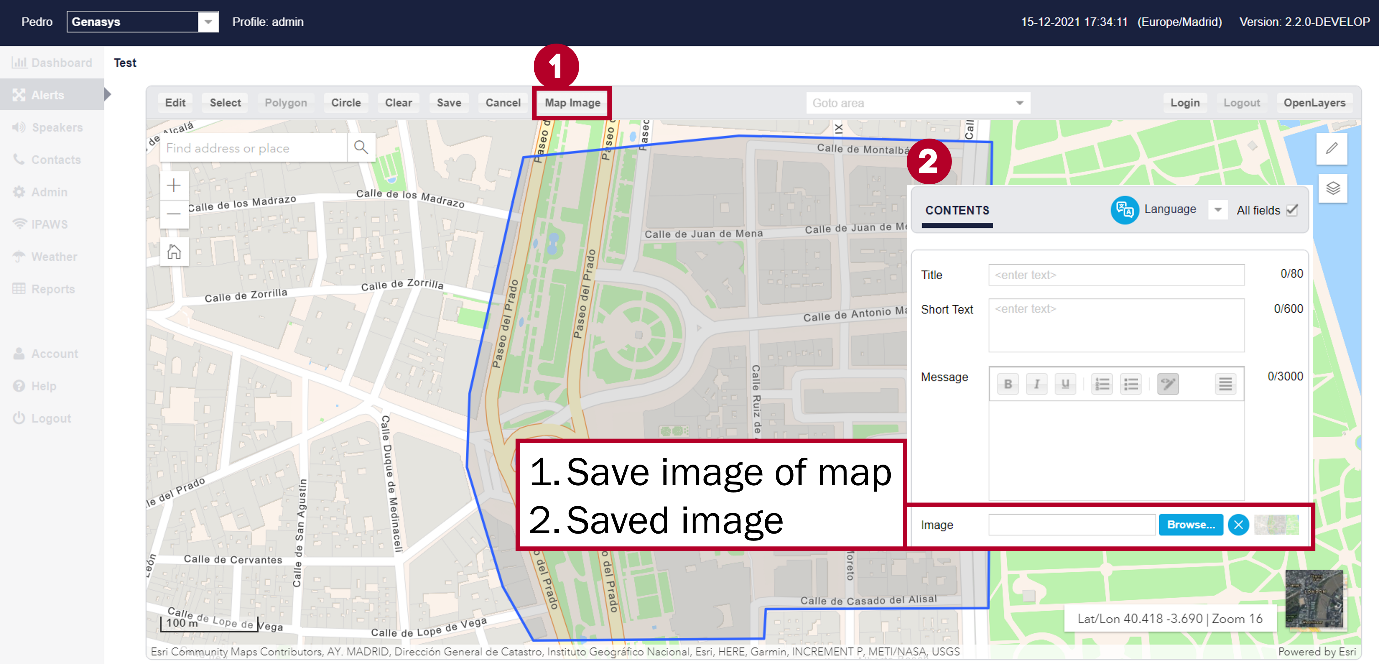
Map image button
Select Groups
When using groups to select targets, all contacts that form part of a selected group will be added to the list of targets. (To find out how to create groups and add contacts to it go to the groups subsection found in the Contacts section of the manual.)
To add a group, select an output channel that uses contact details to find its targets (e.g. phone numbers for SMS, email address for emails) and click on the “Targets” tab on the right side of the Alerts page. Then select the desired group(s).
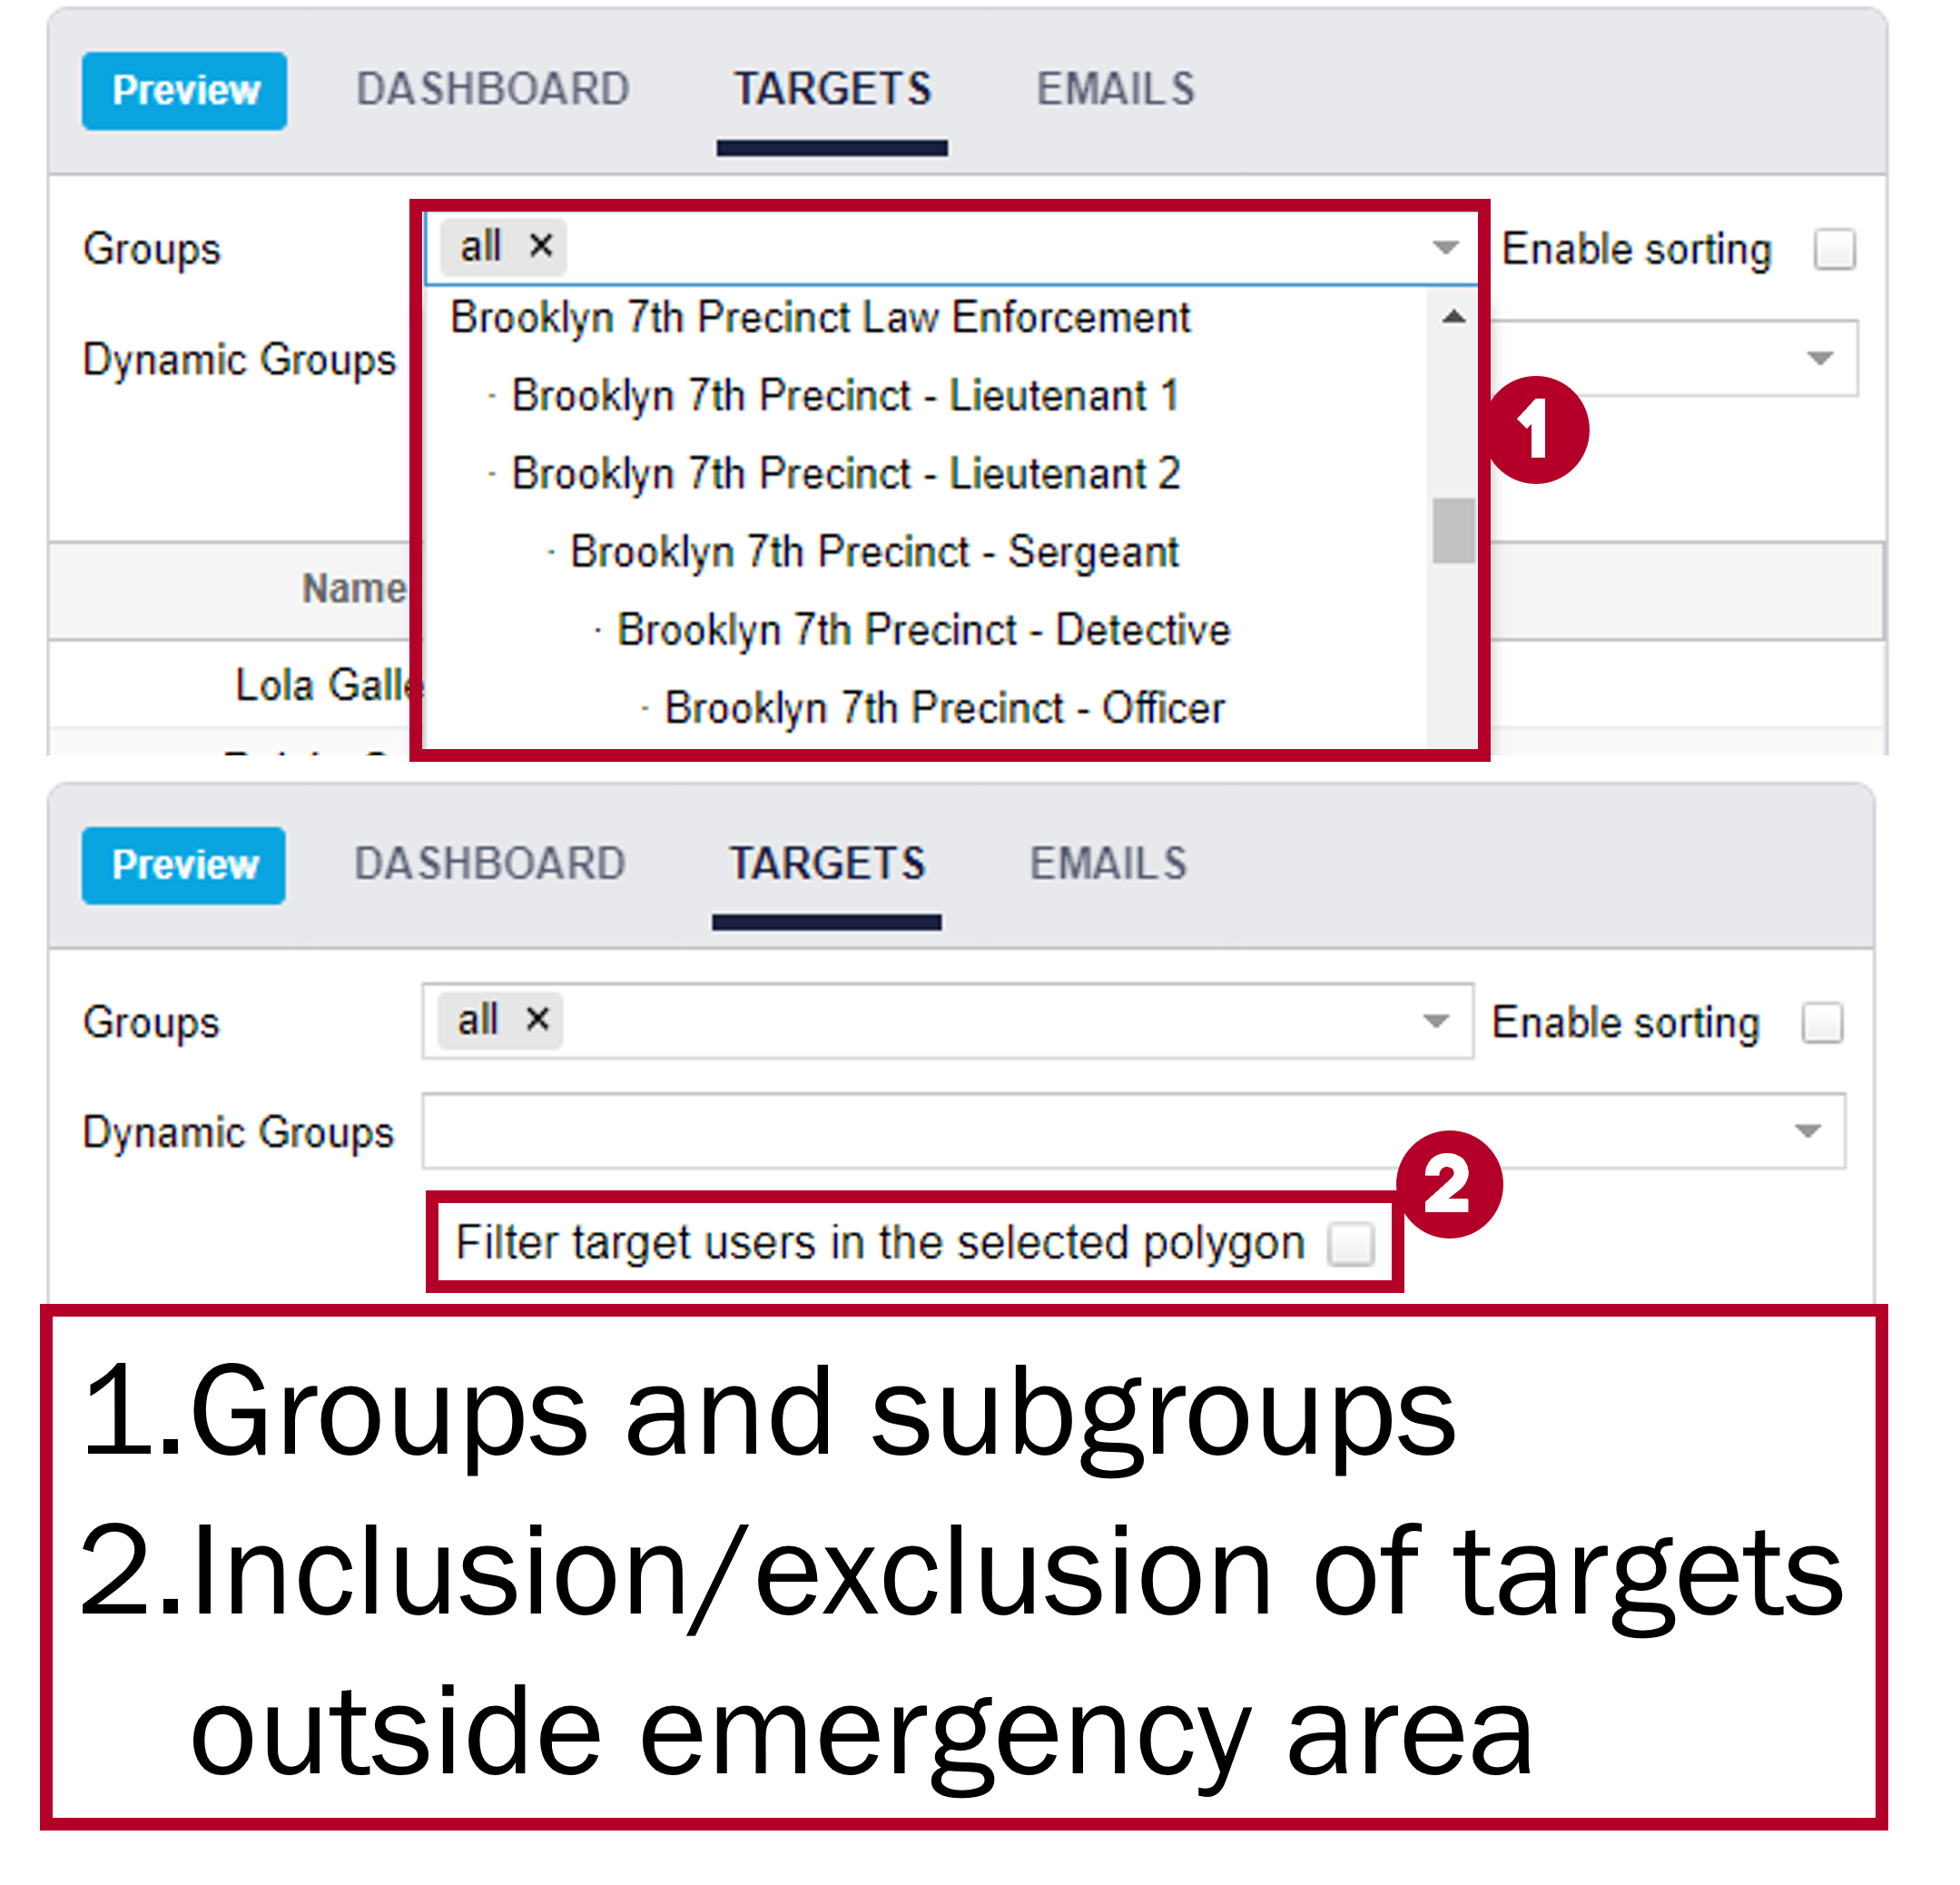
Group Selection in Targets Tab
As seen above, groups can also have subgroups. If a user sends a message to the parent group everyone with this group or one of its subgroups will receive the message, but if a subgroup is selected then only those who fall under this subgroup will receive messages. For example, Brooklyn 7th Precinct Law Enforcement is a group with several subgroups, so an emergency manager could choose to message only 7th precinct detectives and officers by selecting the last two subgroups instead of messaging everyone by selecting the original group.
Select Individuals
It is also possible to select specific targets or remove them through the corresponding buttons, as shown in the figure below.
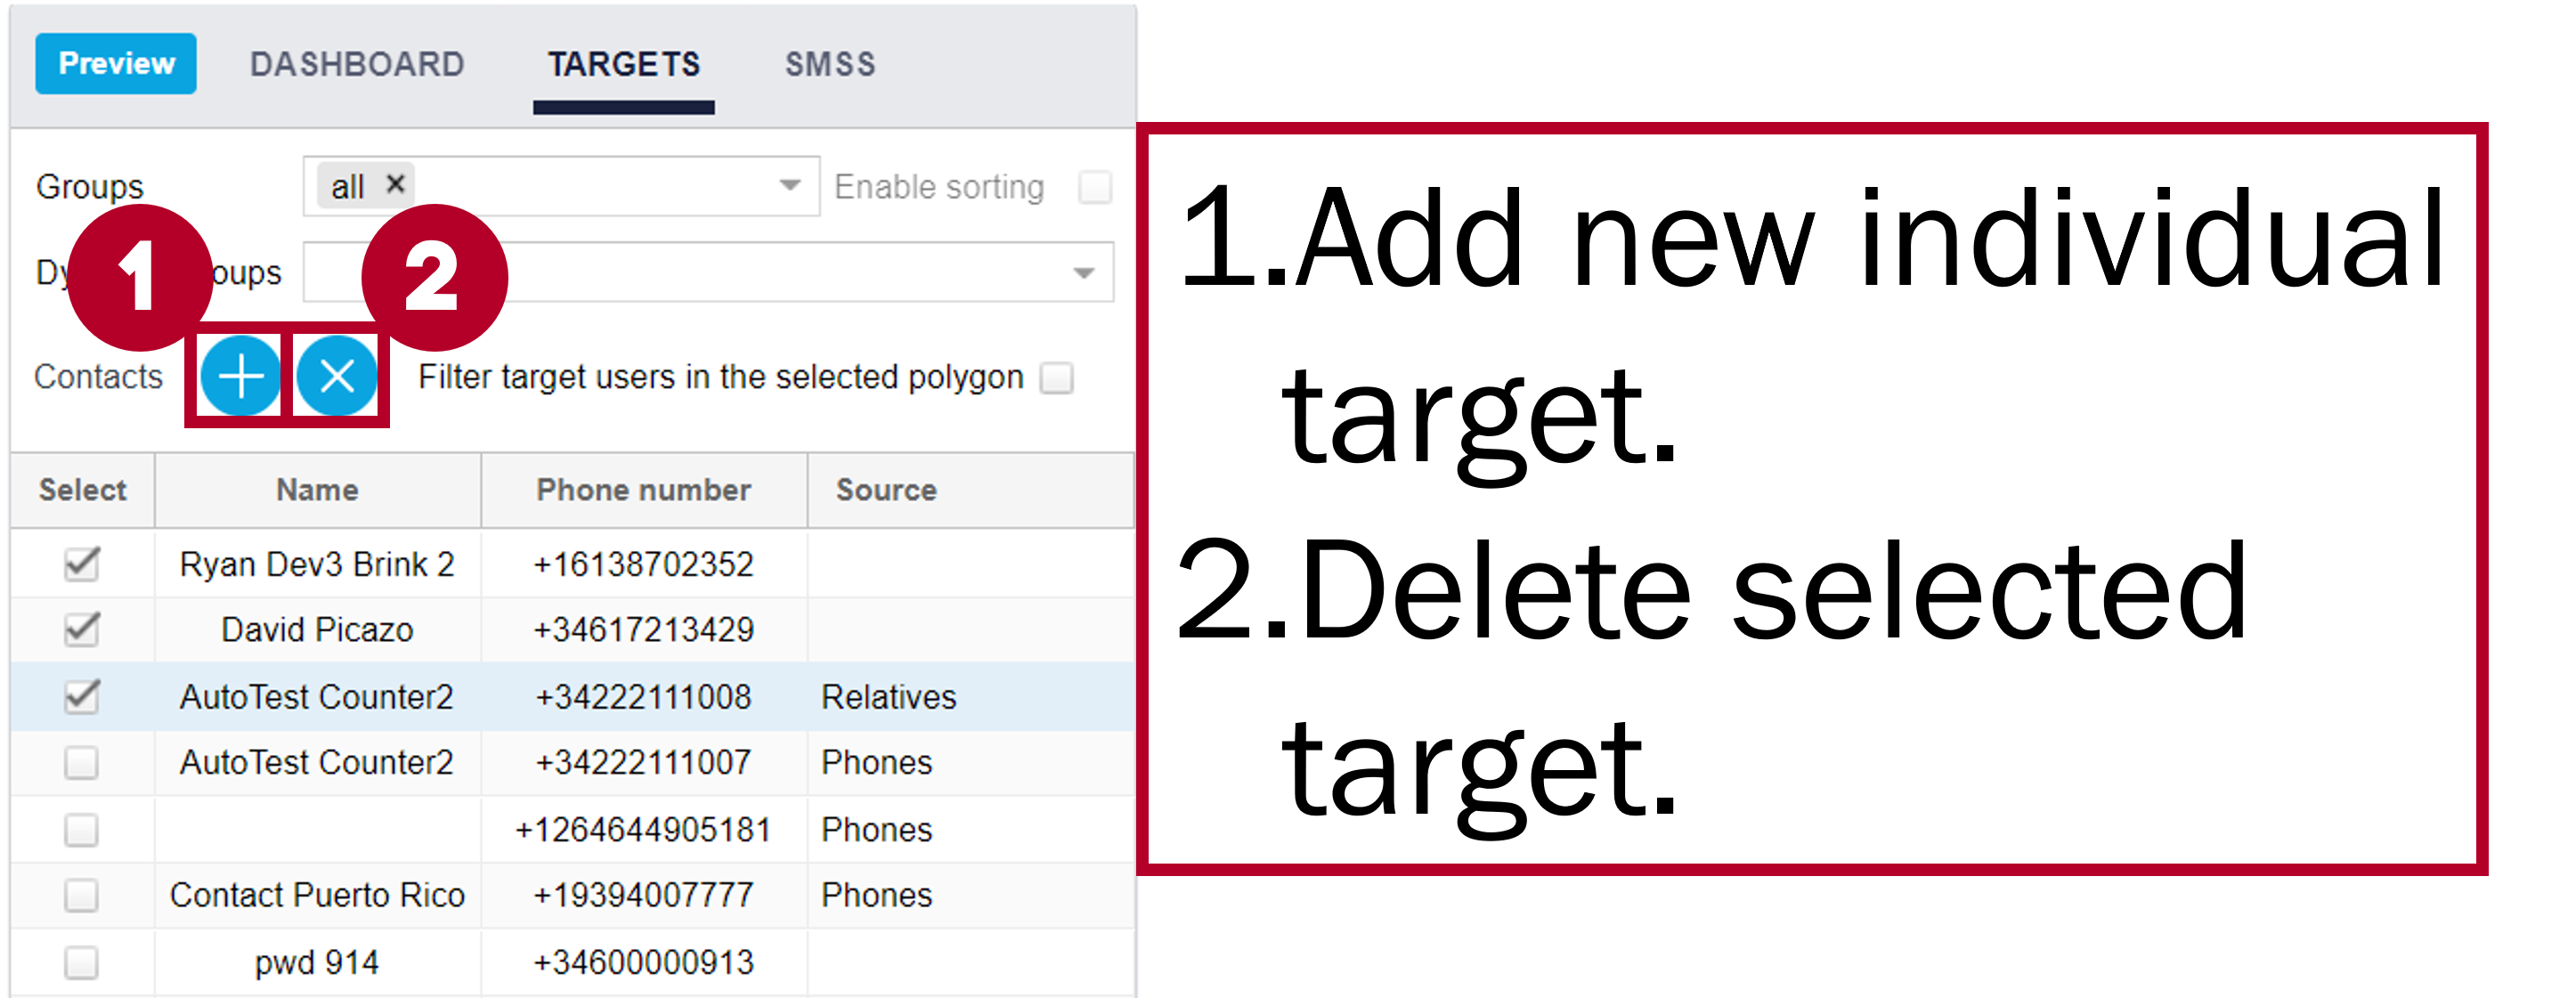
Add / Delete Individual Targets
You must select which targets you want to delete before doing so. Once you click the plus button the following window will appear:
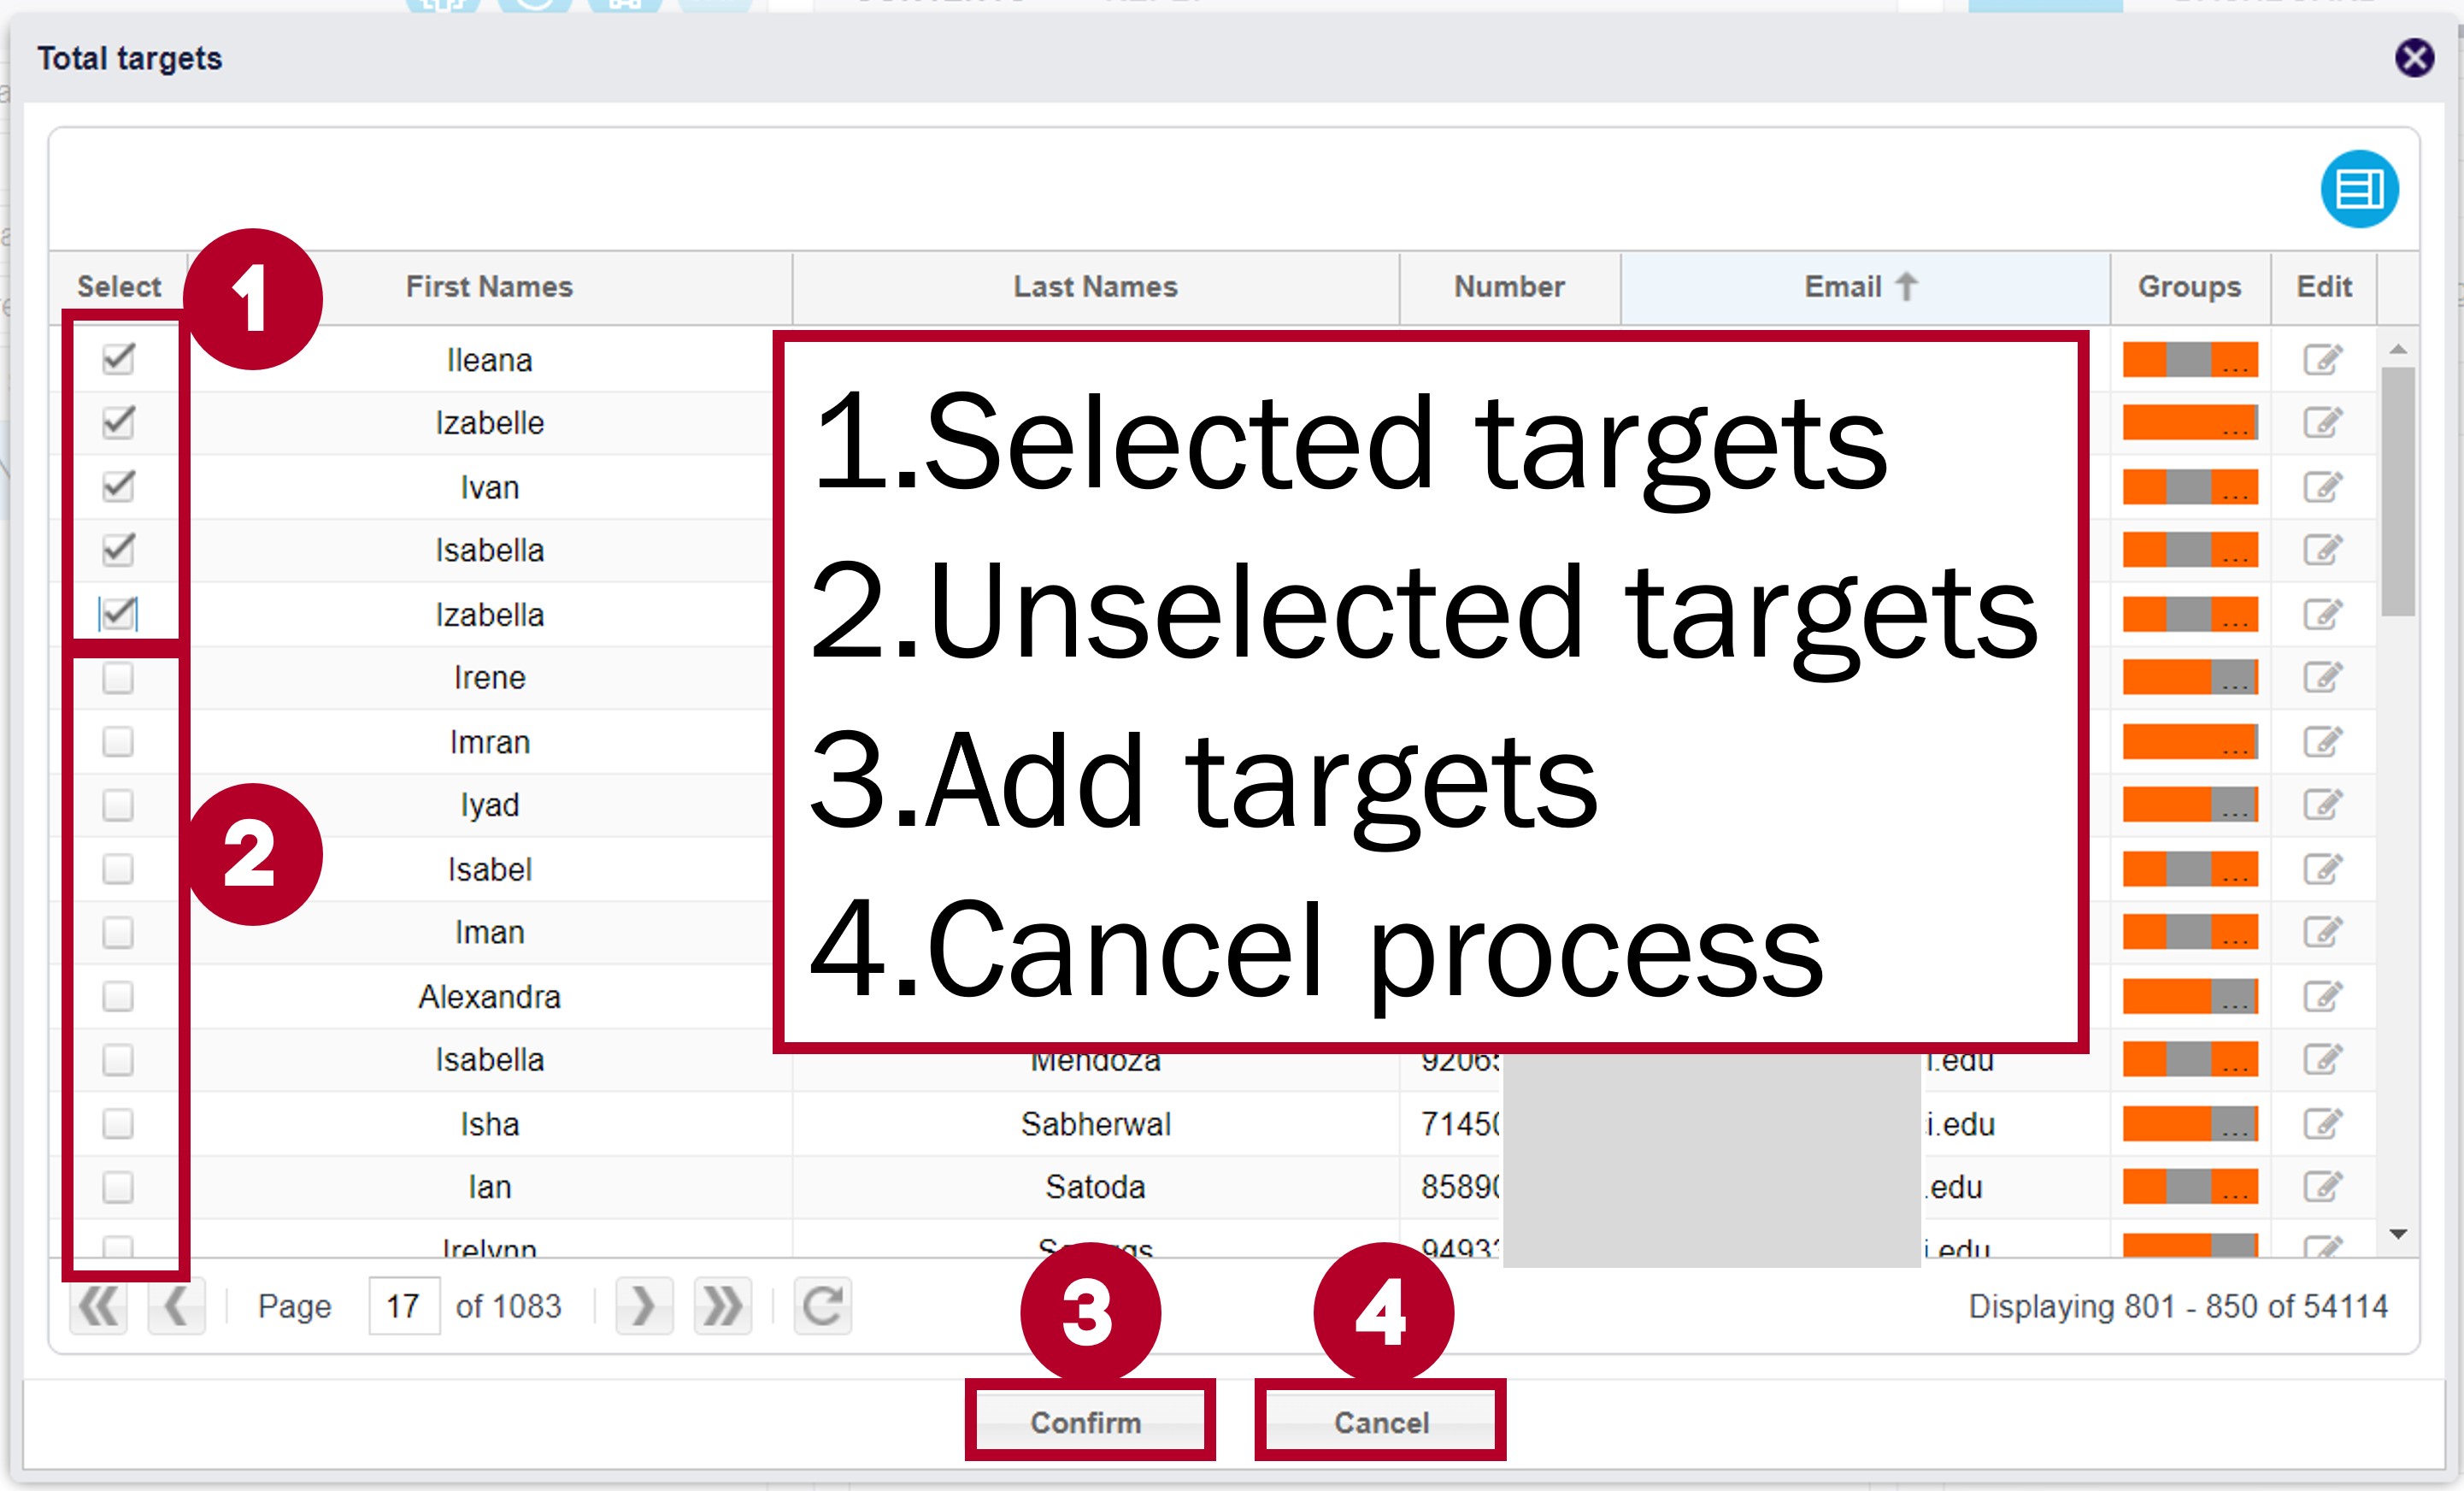
Add individual targets Window
Once you select and confirm the targets they will be added to the total list, which can be combined with the selection of a specific group as described prior.
Preparing State
After defining the area or the group filter, the campaign changes to Preparing state. During the preparing state, the system is calculating the list of targets in that area or included in that group.
During this process additional contacts are included from relevant Includelists and excluded from relevant Excludelists. These lists will be discussed in the Lists Page section.
Once preparation is complete and the list of contacts is calculated, targets will appear in the targets tab. Targets are filtered by output channel so you will need to select the desired channel to see relevant information about contacts receiving alerts through it.
For example, in the case of a Push notification, the list of targets will only show the contacts that have installed the mobile app. The provisioning process is anonymous so the only ID for users will be the User value and ID defined by GEM.
Other Important Details
After setting and preparing the targets, you will have access to further information in the Alert Details page. Important information can be found in the various tabs located to the right of this page, near the Targets tab.
NOTE: Tabs available on this page will vary from alert to alert, depending on each alert’s unique configuration.
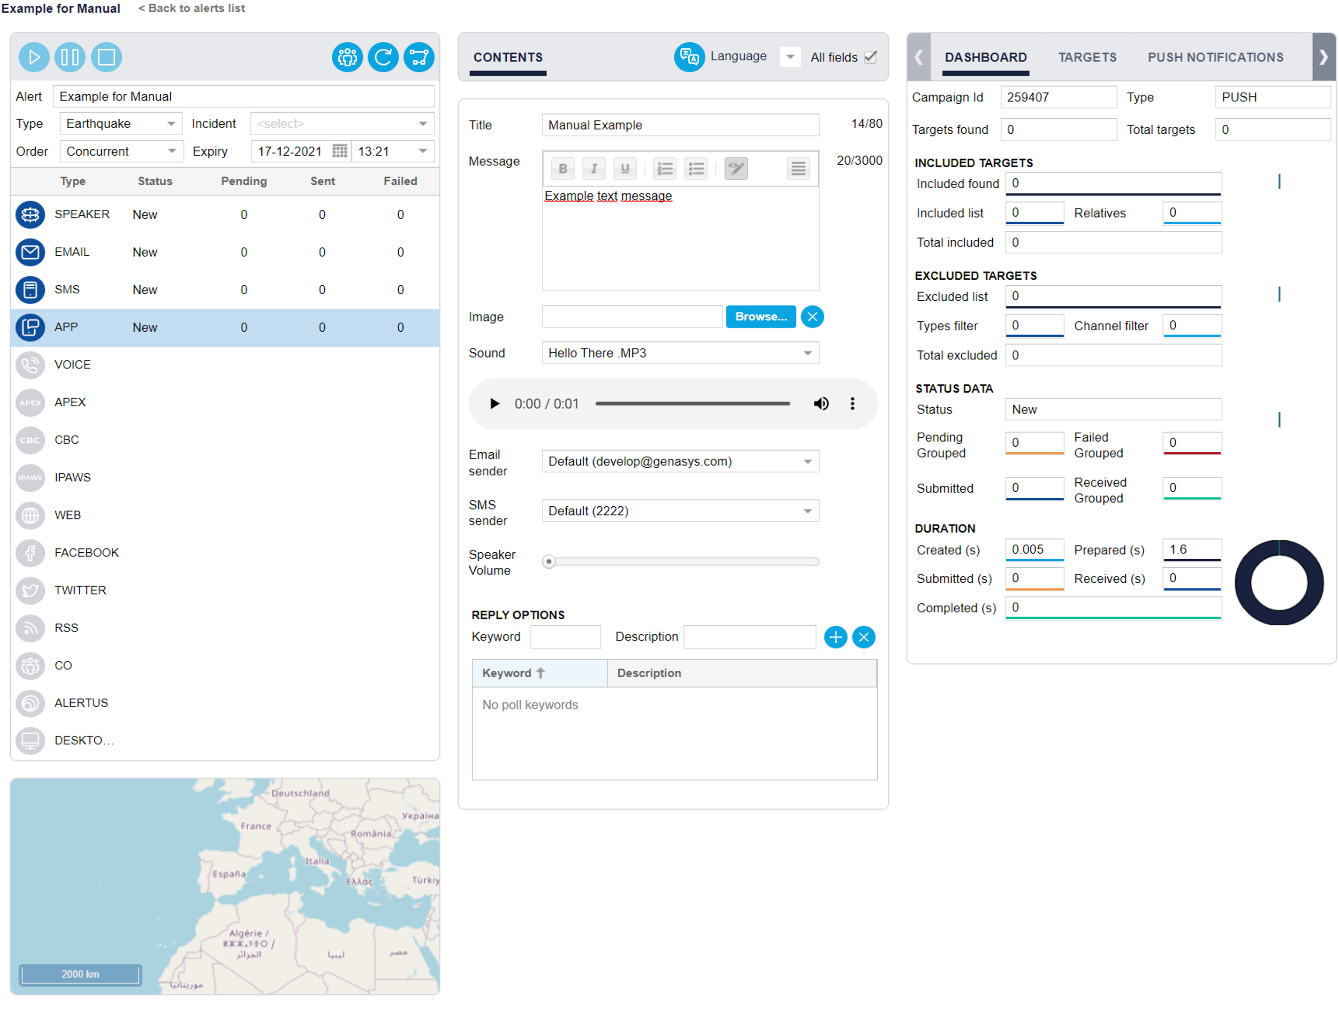
Dashboard Tab
The Dashboard tab contains additional information on the alert’s targets, which are detailed in the figure below and the bulleted list that follows. The Dashboard will show information on the currently selected channel, meaning it will change when you click on different channels.
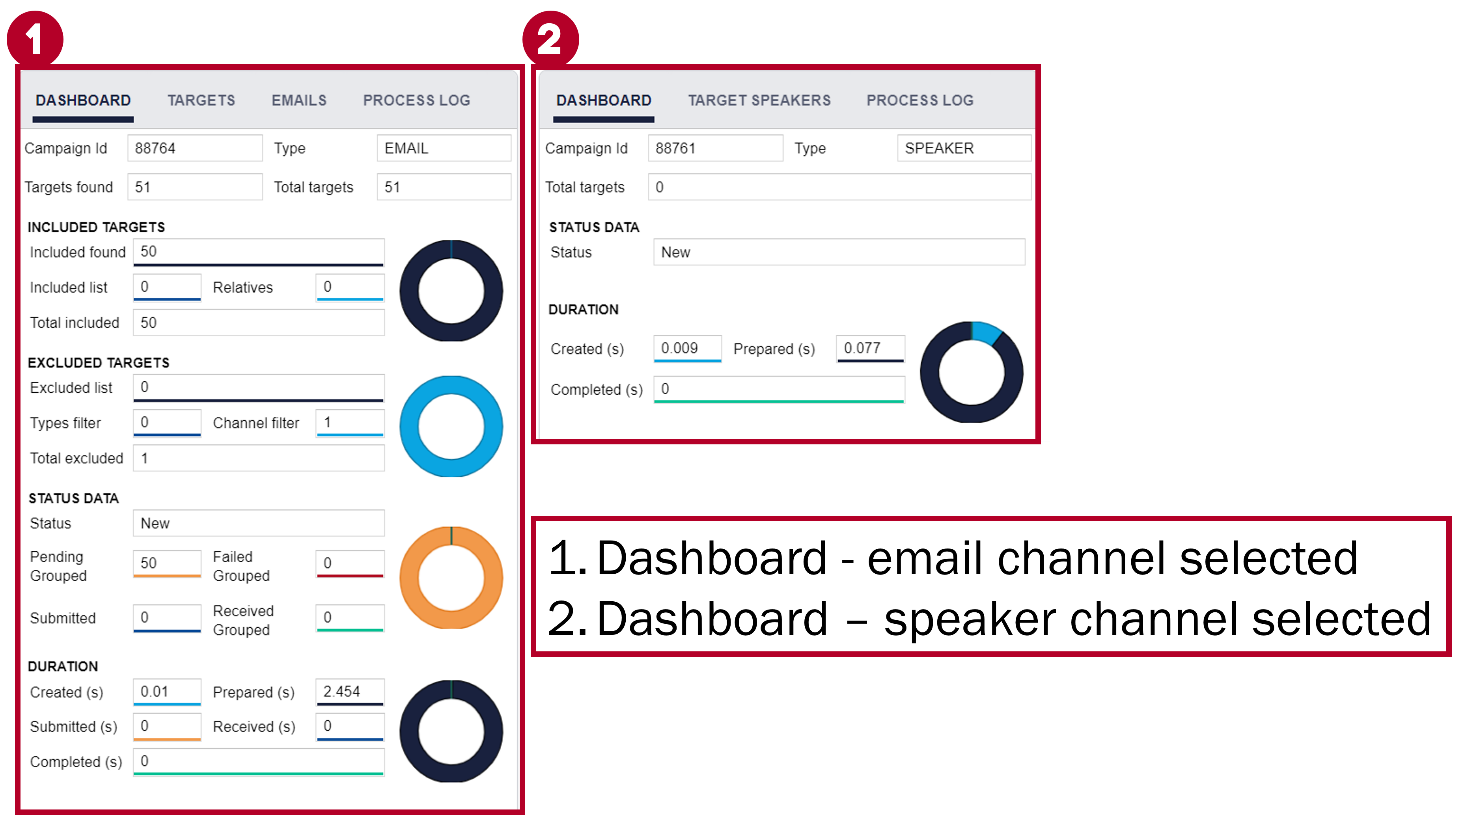
Dashboard information screen.
- Total Targets: Number of targeted contacts selected by the user.
- Included Targets: Number of targets who will actually receive the notification.
- Excluded Targets: Number of targets who have chosen not to be notified for this type of alert and thus will not receive the notification.
- Status Data: Information on the status of the notification to be sent to targets.
- Duration: Information on the time durations of different phases of an alert’s notification.
Channels Tab
The Channels tab contains information on both outgoing and incoming messages.
The outgoing window shows the status of SMS messages that have been or will be sent out to targets, with information on the specific contacts and the delivery status.
The incoming window shows information on any targets that responded, including keywords that trigger responses in the GEM system.
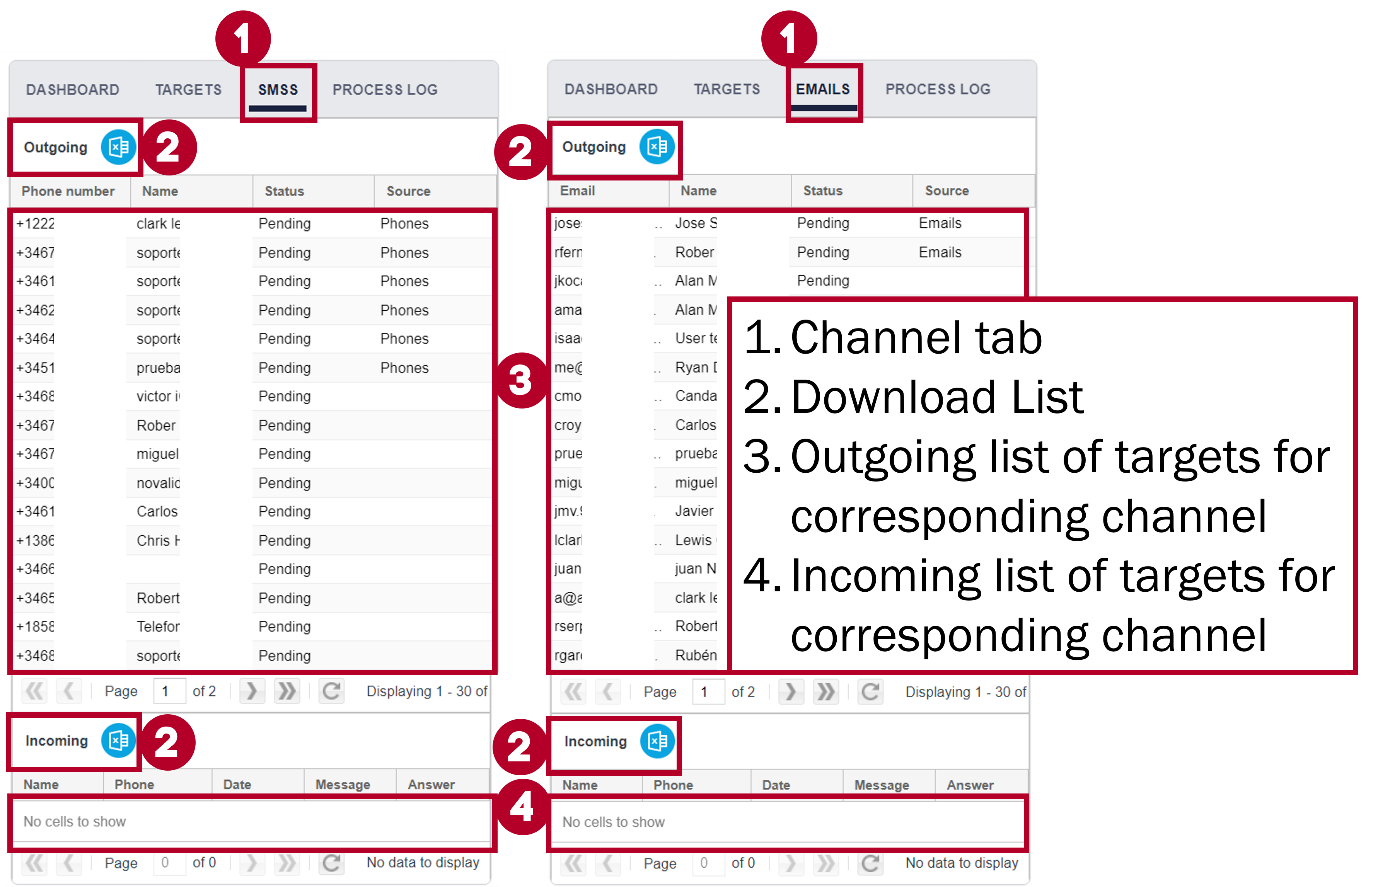
Channels Tab
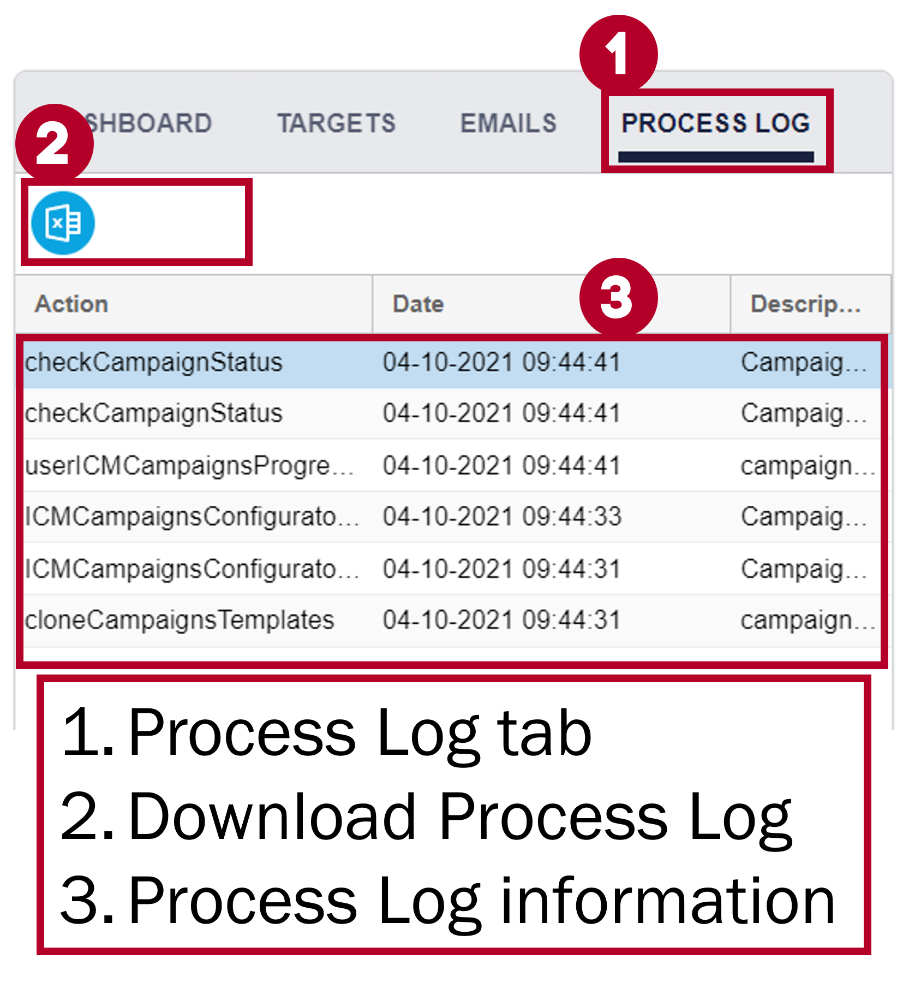
Process Log Tab
The process Log tab contains information detailing an alert’s history, from creation through revision to implementation.
Process Log Tab
Default Columns:
The default columns displayed in the process log tab are the following: Action, Date, and Description. However, like with most GEM columns, a user can customize which columns are displayed so that they have access to more or less information.
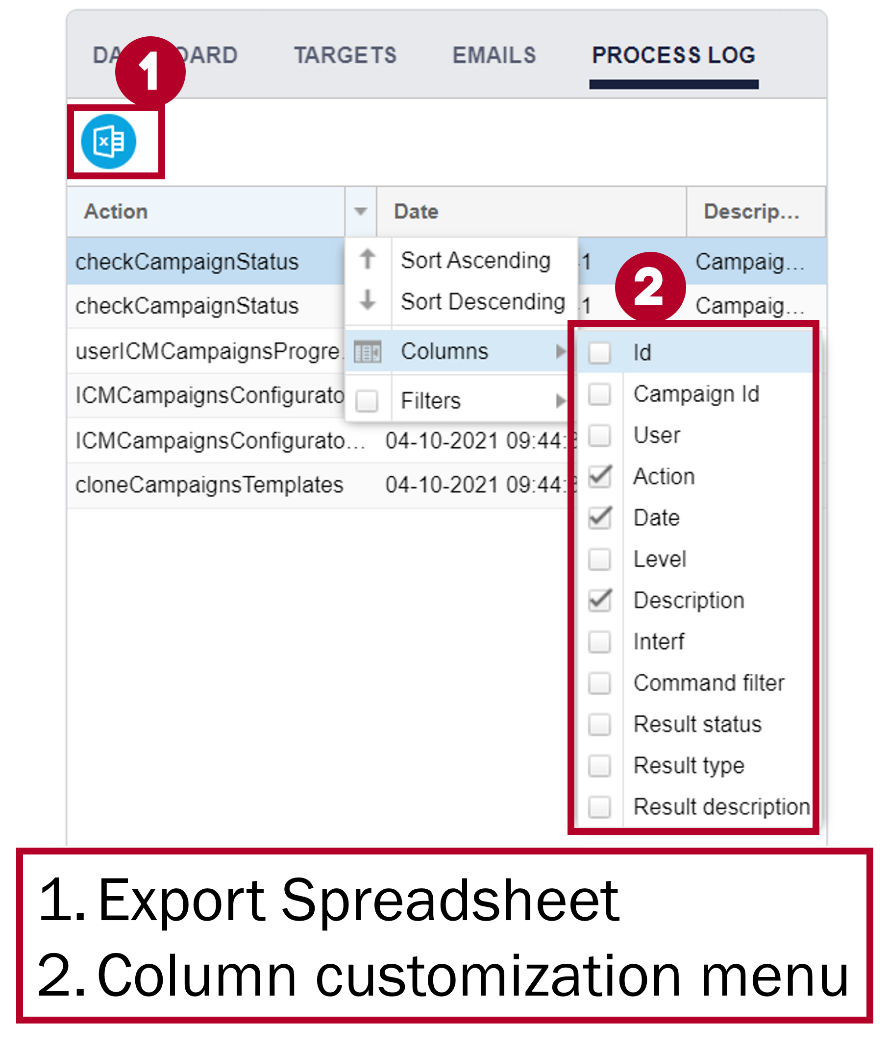
Customizing Columns:
To customize columns so, hover the mouse over the right side of a column’s heading and then click the arrow that appears. This will lead to a drop-down menu, which allows the user to choose which columns are displayed on the screen. Additionally, this drop-down menu allows the user to sort and filter the process log.
Process Log export
Export Spreadsheet
Above the table in the process log tab, you will notice the Export XLS button. Clicking this button creates an Excel Spreadsheet of the process log’s columns, which will be downloaded and saved onto your computer.
Log Details
Double clicking a row in the process log will cause the Log Details window to appear, containing further information on the selected action in the alert’s history. The different pieces of information displayed in the log details window are detailed in the figure and bulleted list that follows.
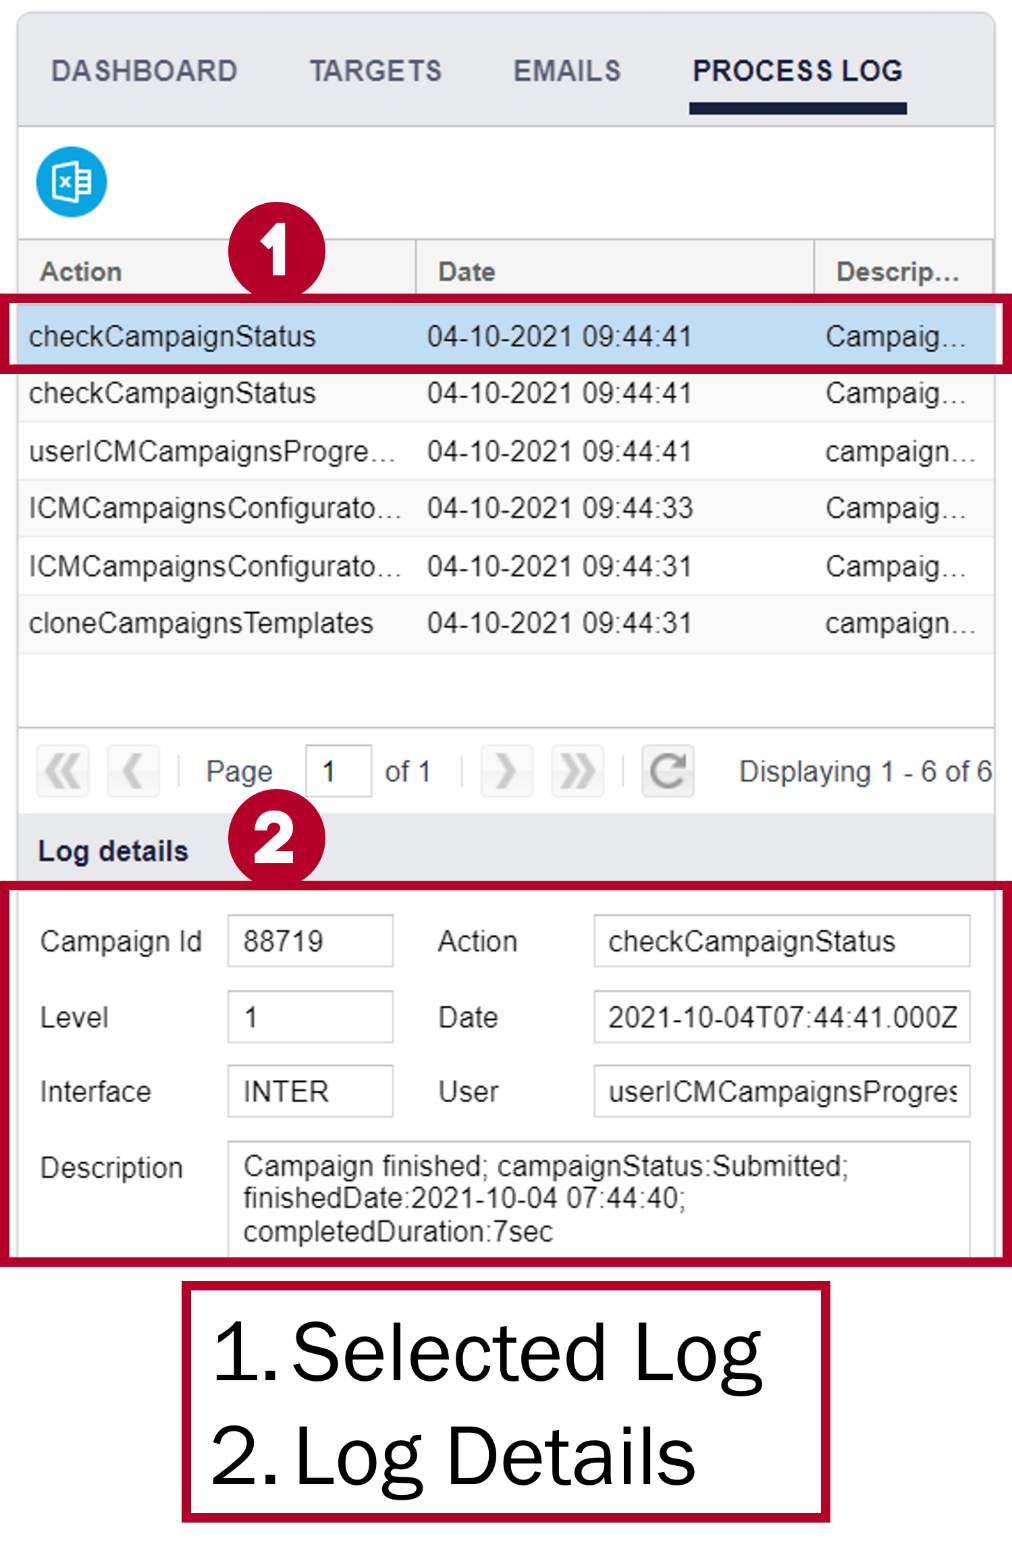
Log Details tab
Campaign ID: The campaign’s identification number.
Command ID: The command’s identification code.
Level: Level of detail in the log.
Date: Date and time that this action took place.
Interface: Interface used to perform the action in the system (web, app, etc.)
User: The user responsible for the action.
Description: A technical description of what took place.
Updating an Alert
The Update button is enabled when an alert with status=Done is selected.
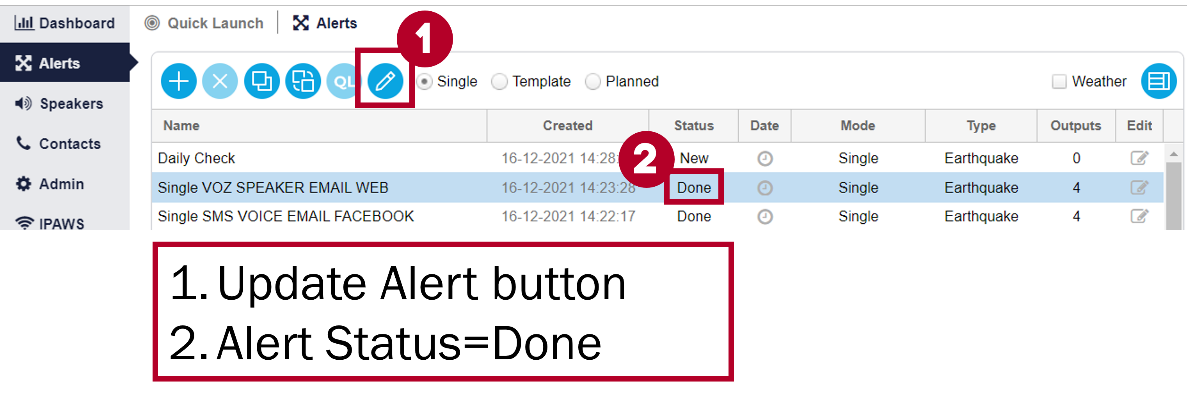
Update button
When you click the button the Update Alert window appears that looks very similar to the Quick Launch window, but with the content and targets of the previously selected alert on display. The alert title has the text (update) appended to the name and the text fields can be edited.
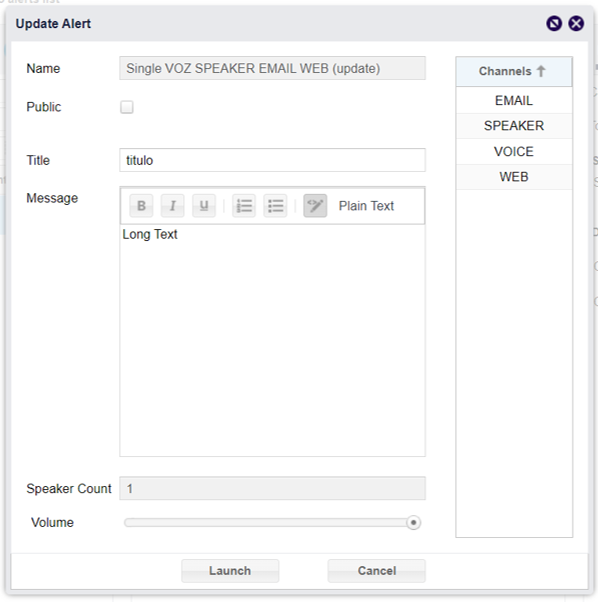
Update alert window
A user who does not have permission to create and modify alerts can be given permission to use the update function. Together with Quick Launch access, it limits a user so that they can only send predefined alerts and update previously sent alerts, giving those in higher positions more control over the alerts that can be launched through GEM.
Previewing an Alert
When you are preparing an alert you can preview the contents before launching it. To do so you must click on the Preview button shown in the figure below.
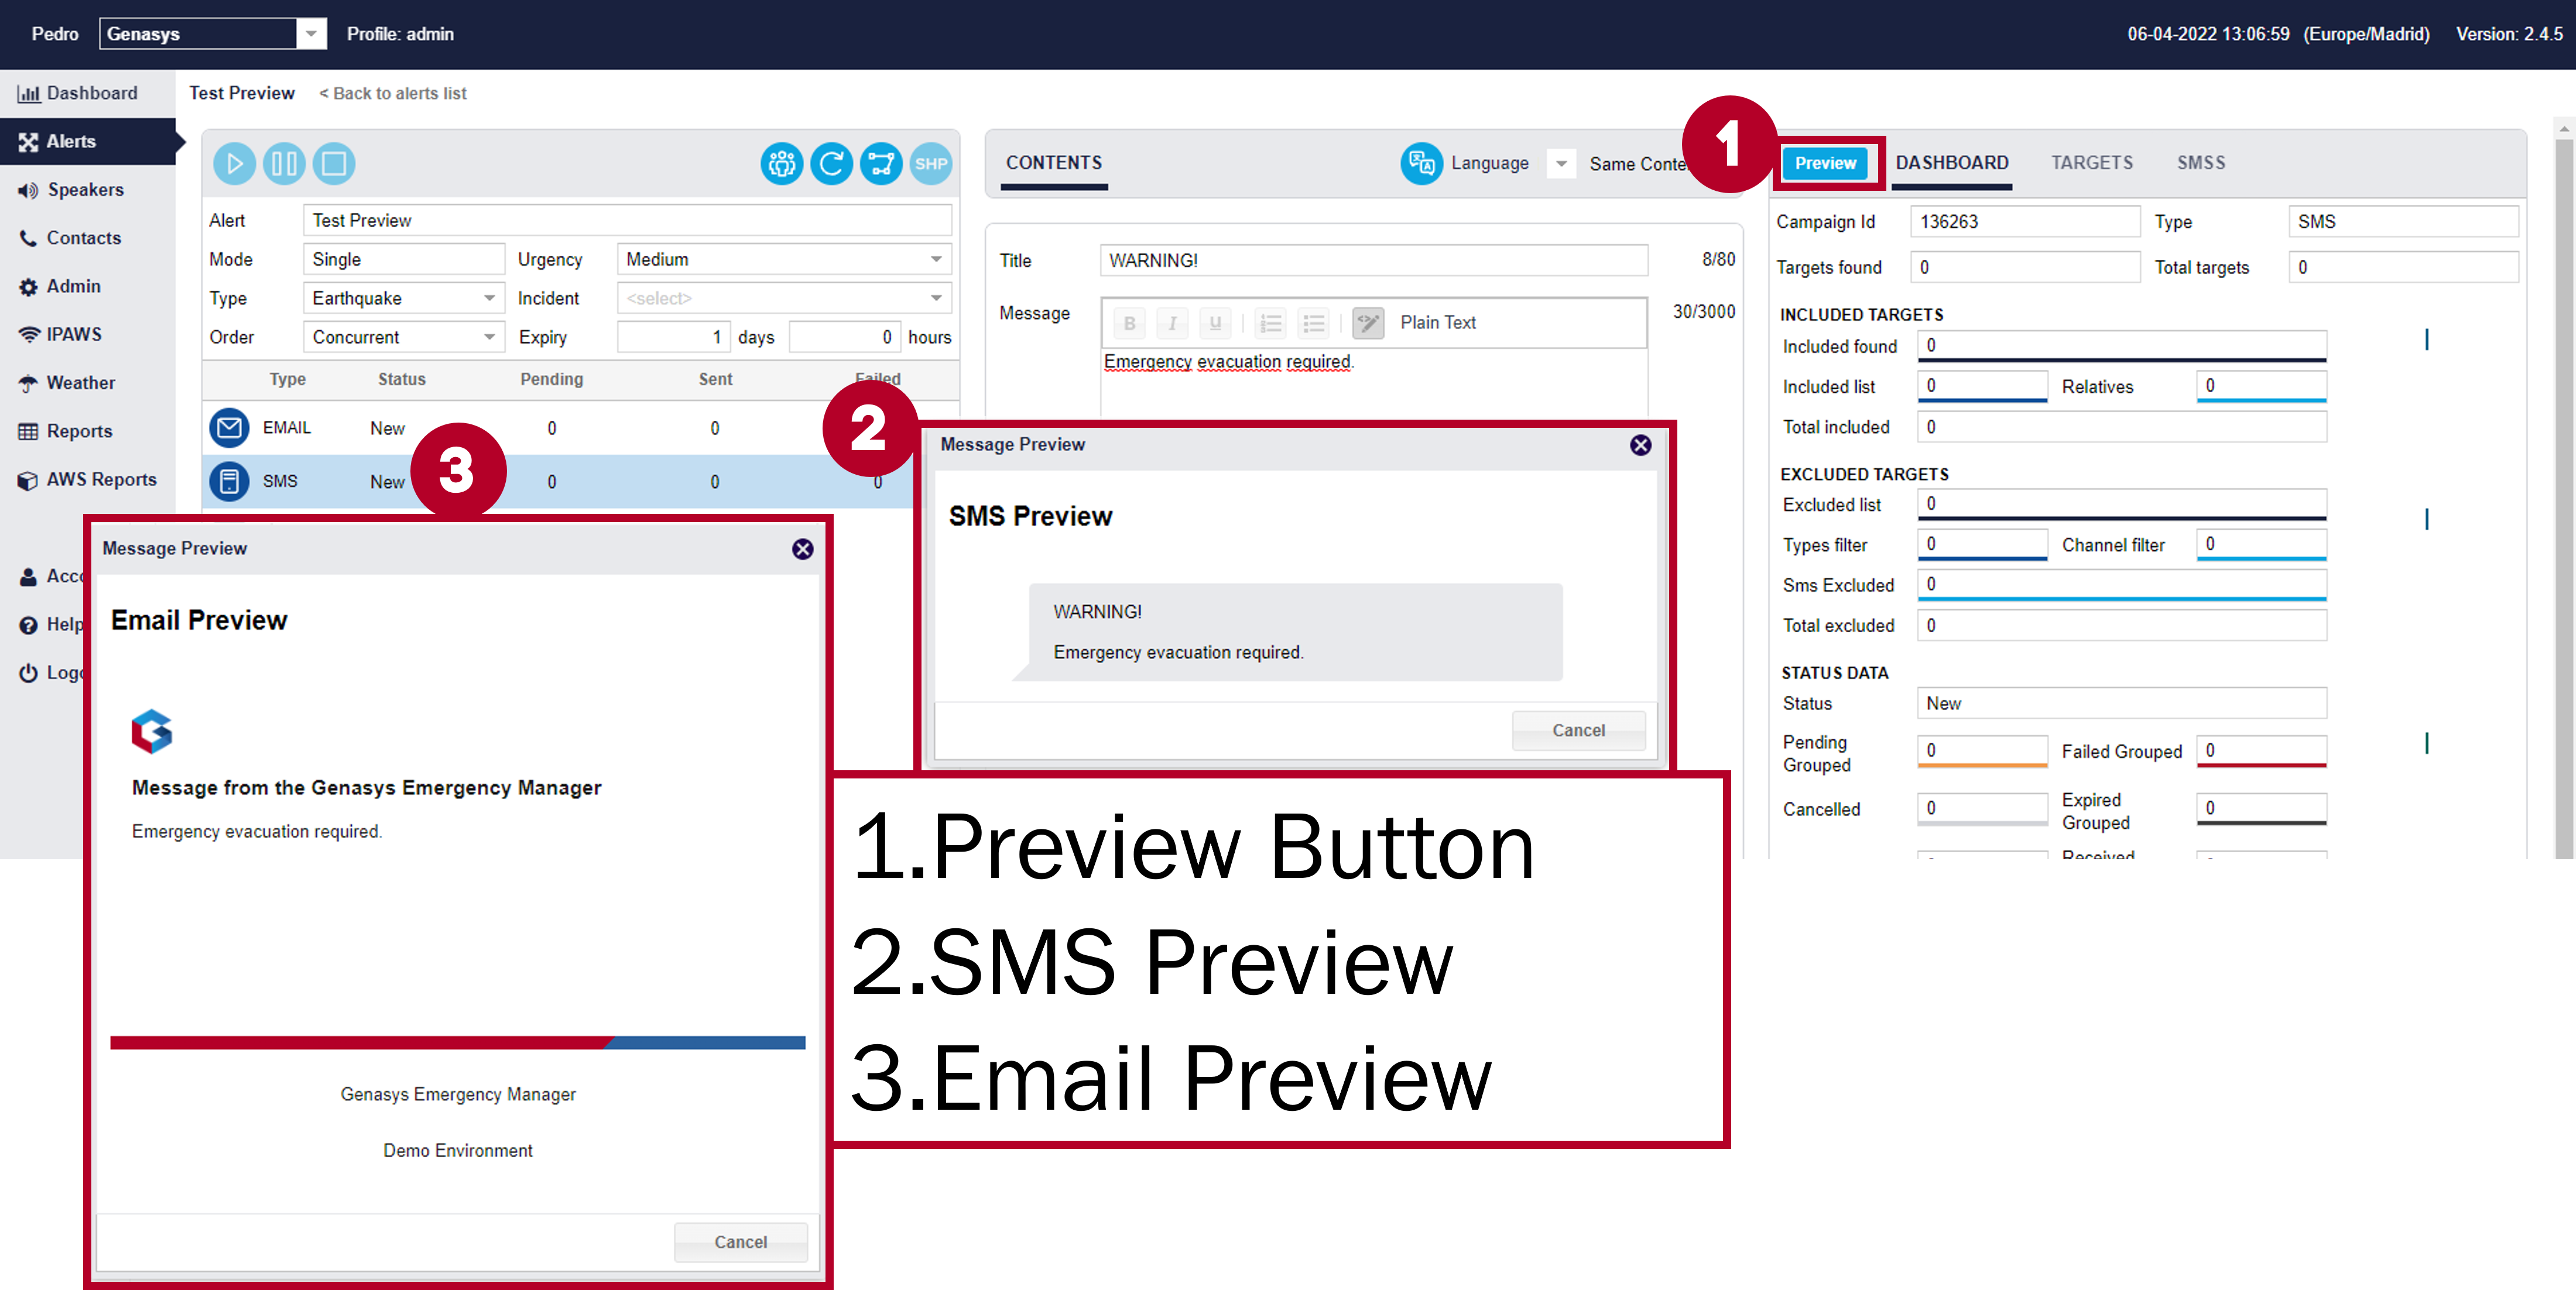
Alert Preview
Note that the Preview button will only show you the contents of the currently selected channel. Be sure to select the desired channel beforehand. In the example above the SMS channel is selected meaning the Preview button will only preview the way the SMS will look. If you do not have a channel selected the Preview button will appear as a lighter color and will not work.
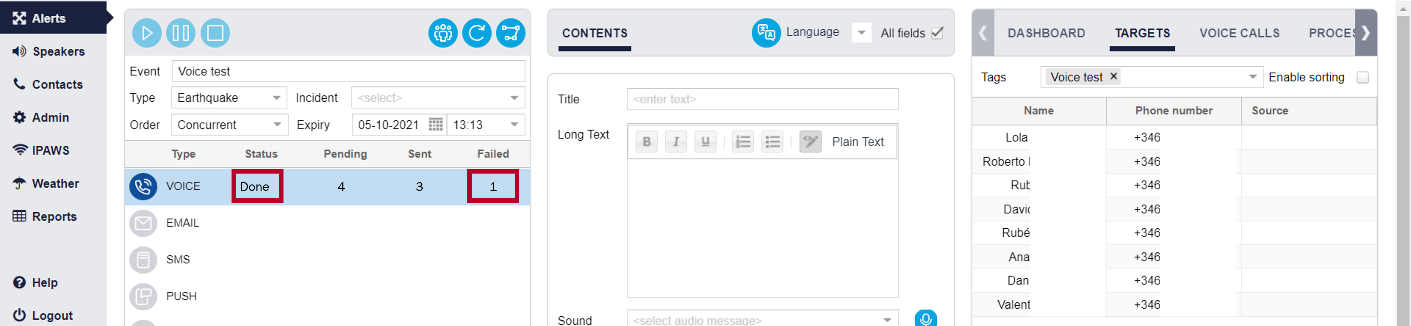
Launching a Single Alert
To launch an alert, you need to ensure that all relevant information is filled in. This includes targets, communication channels, contents for each communication channel selected, and a selected area on the map. Targets must be selected either through groups or by creating a designated area on the map, to launch an alert you must do one of the two or both. Once this is done you can press the play button to launch the alert.
 - Alert launch button. (This button will be greyed out and unusable if an alert is not ready to be launched.)
Alerts can be paused and stopped.
To stop the launch of an alert, click on the stop message button (![]() ) to the right of the alert pause button (
) to the right of the alert pause button ( ).
).
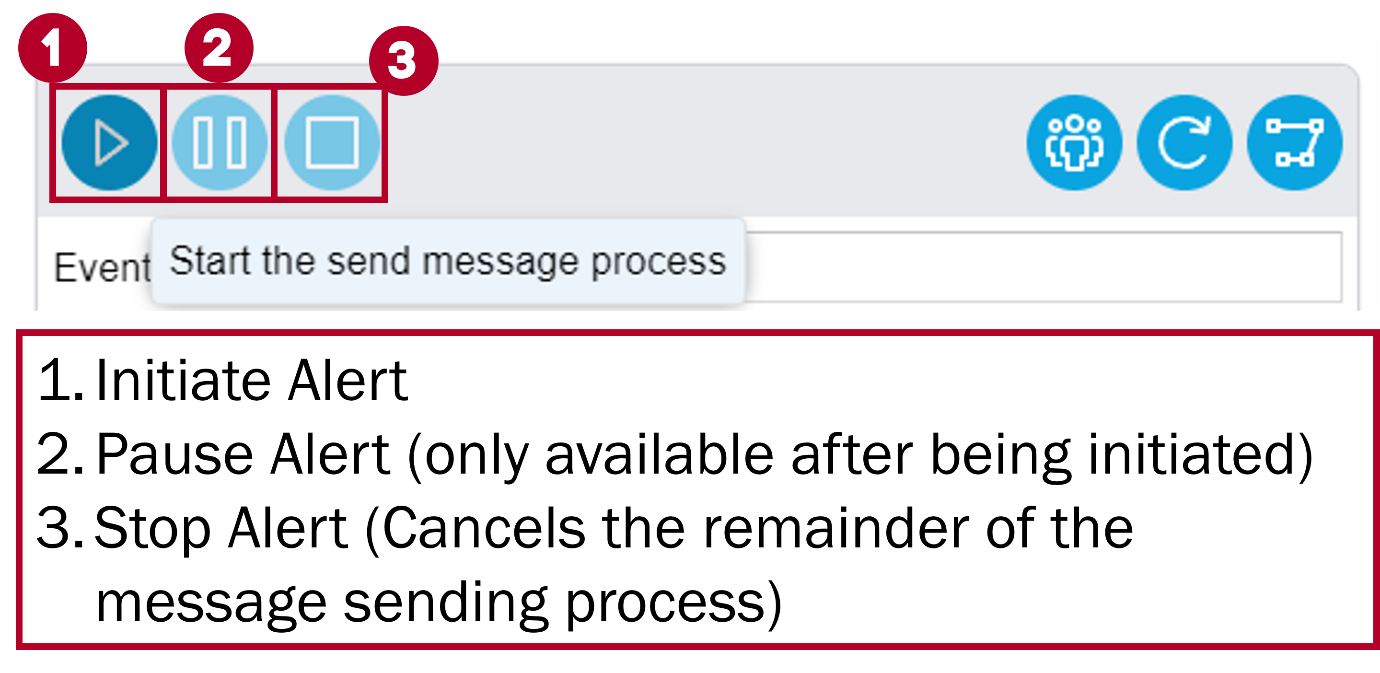
Alert control buttons
You can also add an alert expiration time. Expiration time is set to 24 hours by default, at which time the SMS commands related to the campaign expire along with any sending processes still running. Meaning anyone entering the targeted area in the map will receive the corresponding alert alerts until the expiry time has been reached. You will want to adjust this to how long you believe the alert should remain active and keep sending notifications to people entering or leaving a geofenced area.
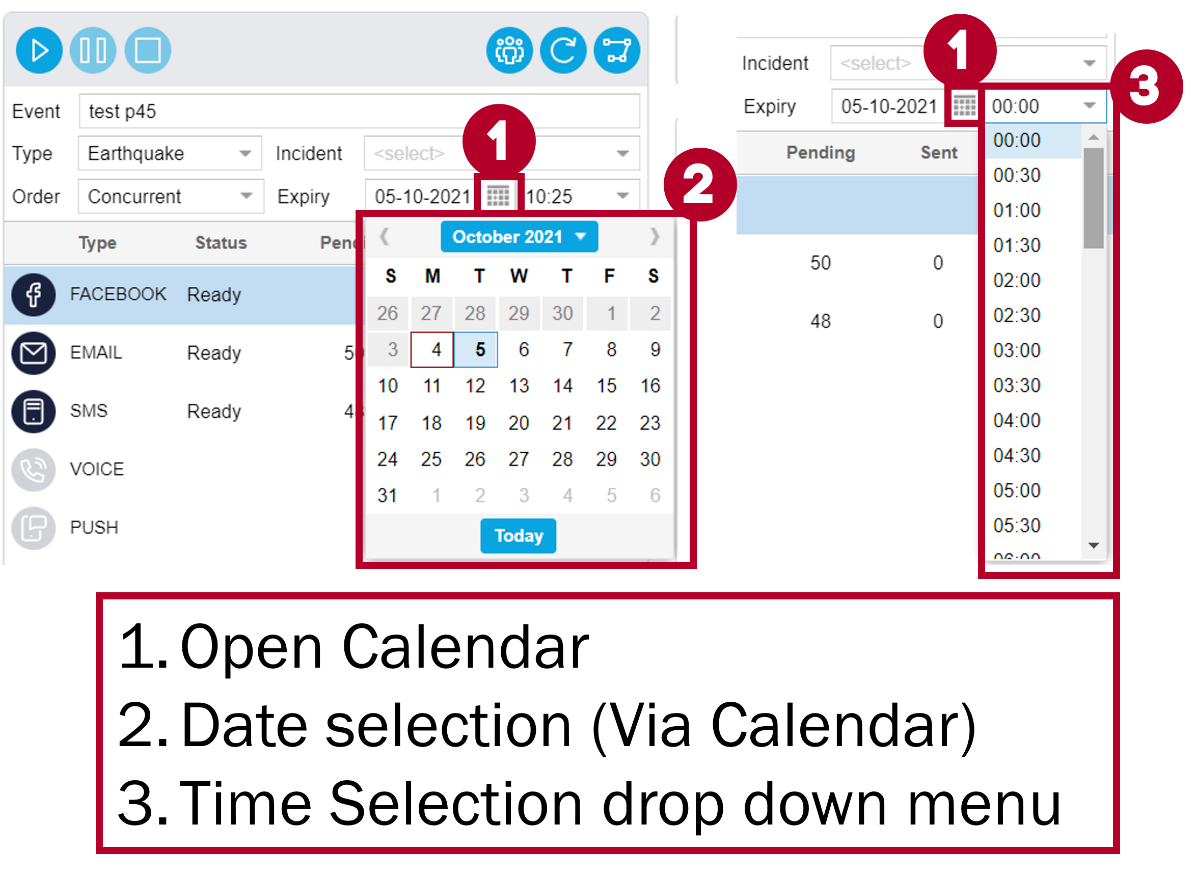
Alert Expiry date
Scheduling an Alert
By default, when an alert is created in the GEM system it is a single alert (i.e. an alert which was, not planned and is not based on a template, created for one time use). However, there may be situations where it is preferable for an alert to occur at a specific, planned date and time in the future. In this case, users can schedule a planned alert.
To schedule an alert, go to the row containing the desired alert and click the Clock icon, found in the Date column.
Once you click on the Clock icon, the Schedule Alert Details window will appear.
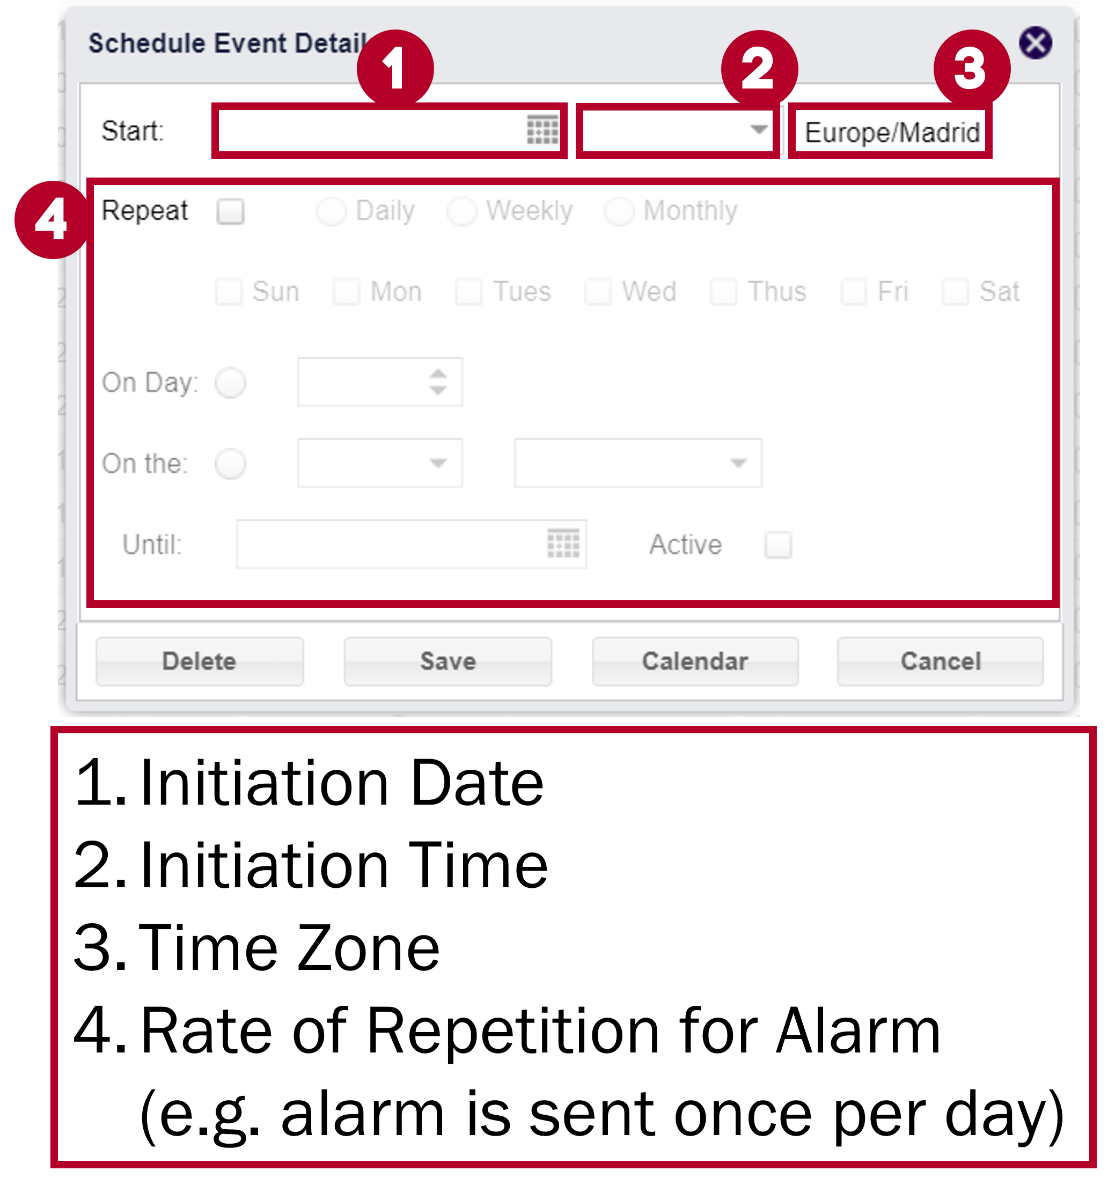
Schedule Alert Details Window
Fields: Schedule Alert Details Window
- Start: The date and time at which the alert will initiate.
- By clicking the calendar icon, you can select the date using a drop-down calendar.
- Location/Time Zone: Indicates the time zone that the selected date and time will correspond to for the scheduled alert.
- The example in figure above shows “Europe/Madrid”.
- Repeat: Select whether the alarm will repeat itself. If selected, the user will be prompted to select from the following repeat options.
- Daily: If selected the alert will repeat itself every day at the same time.
- Weekly: If selected the alert will repeat itself every week. The boxes underneath listing days of the week will become available for the user to select which days the alert should repeat itself on.
- Repeat Monthly: The alert will repeat itself every month. The “On Day:” and “On the:” fields will become available.
- On Day: Select the exact day of the month, by number, at which the alert will repeat. For example, selecting 24 means it will occur on the 24th of each month.
- On the: Instead of setting an exact date by number, select the day of the week and its monthly occurrence. For example, select “third” and “Saturday” if you seek for the alert to occur on the third Saturday, regardless of the numerical date.
- Until: Select the date at which the repetition will stop.
- By clicking the calendar icon, you can select the date using a drop-down calendar.
- Active: Select whether the repetition is active or not.
- Save: Select if you have filled out your alert details and are satisfied with the scheduling. This will implement the alert as planned.
- Cancel: Select to undo scheduling.
- Delete: Select to delete a schedule that was previously implemented for an alert.
- Calendar: Select to view your scheduled alert on a calendar.
Viewing Planned Alerts
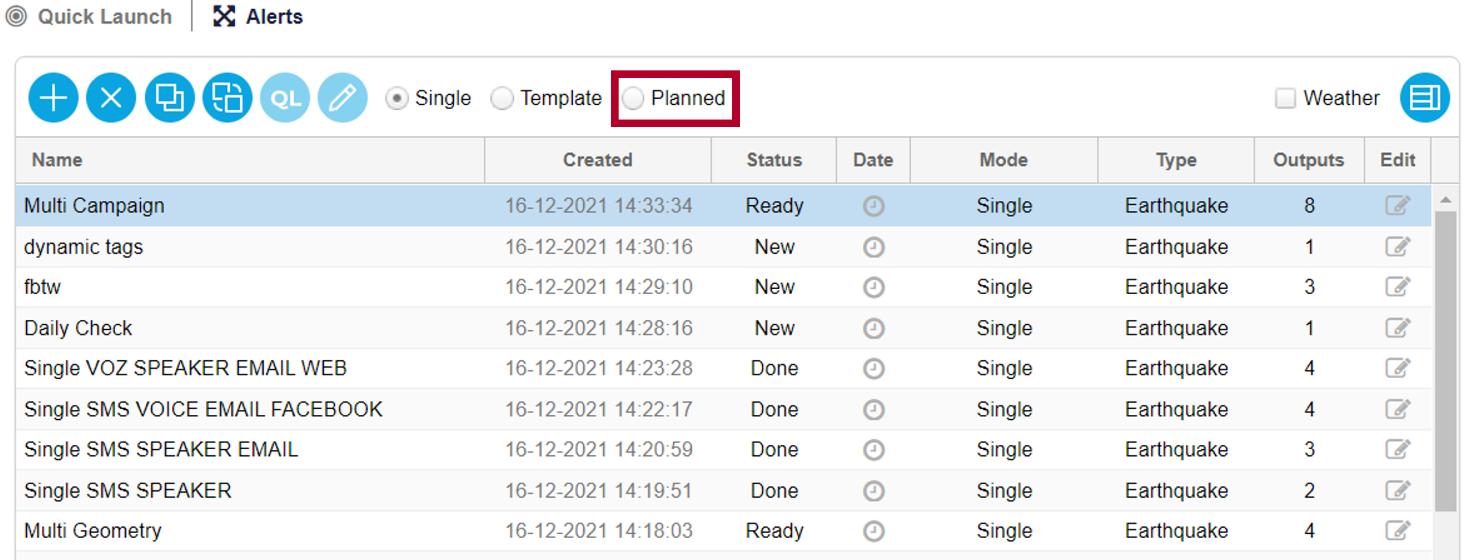
Once an alert is scheduled and saved, the alert will be classified and appear as a planned alert.
- View planned alerts by selecting the Planned filter, seen in figure below.
The planned alerts window contains the following additional columns, which do not appear in other alert modes:
Planned Alerts window.
Templates
Templates are partially constructed alerts through which communication campaigns can be launched. Templates allow future alerts to be launched more quickly and are useful when a region suffers from recurring disasters and emergencies.
- For example, areas prone to wildfire may benefit from having a template for wildfires so that there are less details to fill in.
To create a template, simply open the Add a New Alert window and select the Template option, as shown below.
Template Option in the Add a New Alert Window
Alternatively, you can clone an existing single or planned alert to use as a template. To do so, select the desired alert and then click the Clone Alert as Template button ( ) found to the right of the Add a New Alert and Delete Alert buttons. A template created through this process will contain all the information and channels as configured in the original alert.
A template cannot be launched as an alert since it is only meant to contain part of the necessary information required to launch an alert. To use a template, you must first convert it to a single alert or quick launch.
Create a Quick Launch or Single Alert from a Template
If a template is being used frequently for recurring emergency situations, a user may want to create a quick launch button that corresponds to that alert. This will make the alert appear in the Quick Launch page, to allow for fast access and execution.
To create a Quick Launch button, go to the Alerts tab and view the Template list. Then select the desired Template and click on the Add Quick Launch Button ( ), located above the table of alerts. You will find these in the quick launch tab discussed.
The following window will open:
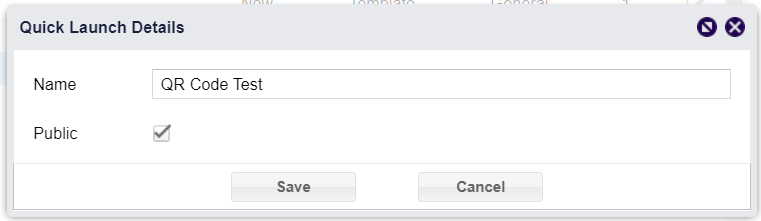
Quick Launch Details Window
In this window, specify a name for the quick launch button. If you want to be able to convert a Quick Launch into a URL/QR Code you must tick the Public box. Then select save and the new button will appear on the Quick Launch page. Alternatively, the user may also select cancel if they no longer wish to create a quick launch button.
To create a Single Alert from a template, click on the Clone Alert as Single button ( ) The button is found to the left of the “Clone Alert as Template” button.
Once you have cloned the template it will now be in the Single Alerts section. There it will function the same way as it would if it were a normal single alert except it will have all the information contained in the template; you will need to fill in any missing information in order to launch the alert.
Email Parser
Templates can also be used to launch alerts through your email. To do so you will need to get into contact with the engineering team Customersuccessteam@genasys.com to set up procedures. The first step is to create a template that includes channels and targets. Once this template has been created you must enable the "Id" filtering column. If you are not sure how to do this go to the Organizing and Filtering Alerts subsection.
Once you can see the template's Id you must copy it and send it to the engineering team. They will link this tempalte Id to a specific email address with a complex code so that it cannot be emailed by accident. Eg. 6PAmSzf1urC2pnCOQQP0KDdLf9QQPsw3V3GT9sIYTyQd1q1u4PT5fFRHpU8aGQsoZMZ3YcUWN1RZ8zo0MNDkVU5re38i0@genasys.me. You will also have to select what emails are allowed to trigger this template so that only emails sent from specific accounts can trigger alerts.
Once you have this email code and you have selected which email accounts are authorized to use it you can trigger the template by sending an email to the code you received from the engineering team.
When you send out alerts this way email components will be converted to alert format, meaning:
- Email Subject = Alert Title
- Email Body = Alert Message
- Email Attachments = Alert Attachments
Map
The map highlights the different, speakers, groups, areas, etc. that are connected to the GEM system. Administrators will be able to see all LRAD speakers, groups, and areas, as the map has a global scale. Regular Users will be limited to viewing only those elements for which they have jurisdiction.
You will be able to change the size of the map display by clicking on the map size button. Left to hide it, middle for smaller display, right for full screen.

Map size toggle
NOTE: Though the map is vital to the Alerts section, as it allows users to select targets and view the area of an alert, it is also accessible and relevant for other sections of GEM. The map will continue to be referenced at various points in this manual.
Default Map Screen
Using and Navigating the Map
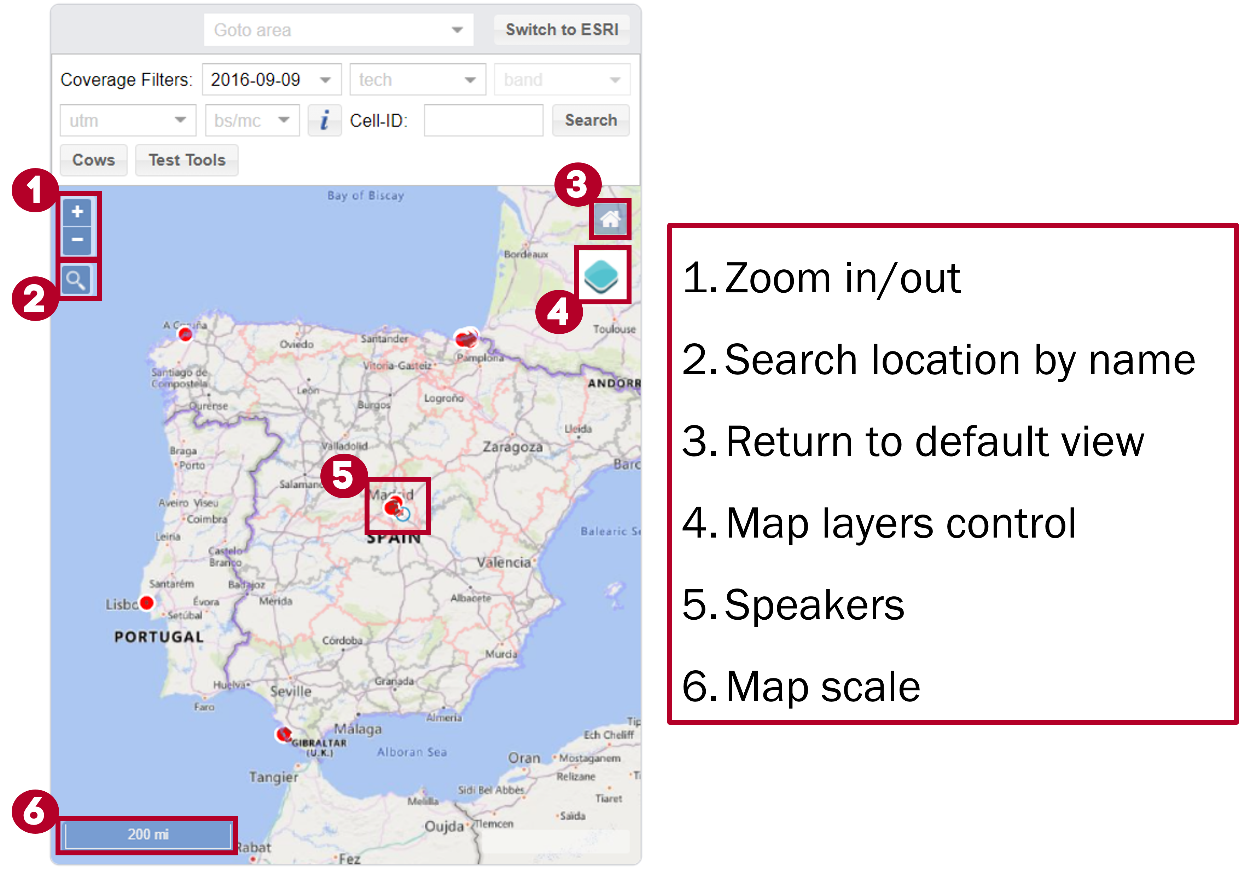
Change Location: Click and drag the map to navigate to different locations. Users can also search for a specific location by clicking the Magnifying Glass button (found in the map’s upper-left corner) and typing in the desired location’s name.
Zoom In/Out: Use the (+) and (-) buttons (found in the map’s upper-left corner) to control the amount of zoom on the map.
- The details of the map will change according to the zoom level.
When an alert is selected that is tied to the map, the map will automatically jump to alert’s location on the map.
OpenLayers
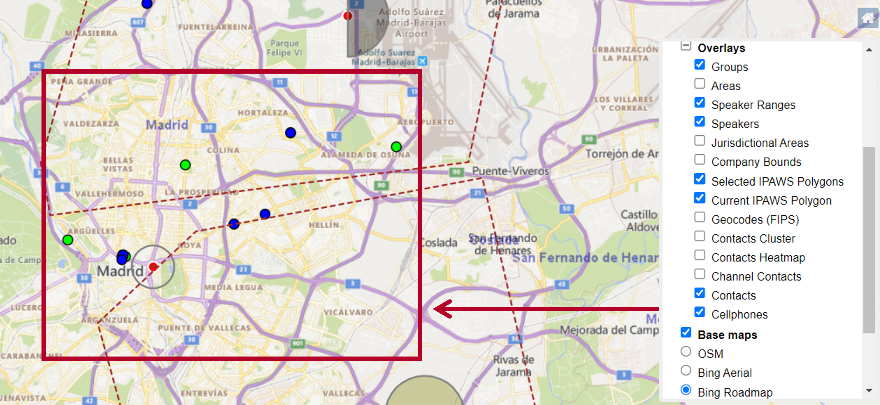
OpenLayers is the default map used in GEM. In addition to the tools previously listed, OpenLayers has a Map Layers Control tool ( ) in the upper-right corner that allows the user to toggle the layers that are displayed and hidden on the map. Simply hover over this button to bring out the Layer Options menu and tick or untick the different options as appropriate. The Layer Options menu is displayed in the figure below.

Layer Options Menu
The Contacts layer displays multiple contacts while the Phones layer displays phones’ locations that have the Genasys User App installed as blue circles.
| The positions of the phones are displayed as green points while the Contact locations are blue. |
Map layer
A number of values are now saved in browser storage between page reloads, including the background map and the on/off status of the Contacts and Phone layers.
In addition, the Speaker tree expand/contract status is also saved. This has been implemented so that small speaker installations can see the complete speaker set without having to select first the area/group nodes.
ESRI
ESRI is an alternate to the default map, OpenLayers. ESRI allows users and administrators to view specific custom layers that are only accessible through an ESRI map (as opposed to an OpenLayers map). To access the ESRI map, click on the top right button which says, “Switch to ESRI” ( ).
).
In the figure below you can see examples of custom layers being displayed. These colored icons cannot be seen in OpenLayers and may be necessary for specific customers.
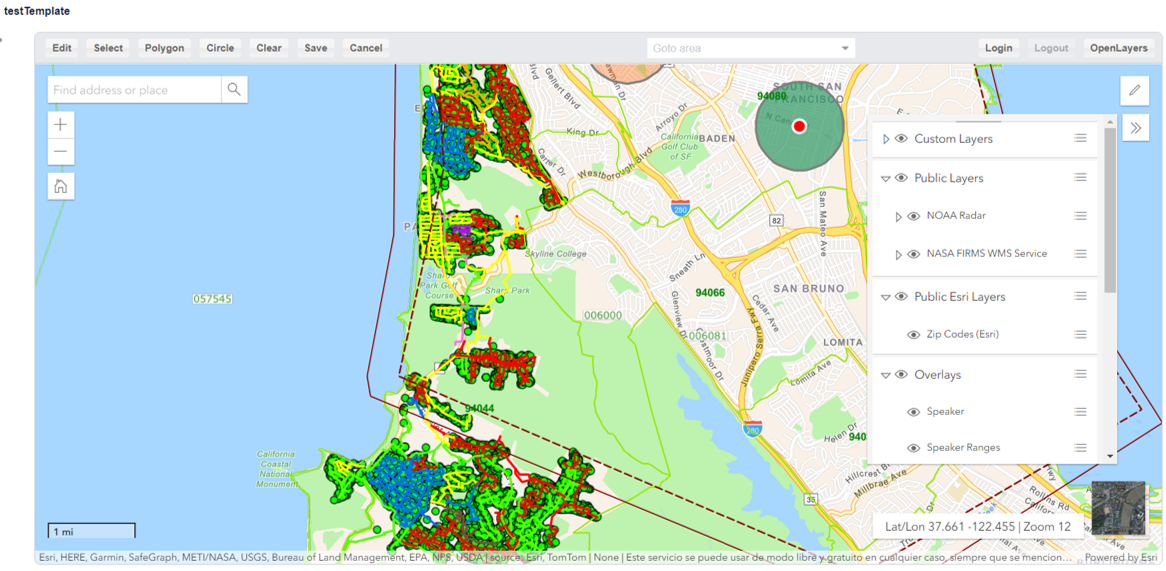
ESRI Map Showing Custom Layers
In the ESRI map you will see new tools that are available.
One tool is the Edit tool, which is represented with a pencil ( ) in the upper-right of the map. This allows users to add and edit features.
The tool below that is ESRI’s version of the Map Layers Control tool and it has the same function as the equivalent tool found in the OpenLayers map.
Next to each Map layer you will see the key tool ( ). Clicking this tool opens up a key to the various different symbols appearing on the map, which are based on each layer.
ESRI Map Key
Voicemail and Retries
This section describes the voicemail and voice-call retry functionality.
Voicemail
When a voice-call message is sent, contacts receive a call from a predefined number. If a user calls that number, the message of the most recently executed voice-mail alert that included that contact will be played.
If the user has no current message, a preconfigured message will be played, such as:
“We are sorry, you have no messages.”
If an error occurs during the process, the following message will be heard:
“We are sorry, an error has occurred.”
These messages are configurable.
Retries
This functionality retries sending voice calls that have not been answered. When a contact answers the call, the status is set to Received.
Voice call status
The following statuses will cause the system to retry:
Busy: user rejects the call or the line is busy.
No-answer: user does not pick up the phone.
Failed: phone off or out of coverage.
Cancelled: call cancelled.
These statuses will be displayed in the GUI as an Error.
Voice call status “failed”
The number of retries is configurable per client. The current default is 2. The time interval between retries is also configurable by client with the current default value being 3 minutes.