Admin
This section contains pages and tools that are only accessible to GEM administrators.
Through this section administrators can manage system users, customize contact information fields, add new custom map layering, create includelists and excludelists and more. It contains functions which are not directly relevant to the regular user which is more concerned with creating communication campaigns or gathering information on past alerts etc.
Custom Fields Page
Description
This section describes the custom fields functionality of GEM. These fields make it possible to customize the data of contacts, adding specific fields per company.
Managing custom fields
Custom field management can be done from the “Custom fields” tab, inside the “Admin” section. In this section, custom fields can be created, edited or deleted.
Creating custom fields
To create a custom field, click on the  button at the top of the custom fields grid. A window will pop up showing the new custom field details:
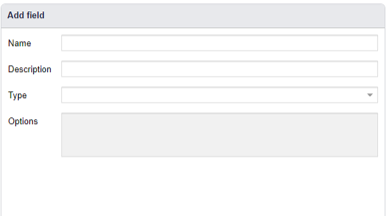
Add field table
Each custom field has three attributes:
Name: The name of the field. This name will be displayed on the contact details section.
Description: The description of the field, optional.
Type: The type of field. At the time of writing this document, only two types exist: text field and Single-select list.
If type is “Single-select list”, we will have to fill in the possible options in the list:

Type: Single-select list, Options: fill in by hand
You can edit existing custom fields through the edit ( ) button.
Viewing custom fields
To view the content of a contact’s custom fields, go to the contacts grid, located under the “Contacts” tab:
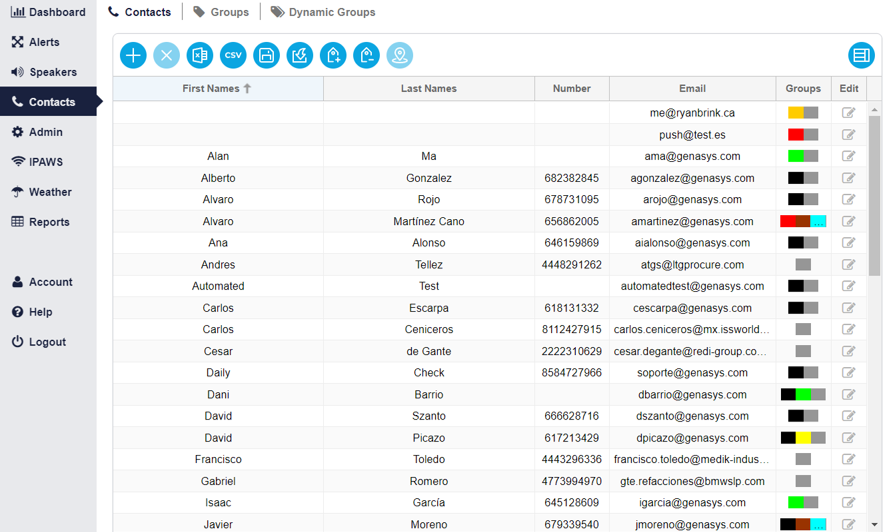
Contacts Tab – View custom fields
Then click on the edit button  on a contact to see the contact details:

Contact details
The custom fields will be displayed at the bottom of the “Custom Fields” tab. In the screenshot above there are custom fields: “Rank”, “Group”, “Departament”, “Position”, “Goal Scored”, “class” and “Test single” (the same three fields defined in the custom fields grid). While Rank”, “Group”, “Departament”, “Position”, “Goal Scored” and “class” are a textfield, “Test single” is Single-select list .
Administrators Page
This page is exclusive to Administrators. Here you can see all users registered in the system. You can also add, edit, and delete users.
Table of Users
In the Administrators page, you will see a large table listing all the users. This table organizes and displays user information in columns, as seen below.

Column Headings: Table of Users
Column Headings: Table of Users
First and Last Name: User’s full name.
Email: User’s email address.
Profile: User’s access level.
This can either be ‘user’ or ‘admin’.
Active: Tells if the user is still active and operational in GEM.
True: Active (the user is able to log into GEM)
False: Not active (the user is unable to log into GEM)
Edit: Tool that allows an admin to edit the selected user.
These columns can be further sorted and filtered by opening the drop-down menus found to the right side of each column heading.
Press the Export XLS button (![]() ), found above the Table of Users, to download a spreadsheet of the table.
), found above the Table of Users, to download a spreadsheet of the table.
Area/Group and Assigned Windows
Underneath the Table of Users, you will see two windows showing area and group assignment.
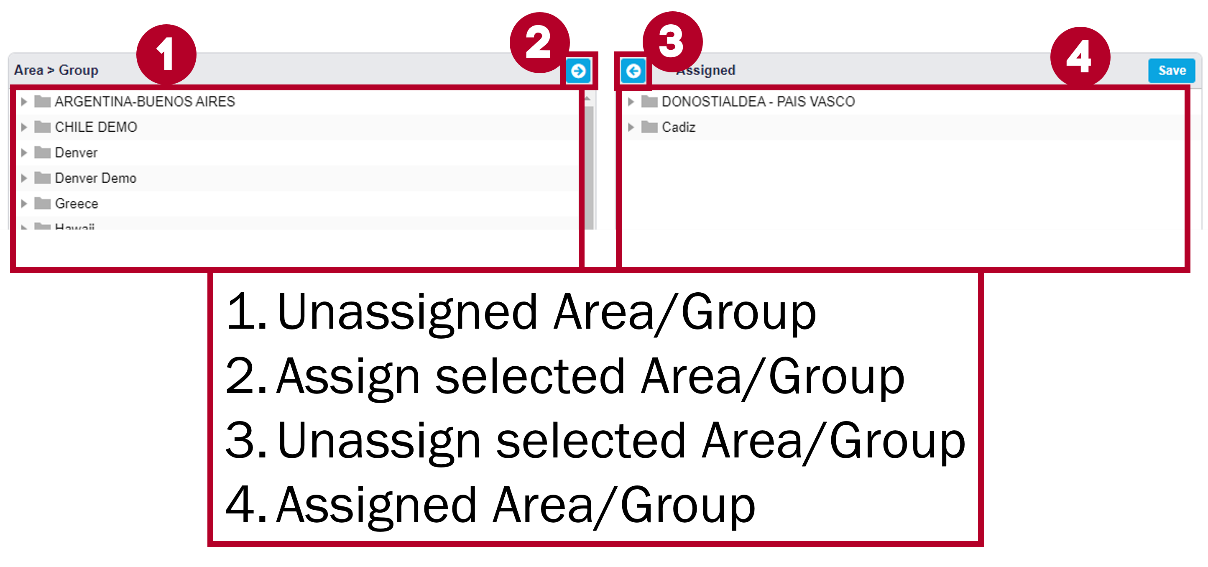
Area/Group and Assigned Windows.
These windows are tied directly to the Table of Users and will display the area(s) and group(s) assigned to the user selected in the table. Note that these tables will only appear for users who have the ‘User’ role, since users with ‘Admin’ role have full jurisdiction and functions available, meaning ‘Admin’ users do not need to have any areas assigned to them.
- For example, the user in the figure above is assigned to Donostialdea – Pais Vasco and Cadiz.
The areas and groups assigned to a user will determine which areas a user will have access to when using the application. This means, that the user in the figure above can only see and activate alerts in Donostialdea – Pais Vasco and Cadiz. If they drew an area that extended beyond their jurisdiction an error message would appear.
The groups and areas can be changed using the arrows found in the headings of each window. If you would like to assign an area or group to a user, select the desired area or group in the Area/Group window and press the arrow pointing to the right. This will move the selection into the Assigned window.
- Alternatively, if you would like to remove an assigned area or group, select the desired area or group in the Assigned window and press the arrowing pointing left.
- When you have finished, press the Save button in the upper right corner to confirm all changes.
These windows are only applicable for users with the ‘users’ role, as they only are allowed certain access.
- When an ‘admin’ is selected the windows will not be available because by default admins have access to all groups and areas.
Adding/Editing Users
To add a user, select the add user button (![]() ), found above the Table of Users.
), found above the Table of Users.
To edit a user, select the edit user button (![]() ), found to the right of the users row.
), found to the right of the users row.
After selecting either of these buttons, the User Details Window will appear.
NOTE: When adding a user the fields will be blank, but when editing a user the fields will be partially or completely filled in.
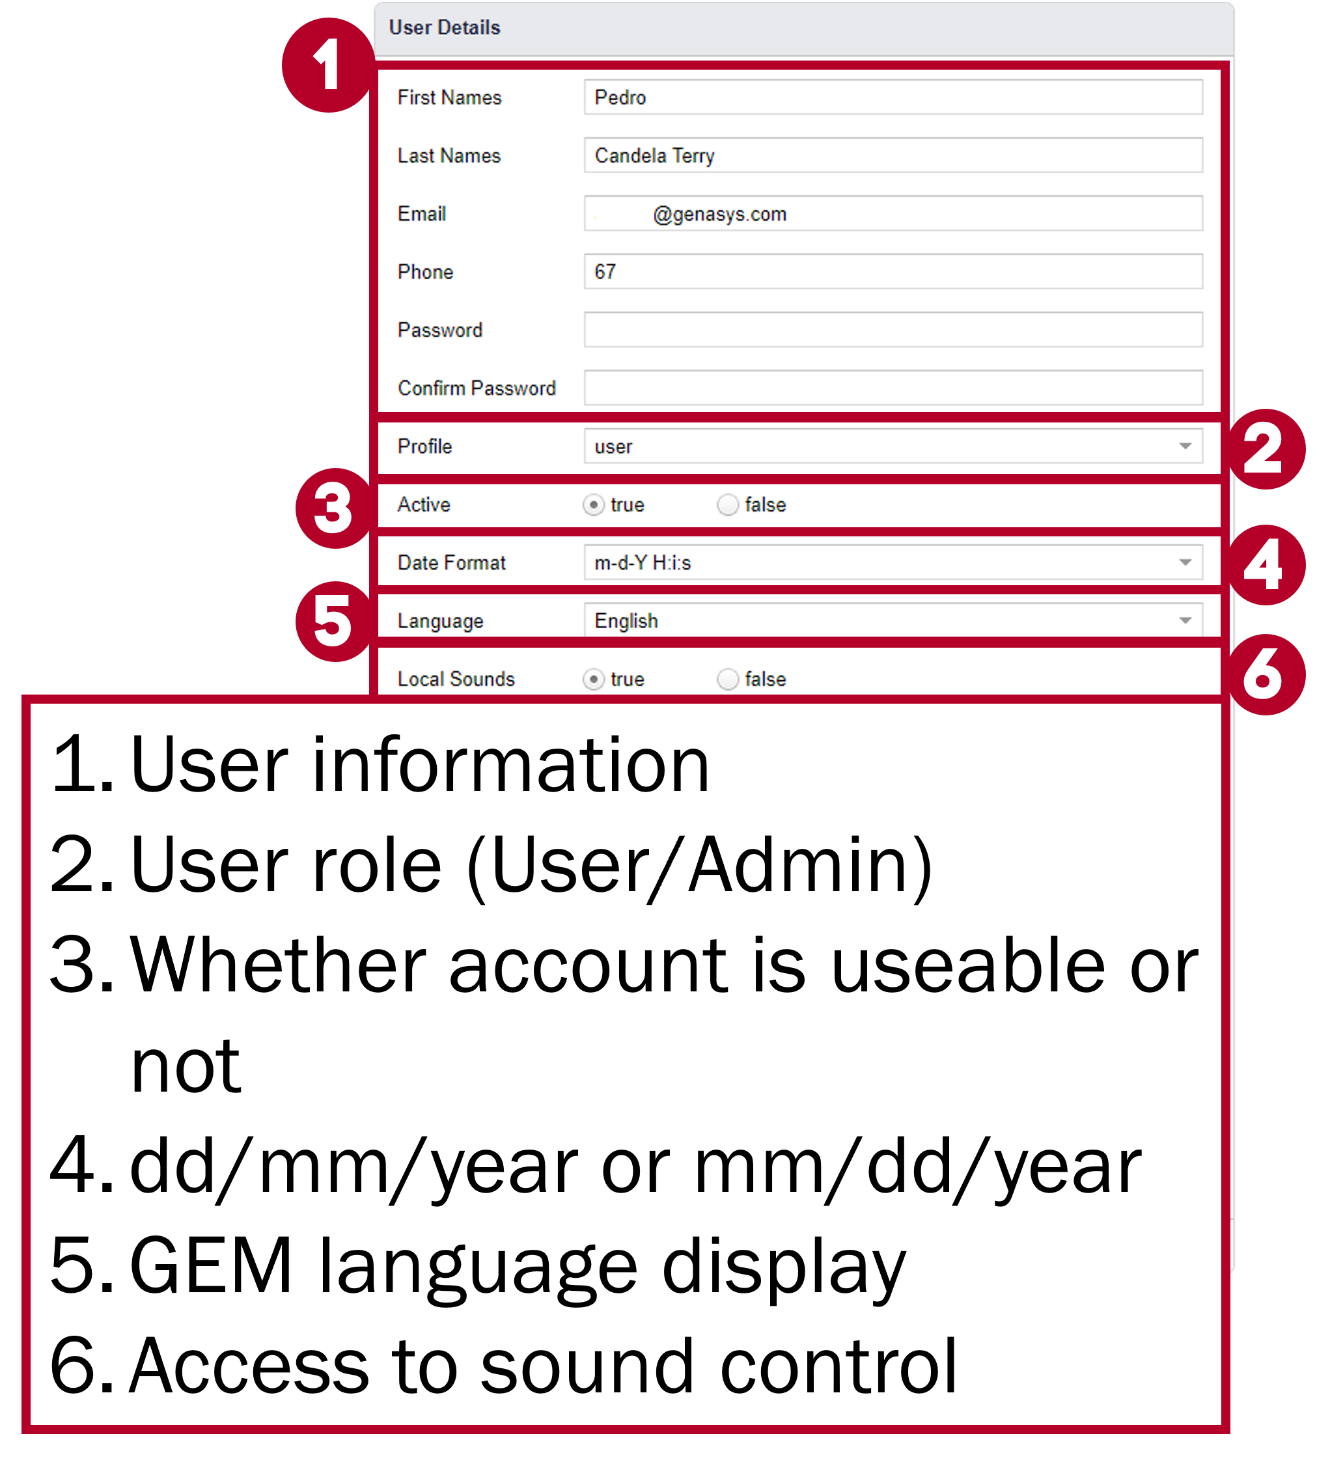
User Details Window
Fields: User Details Window
NOTE: Fields marked with * are mandatory.
- First Names*: User’s first name.
- Last Names: User’s last name
Email*: User’s email. Will be used along with their password to access GEM.
Phone: User’s phone number.
Password*: User’s password. Will be used along with their email to access GEM.
Confirm Password*: Field to reenter the password to ensure that no mistakes were made when creating the password.
Role*: User’s role. Select either admin or user.
This determines the user’s access level.
Active: User’s status in the system. Select either true or false.
Date Format: User’s date format. Select whether the user will see dates in American or global date notation.
Language: User’s language. Select whether the user will see the application in English, Spanish, or French.
Load Sounds: User’s access to saving sounds locally.
True: User can access sounds.
False: User cannot access sounds.
Once you have filled out all fields in the User Details Window, press ‘Save’ to store the new/edited user in GEM. You can also press ‘Cancel’ at any time to undo the changes to the user.
User Maps Page
On this page, users can view and manage external maps, layers, and other information. This capability allows users that require certain information in their maps to import the desired information into the application, even if it was not originally implemented.
Available maps are listed in a table on the left side of this page. These maps can be augmented based on a user’s needs. For example, a customer may have access to a more detailed map of a certain area which will include layers with information that is relevant to them such as electricity lines, pipelines, phone lines etc.
Maps are sorted into the following columns:
|
•ID |
•Name |
•Type |
|
•Geometry Type |
•Active |
|
User Maps Page
Custom layers can be added to assist with emergency area definition and highlight other relevant locations and points.
The application uses the OpenLayers map format by default, but different users may require different types of maps.
- For example, ESRI maps show certain information not visible in OpenLayers.
- Visible/accessible layers will depend on the map being used.
NOTE: See Section 5.3 for more information on maps.
Editing Map Layers
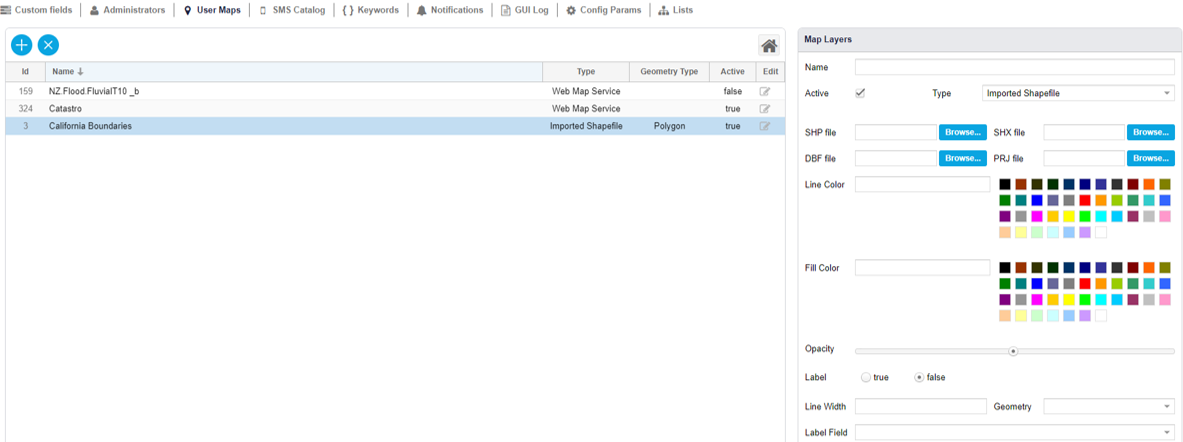
To edit a map layer, first select the map layer you would like to modify from the table. This will activate the Map Layers window, found at the bottom of the page. Use this window to modify map layers.
Map Layers Window
Fields: Map Layers Window
Name: Map layer’s name.
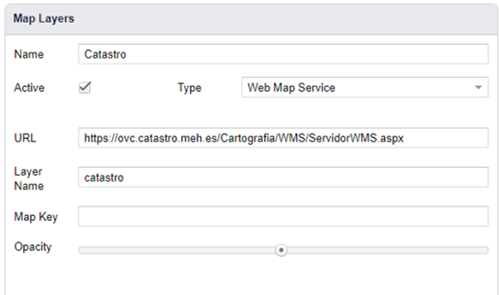
Type: The format type that will be used for the map layer. There are three options.
Web Map Service
Imported Shapefile
ESRI Layer
Active: Map layers will only function if they are active.
URL: The web address for the map layer.
Layer Name: The name/parameter for the system’s petition to obtain the map.
Map Key: The parameter to obtain the map.
Opacity: The level of transparency the layer has on the map. If it is all the way to the left it will not be visible, if it is all the way to the right it will be opaque.
If you are editing an existing map layer, press the Update button to save and update the existing map layer.
If you are adding a new map layer from scratch, press Save As New. You can also press this button if you want to edit an existing map layer but you want to save it as a new layer, this way you could have more than one version of a map layer or you could use an existing map layer as a base from which you create a different layer instead of starting from scratch.
If you are deleting a map layer, press Delete.
If you are clearing all fields in the window, press Clear.
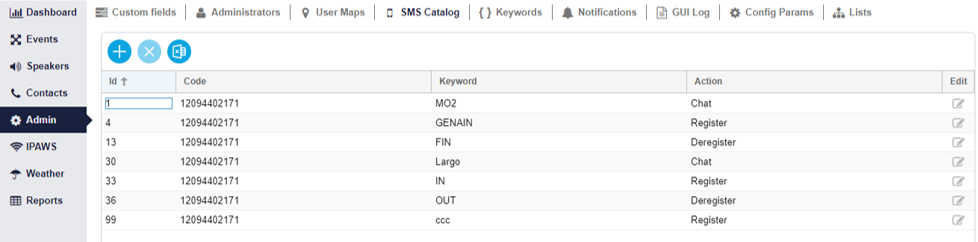
SMS Catalog Page
On this page users can learn about and configure reply options and keywords for SMS messages. These are used through the reply options function found when launching alerts.
The use of replies and keywords allows for interaction between targets and GEM.
- Reply Options: A specific type of message that requires a response from the target.
- Reply Options Keyword: A response from a target that triggers an action in GEM.
Users can create reply messages with their targets, or targets can open a chat through the application.
For SMS interaction with a target, first the system must send a reply message and then the receiver must respond with a keyword that triggers the desired action.
SMS Catalog in use
There is a default catalog of keywords that are common to all companies using GEM. Some of these keywords require the company’s initials as parameter after the first word in the message. For a successful response, the target must respond with both the keyword and the company’s initials.
- The first word defines the action, the second word defines the company.
- The Company’s initials must be configured into the system for this to work.
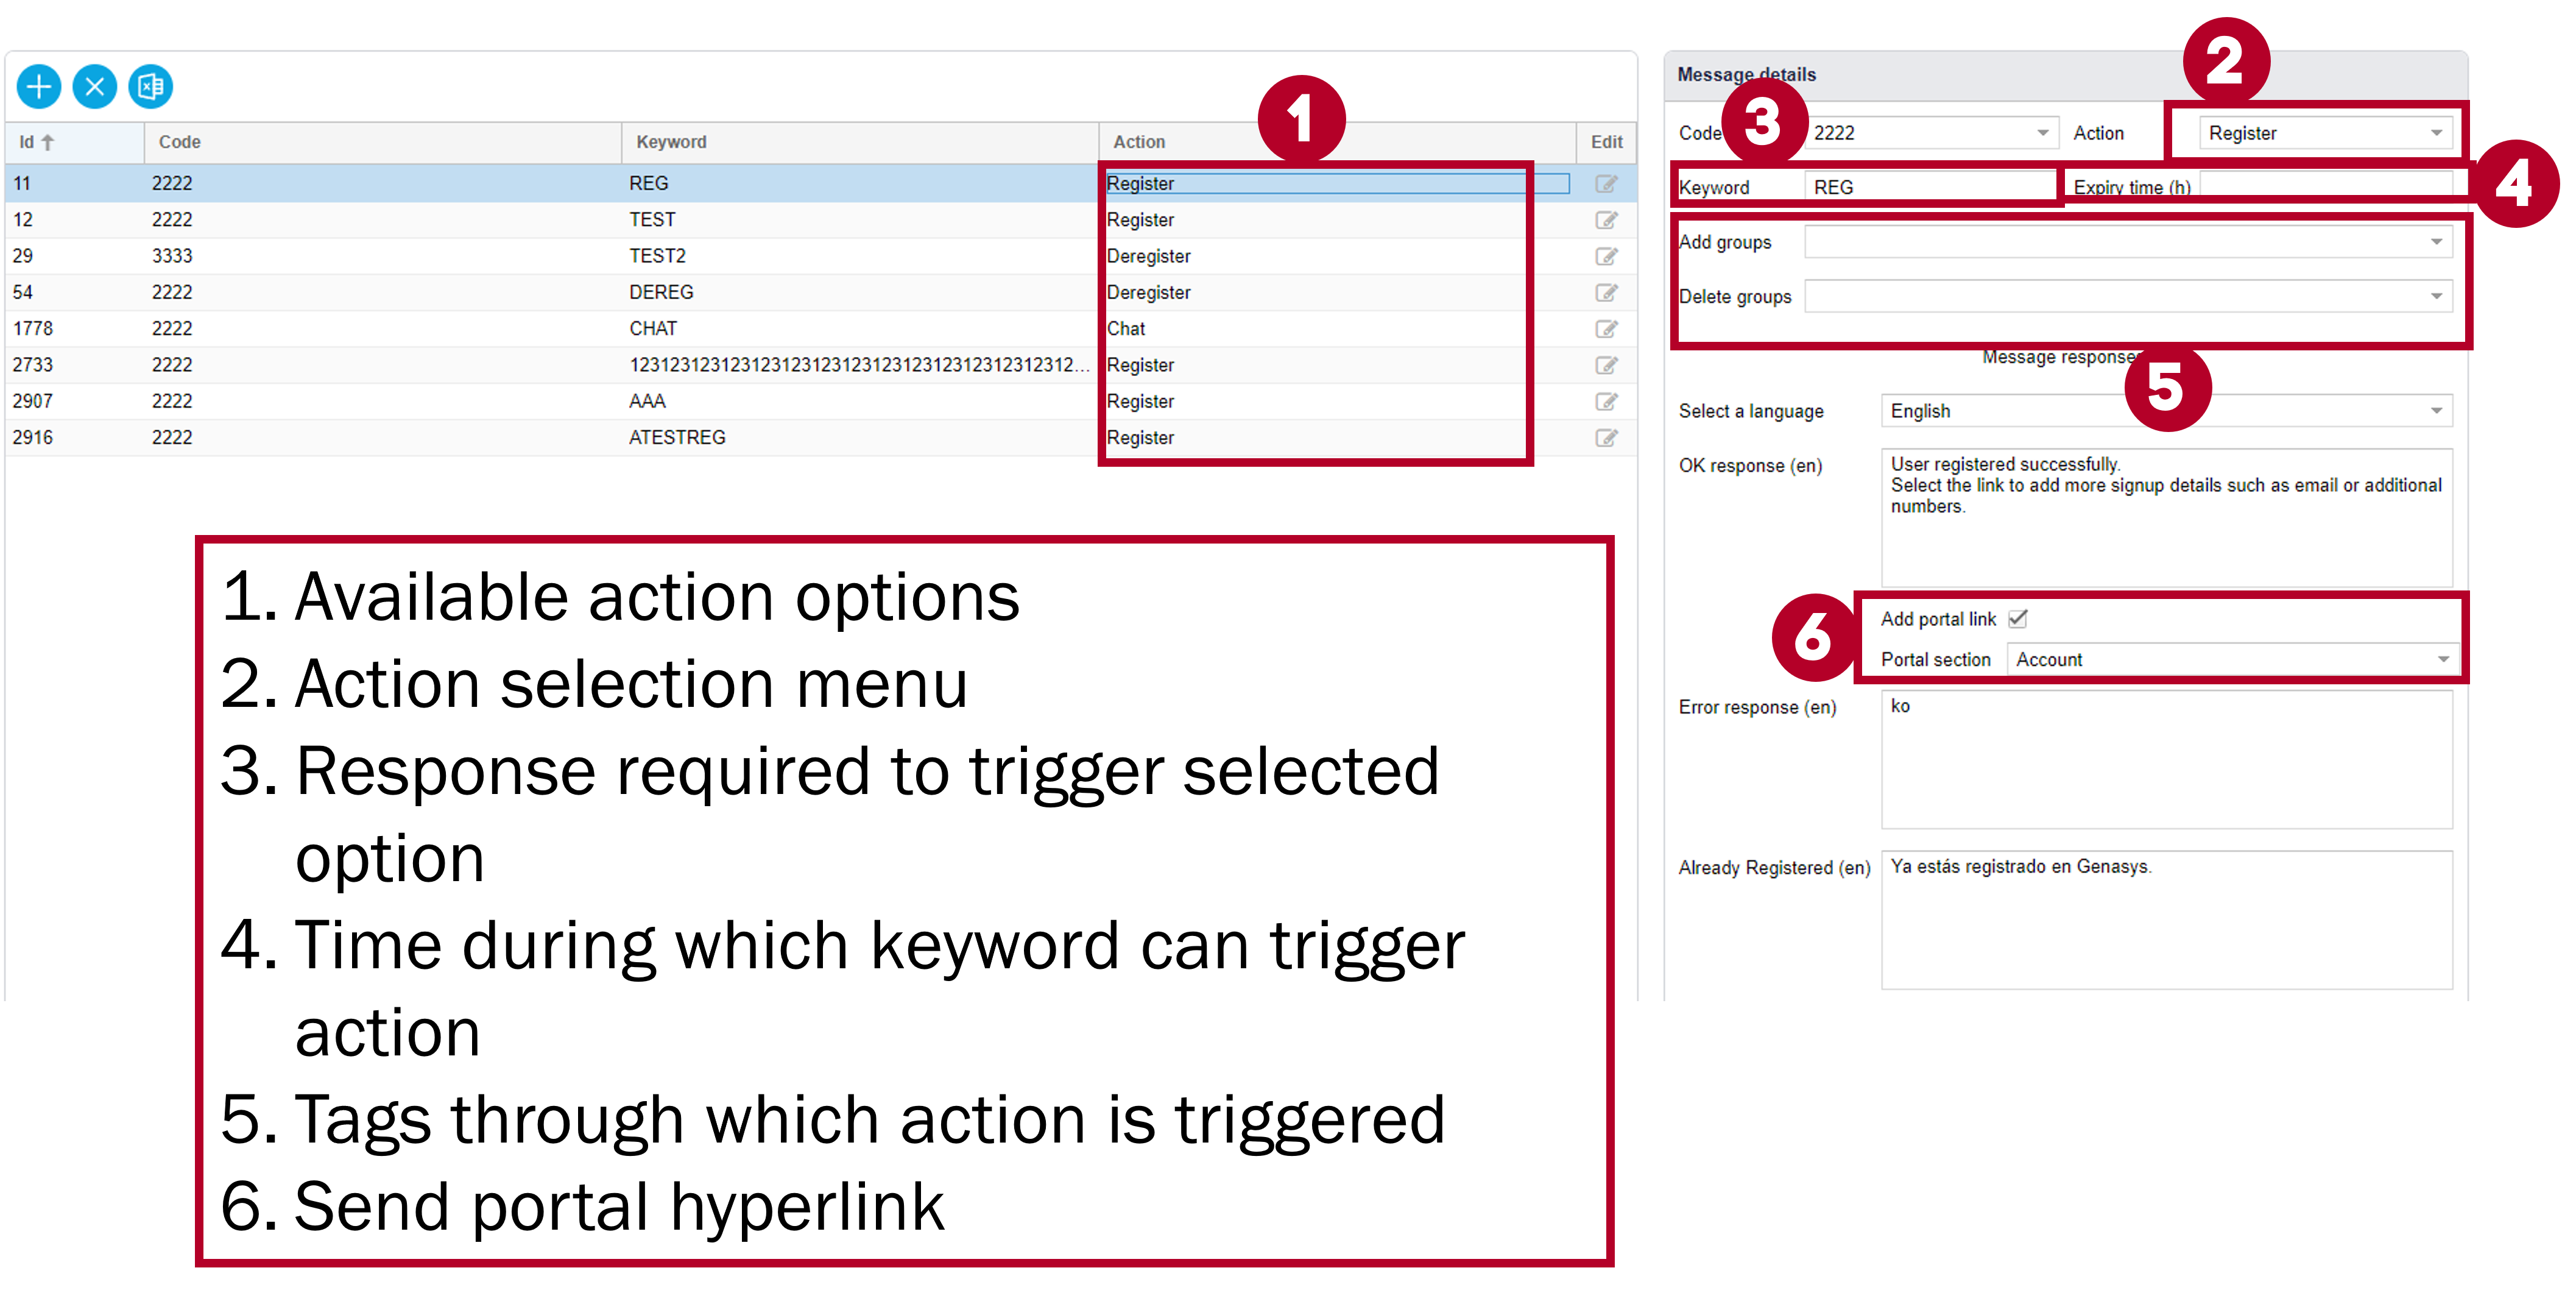
OK response is the follow up SMS that targets will receive if they send back the correct keyword. Error response is sent out if an error occurs during the process such as if the keyword is misspelled. You can also send a hyperlink to targets by clicking the 'Add portal link' tickbox.
Default Keywords
- REGISTER + “Company initials”: Registers the user in the system as part of the company defined by the initials in the message.
- HELP: Returns the list of initials where that phone number is registered.
- HELP + “Company initials”: Returns the SMS catalog list for that company.
- STOP + “Company initials”: Unregisters that phone number from that company.
Register User Via SMS
This option is aimed at targets that may receive alerts during a limited period, after which they are automatically removed from the system.
GEM has three types of SMS commands: Register, Deregister and Chat. Currently the expire time only applies to the Register command. An example use of this would be to opt-into a group.
When the user creates or modifies an SMS Register command, the validity duration can optionally be set and will be applied to all contacts that are registered with this command.
SMS Catalog
When the contact is registered, the expiration date is calculated and inserted as an attribute. Every 60 seconds the system deletes expired targets. If the contact has already been included as a Target, it will remain until the targets are re-calculated or the alert is executed.
Adding and Editing Messages with Keywords
To add a reply option, select the Add Message button (![]() ), found at the top left of the page.
), found at the top left of the page.
To edit an existing message, double click the row containing the desired reply message.
NOTE: If you are adding a message, a blank window entitled ‘Add Message’ will appear. If you are editing an existing message, a completed window entitled ‘Message Details’ will appear.
- Both windows will contain the same fields despite the different names. These windows are shown in the figure below.
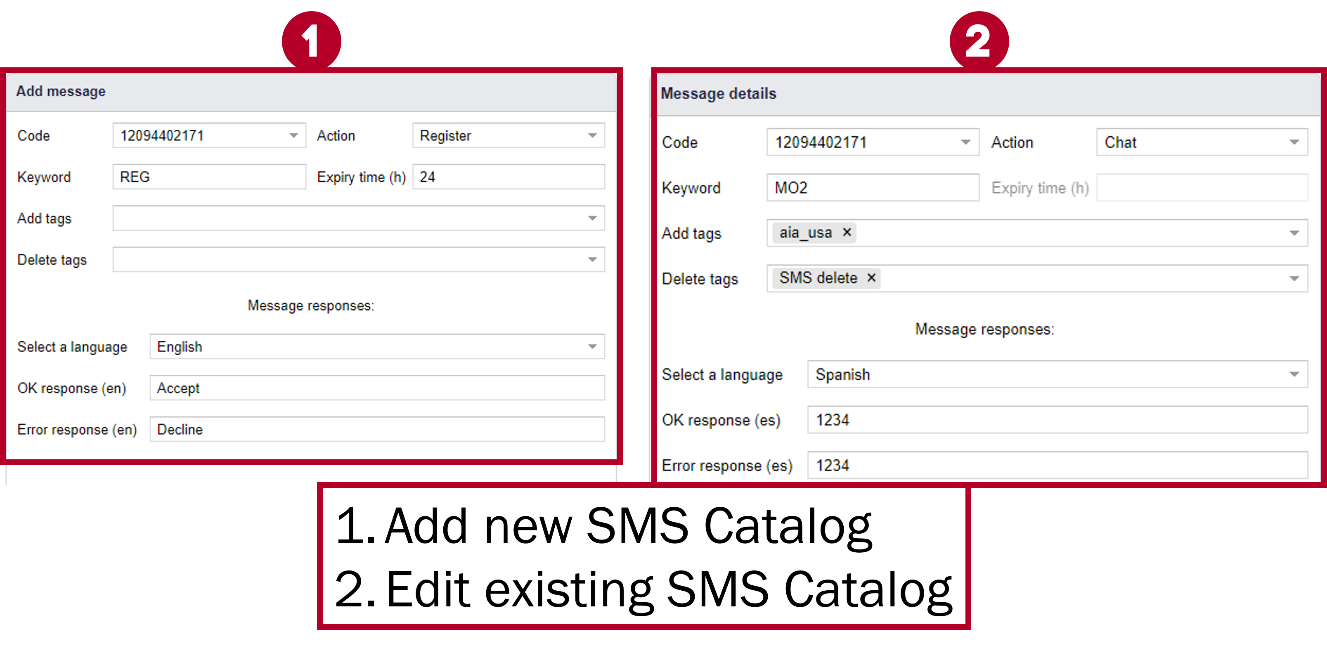
Add Message Window (left) - Message Details Window (right)
Fields
- Code: The SMS short code number.
- Action: The process the SMS catalog carries out when triggered by the keyword.
Keyword: The keyword in the SMS message that must be included in the target’s response to trigger the action.
Select Language: SMS catalog’s language.
OK response: Response sent to the application if the action is successful.
Error response: Response sent to the application if the action fails.
Keywords
In this tab you will be able to add, delete and edit potential keywords which are used for Quick Launches. These keywords are separate to those used for reply options and SMS Catalog. In this case keywords are parts of a Quick Launch which are left fillable to make them more adaptable. For example, a Keyword could be “City Center” and within this keyword we would make a list of the various streets that are found within the city center.
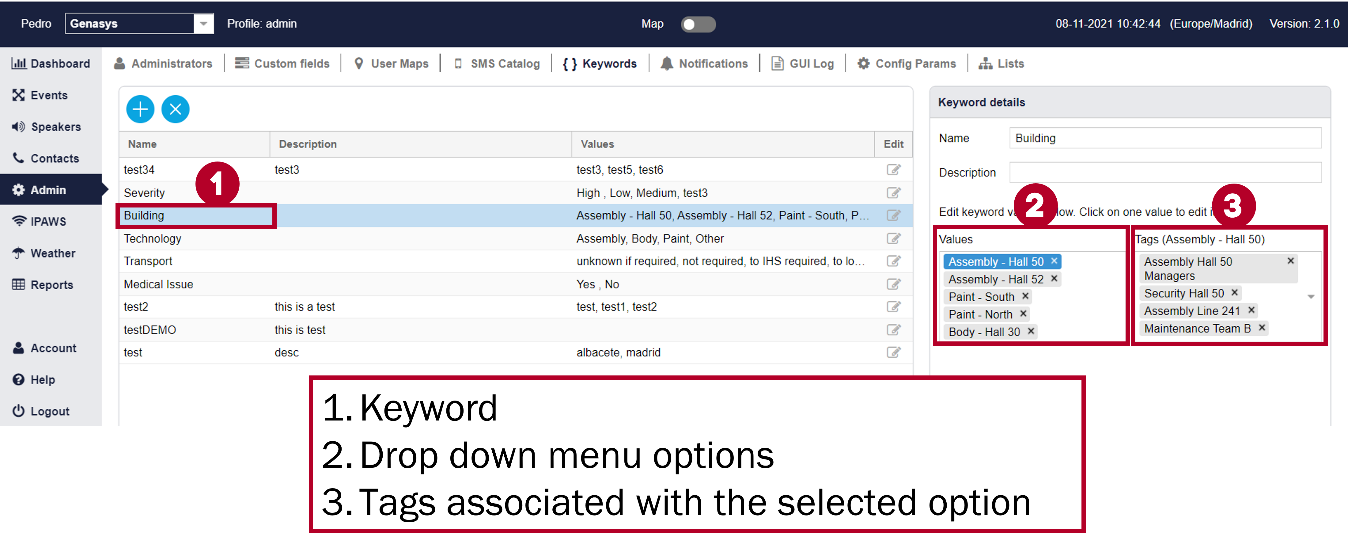
Keywords editing window
If a template contains an existing keyword before being converted into a quick launch you will be able to select what word appears in the keywords place from drop down menus. For example, {Building}, lets you choose from the options – “Assembly – Hall 50”, “Assembly – Hall 52”, “Paint – South”, etc. As mentioned in the Quick Launch section, each of these options can have specific groups associated with them. As can be seen above, Assembly – Hall 50 has several groups associated (Assembly Hall 50 Managers, Security Hall 50, Assembly Line 241, Maintenance Team B). This means that everyone that is part of these groups will be alerted if a quick launch uses the {Building} keyword and selects the “Assembly - Hall 50” option from the drop down menu.

Keywords selection table
In the figure above you can also see the special keywords {Today’s Date} and {Current Time} which will change based on when the quick launch is used.
Notifications Page
The notifications page allows users to notify campaign managers, targets, and admins when communication campaigns change of status.
- For example, a user may configure a notification so that a specific admin is notified when a certain campaign is executed.
The Notifications page contains a table that lists all the different notifications that are tied to campaign statuses, as well as important details on each notification.
1.png)
Notifications Page
Aside from writing a message that selected phone numbers/emails will receive it is possible to introduce commands that will give information on the campaign. These commands must be written between two angled brackets (i.e. <>) and are as follows:
- <ALERTID> Alert identification number.
- <CAMPAIGNID> Sends the campaign identification number. (A campaign is the alert details for a specific alert. So one alert will have multiple campaigns if it uses multiple communication channels.)
- <CAMPAIGNTYPE> Sends campaign type (single, planned, template).
- <STARTTIME> Sends the time at which the campaign started or is scheduled to start.
- <SENDER> User information for the person who sent the alert.
- <TARGETSOFTOTAL> Number of targets.
- <TITLE> Alert title.
- <MESSAGE> Sends the contents that the alert's contacts will receive.
- <ATTACHEDIMAGES> Adds any attached images to the email.
- <SOUNDFILE> Adds any sound files to the email.
- <STATUS> Sends the campaigns current status at the time that the notification is sent.
- <CAMPAIGNSIZE> The length of the text message sent through the alert.
- <EXPIRYTIME> Alert expiry time. (Expiry time is the time at which the campaign will cease to send alerts to people.)
- <VALIDITY PERIOD> Duration from start to expiry time.
The options listed below are only available for alert status = Done:
- <TARGETSSENT> Targets with status = Received.
- <TARGETSFAILED> Targets with status = Failed.
- <DURATION> Time from alert launch to status = Done.
Users can download a spreadsheet of the table in the Notifications page by pressing the Export XLS button ( ).
).
Modifying notifications
Notifications can be modified so that they are sent only to specific users.
To modify a notification, double click the row containing the desired notification and campaign status. This will prompt a window entitled Modify Notification to appear on your screen.
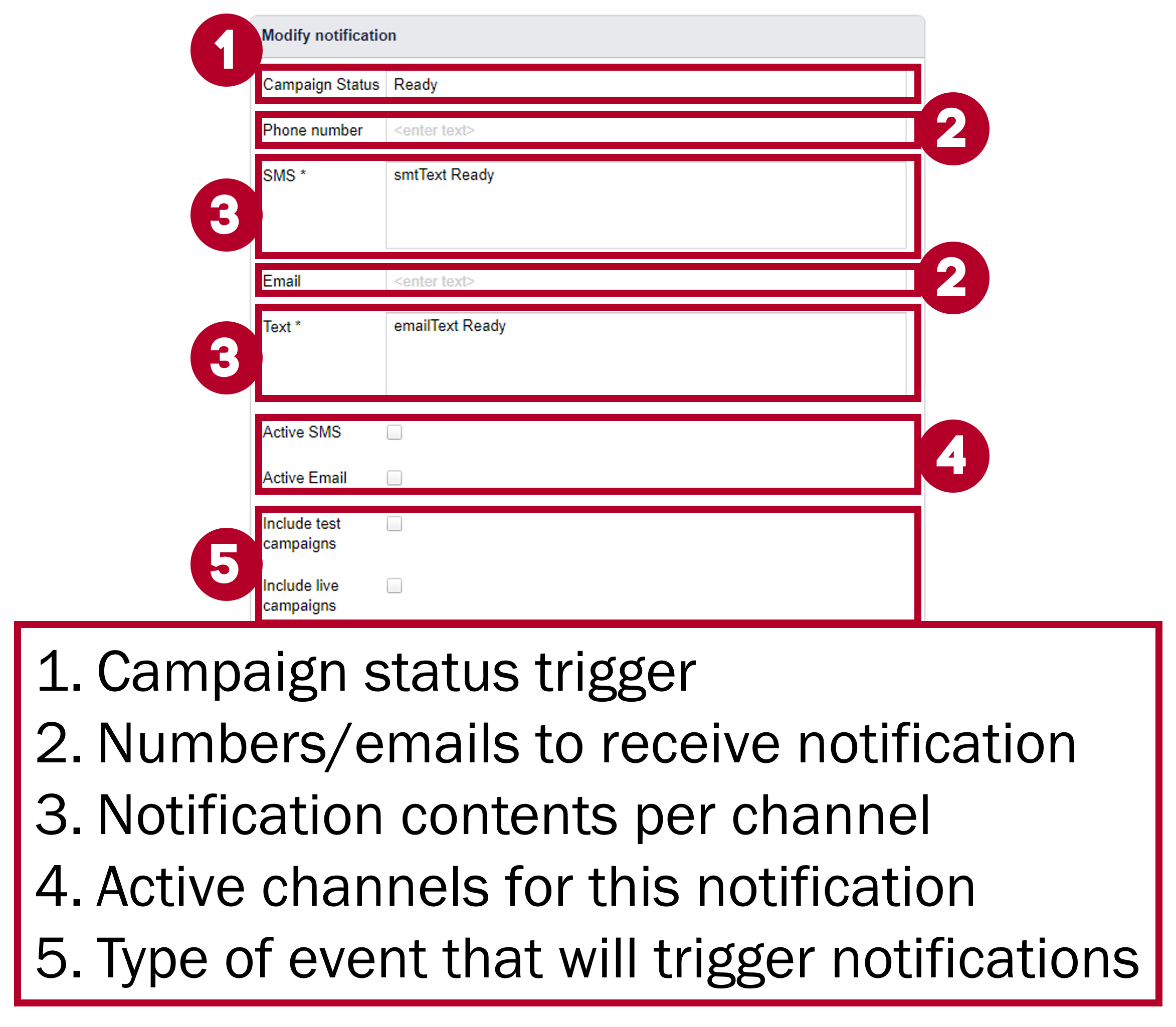
Modify Notification Window
Fields: Modify Notification Window
NOTE: Fields marked with * are mandatory.
Campaign status: The campaign’s state. One of the 11 available campaigns.
Phone Number: Phone number of the user receiving the notification.
SMS*: The SMS message that will be received by the user.
Email: Email address of the user receiving the notification.
Text*: The text that will appear in the email that will be received by the user.
Active SMS: Select whether an SMS will be sent.
Active Email: Select whether an email will be sent.
Include Test Campaigns: Whether application tests will be included in administrator updates
GUI (Graphic User Interface) Log Page
This page contains a record of all interactions that occur between users and the application.
These interactions are listed in a table that encompasses the entirety of the GUI Log page.
Interactions can be filtered and sorted using the drop-down menus found at the head of each column.
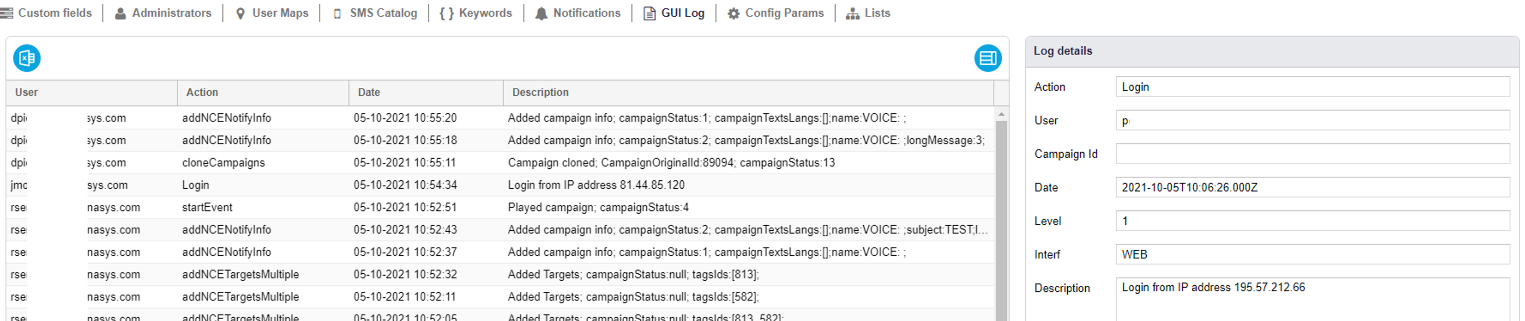
GUI Log Page
Users can download a spreadsheet of the table in the GUI Log page by pressing the Export XLS button (![]() ).
).
Config Params
This section allows users to modify and change the way the system works through embedded code. Such as adding a text message in html format to the portal from the Admin interface. The message appears when a user accesses the portal. If no message is defined the panel does not appear.
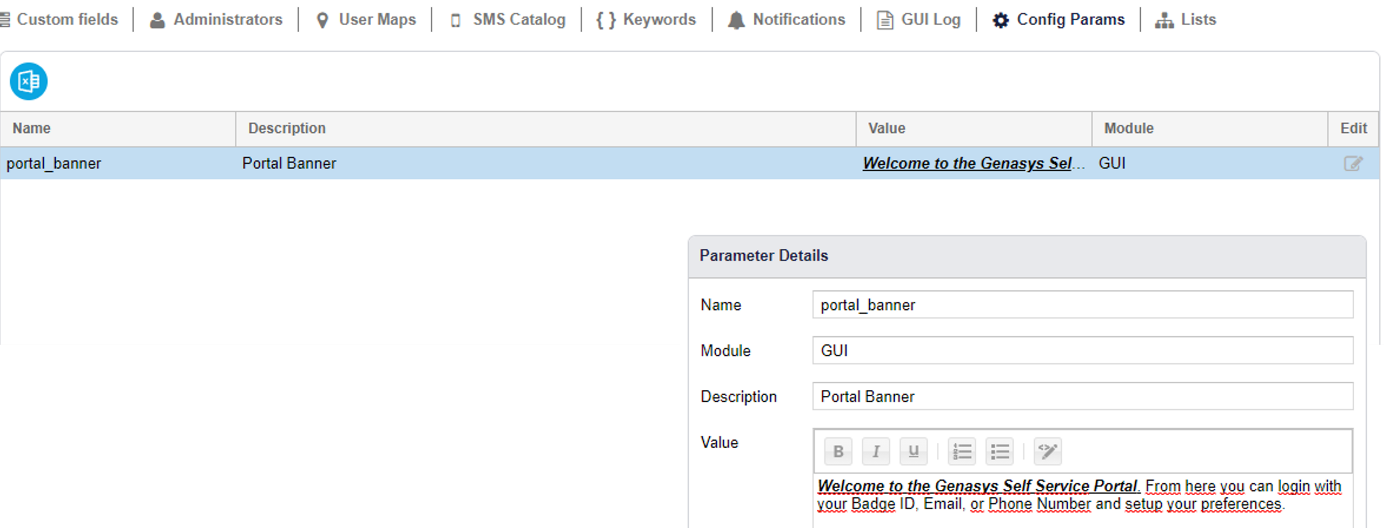
HTML message editing
The message appears on the portal below the title bar and can be closed.
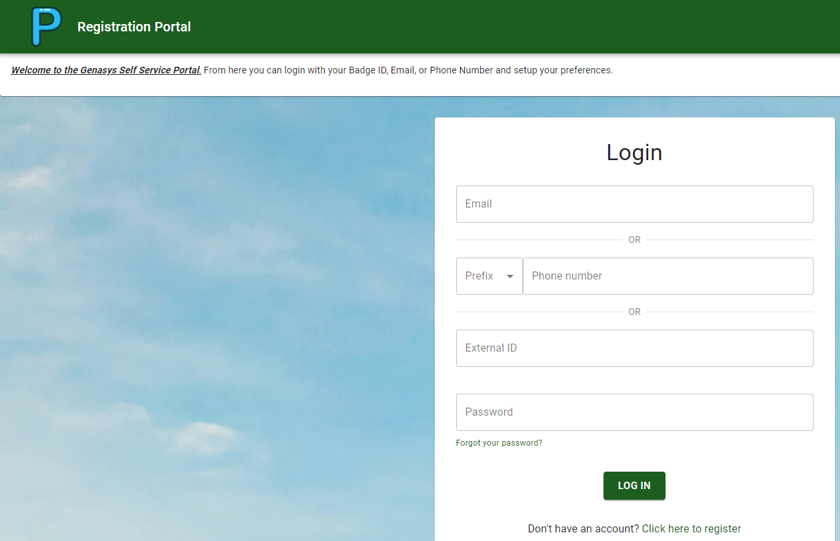
HTML message shown in login page
Other examples of system configurations are modifying the number of login attempts, the number of alert sending retries, length of time someone is blocked after exceeding login attempts, password parameters, etc.
Below is a complete list of password options:
|
Password requires special character |
pass_required_special_char |
true/false |
|
Minimum password length |
pass_length |
Number (min 10) |
|
Days until password must be changed. |
pass_expiry_days |
number |
|
Number of different passwords |
pass_previous_different |
number (min 10) |
|
Number of incorrect logins before account is blocked. |
max_login_attempts |
number |
|
Number of minutes that an account is blocked after incorrect logins. |
minutes_blocked |
Number (30 min) |
To meet higher security standards, when passwords are renewed, a minimum length of 10 characters will be obligatory.
When configuring alert retries, each channel has its own value.
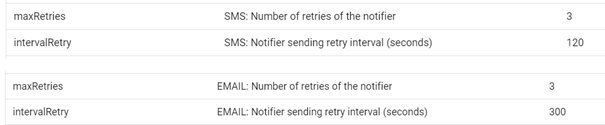
Alert Retry Configuration
Lists Page
This page contains two lists, the Includelist and the Excludelist. Targets can have their phone numbers added and/or removed from these lists depending on the situation.
- Includelist: Phone numbers on the includelist will always receive notifications and alerts.
- Excludelist: Phone numbers on the excludelist will never receive notifications and alerts.
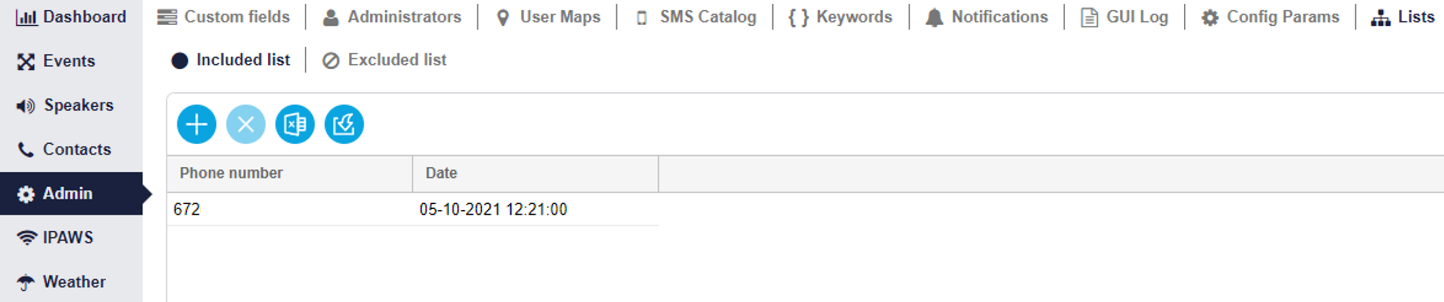
Lists Page
Add Phone Number
To add a single phone number to either list, press the ‘Add Phone Number’ button
(![]() ). This will prompt the Add Phone Number window to appear. Simply enter the phone number in this window and press the ‘Save’ button.
). This will prompt the Add Phone Number window to appear. Simply enter the phone number in this window and press the ‘Save’ button.
To add several phone numbers at once, you can import a file. Press the ‘Import’ button (![]() ). This will prompt the ‘Import Contacts’ window to appear. Press the browse button to find and add the desired file to the window. Then press the ‘Load’ button to import the contacts.
). This will prompt the ‘Import Contacts’ window to appear. Press the browse button to find and add the desired file to the window. Then press the ‘Load’ button to import the contacts.
Delete Phone Number
To delete a phone number from either list, select the desired number and press the ‘Delete Phone Number’ button (![]() ). This will prompt the ‘Delete Phone Number window to appear. Simply select ‘OK’ on this window and the deletion will be complete.
). This will prompt the ‘Delete Phone Number window to appear. Simply select ‘OK’ on this window and the deletion will be complete.
Users can download a spreadsheet of either list in the List page by pressing the Export XLS button (![]() ).
).
Social Networks
In the Social Networks tab you will be able to add Facebook and Twitter accounts into GEM for the publication of alerts in the Events section.
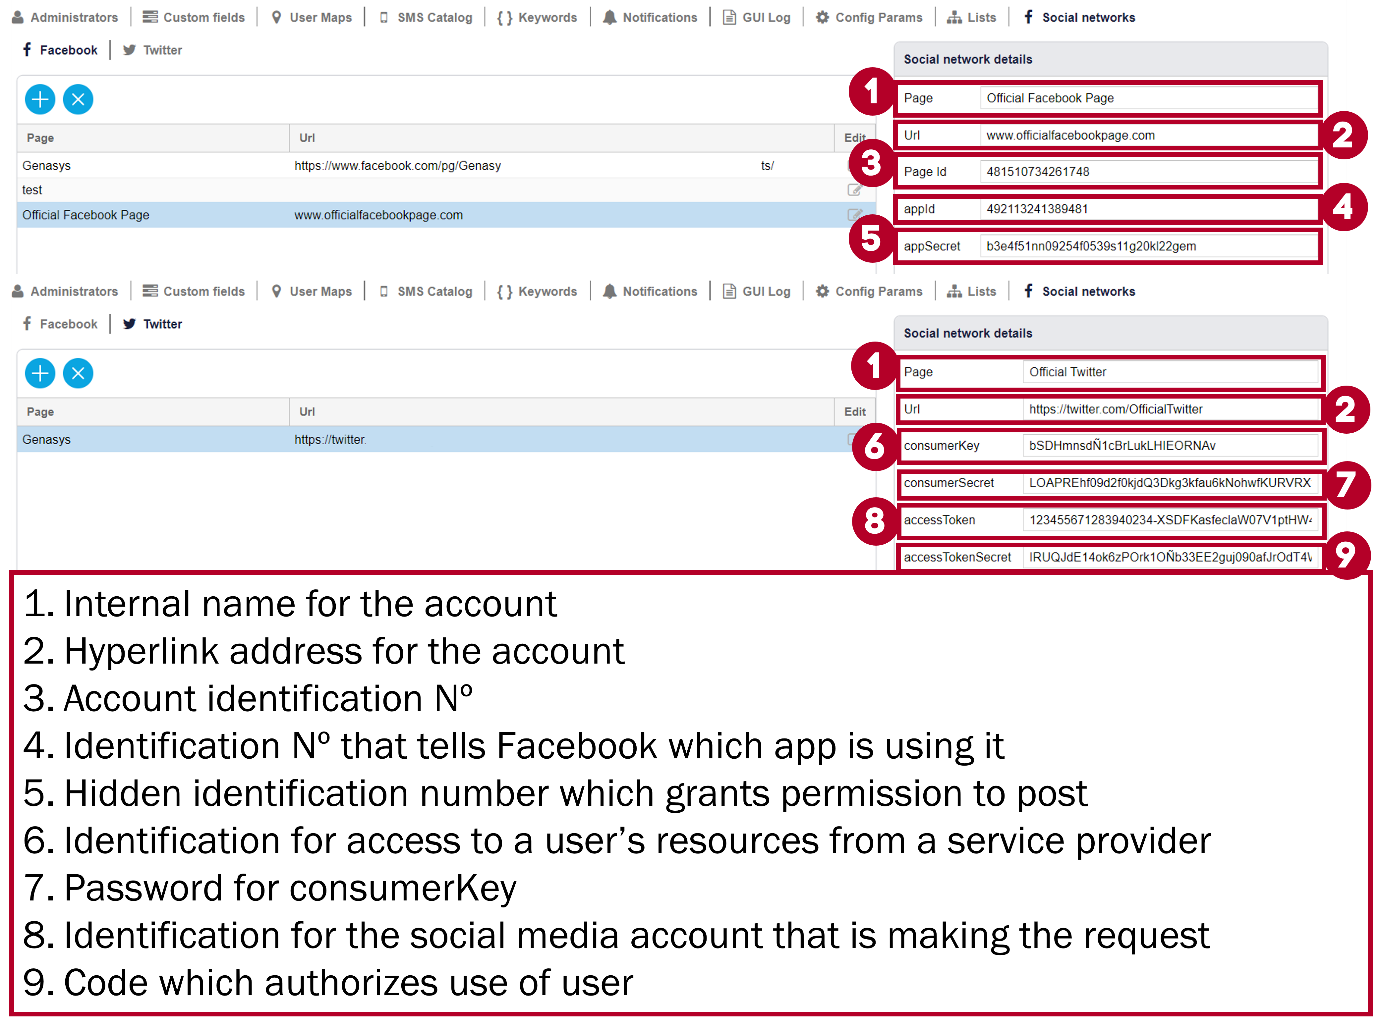
Social network configuration
Once you input all relevant information GEM will be able to send alerts through your Facebook and Twitter accounts.
Note: When launching an alert you will need to select which social media accounts you want to use for each alert.
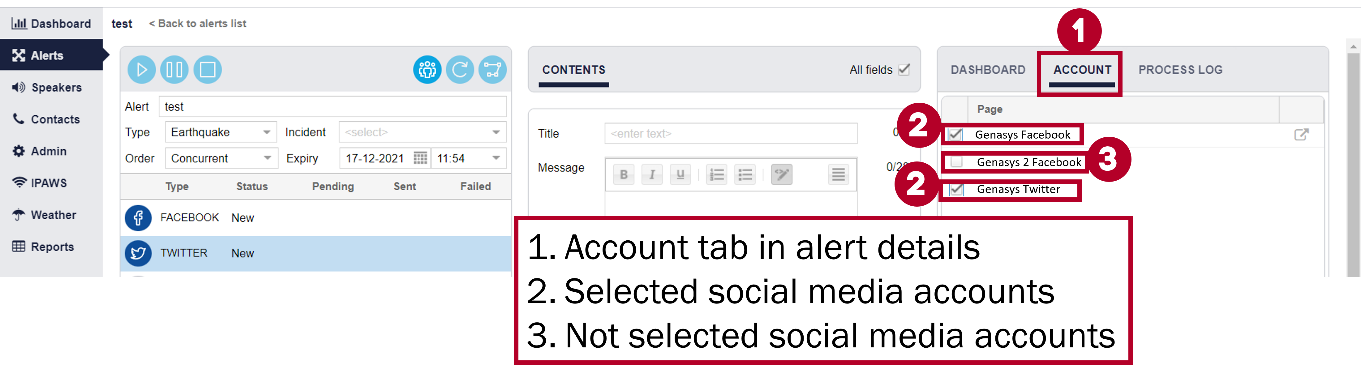
Social media account selection
CAP RSS
Most users will not need to interact with CAP RSS. This tab corresponds to high level administrators and Genasys administrators only. In this tab administrators create links between Zonehaven and Google Maps so that Zonehaven information automatically gets updated into Google Maps. This means during critical events important information can also be seen in Google Maps.
To do this Zonehaven calls to the internal GEM API and executes a QL function with the message contents being sent as input parameters. Multiple zone changes can be included in the same request. By clicking the plus button (![]() ) you will be able to add new urls which will contain the necessary information to automatically update Google Maps with Zonehaven information.
) you will be able to add new urls which will contain the necessary information to automatically update Google Maps with Zonehaven information.
Jurisdictional Areas
Genasys administrators can assign jurisdictions to different, parent companies and sub companies. A parent company is a client that uses GEM. This could be a company, a country, a state/province, etc. If a client is large enough it may want to split up responsibilities. For example, a client could be a country like Spain, but it may complicate things to have all emergency managers in Spain using the same GEM site for all alerts. In this case the parent company, in this case Spain, could create sub companies for its provinces or even cities, so that each sub company can manage its own alerts. The parent company would still have access to its whole jurisdiction and could trigger large scale alerts, such as national alerts, that affect the whole jurisdiction while its sub companies would be limited to their area.
When creating an alert, areas created outside the defined area are rejected.
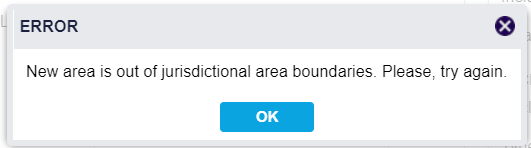
Jurisdictional Area