Speakers
The Speakers section of the menu contains information and controls for speakers, with tabs also detailing speaker types, groups, and sounds.
Speakers Page
Selecting Speakers
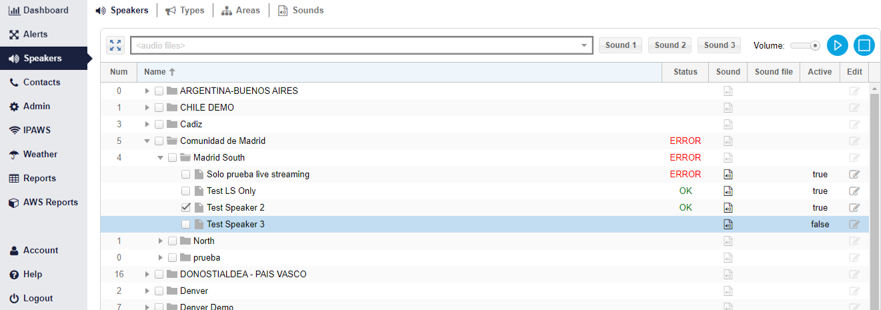
On the speakers page the user will find several rows named for the location of the corresponding speaker or speakers. From here, the user can select speakers individually, by group, or by area.
- Area: A specific geographic location where one or more speakers are located.
- Group: A smaller section that is part of a larger area. It is useful to organize speakers into groups when there are several speakers in one area.
To select an entire area, click on the small tick box to the left of the area’s name.
To select a group or groups within an area, first click the small arrow to the left of the area’s tick box or double click the area row itself. This will reveal the groups contained in that area. Then select a group by clicking the tick box found in the desired group’s row.
To select individual speakers, first click the small arrow to the left of the group’s tick box or double click the group’s row itself. This will reveal the individual speakers contained in that group. Then select a speaker by clicking anywhere on the speaker’s row instead of the tick box.
NOTE: When entering this page the expand button ( ) will appear on the top left. By clicking it you will open all areas at once. After using the expand button it will change into the contract button (
 ) which will close all areas at once.
As shown in the figures below: When speakers are selected, they will be circled in green on the map.
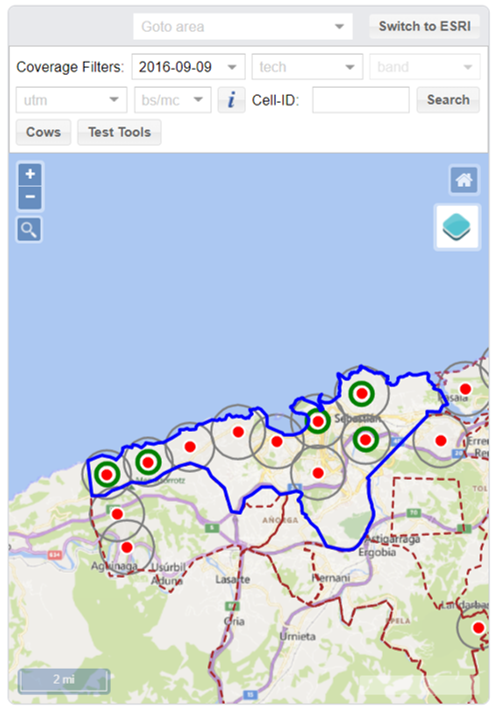
Corresponding Map
Selecting and Playing Audio
Once the desired speakers are selected, the user can then play audio files. First select the audio file by opening the <audio files> drop-down menu at the top of the page and selecting the desired file. If the speaker has the function enabled it will also have access to the "Sound 1", "Sound 2", and "Sound 3" buttons which will play the corresponding sounds immediately. Enabling and applying these quick access buttons can be done when adding new speakers or by editing existing ones as shown in the Adding a Speaker section.
Once the audio file is selected, use the tools to the right of the drop-down menu to manipulate the file playback. These tools are:
- Volume
- Play
- Stop
It is also possible to live stream your microphone through the speakers. Once you press the 'Start Streaming' button a window will appear with a list of the speakers that will play the sound. Once you press 'Start' your microphone will activate and the speakeres will play any sound it detects in real time. This is especially useful for Public Announcements (PA) where GEM users need to transmit information across a large area in real time. Possible use cases include, but are not limited to, relayinig evacuation & safety instructions, information on elections, general information that is of interest to the public, quarintine regulations, etc.
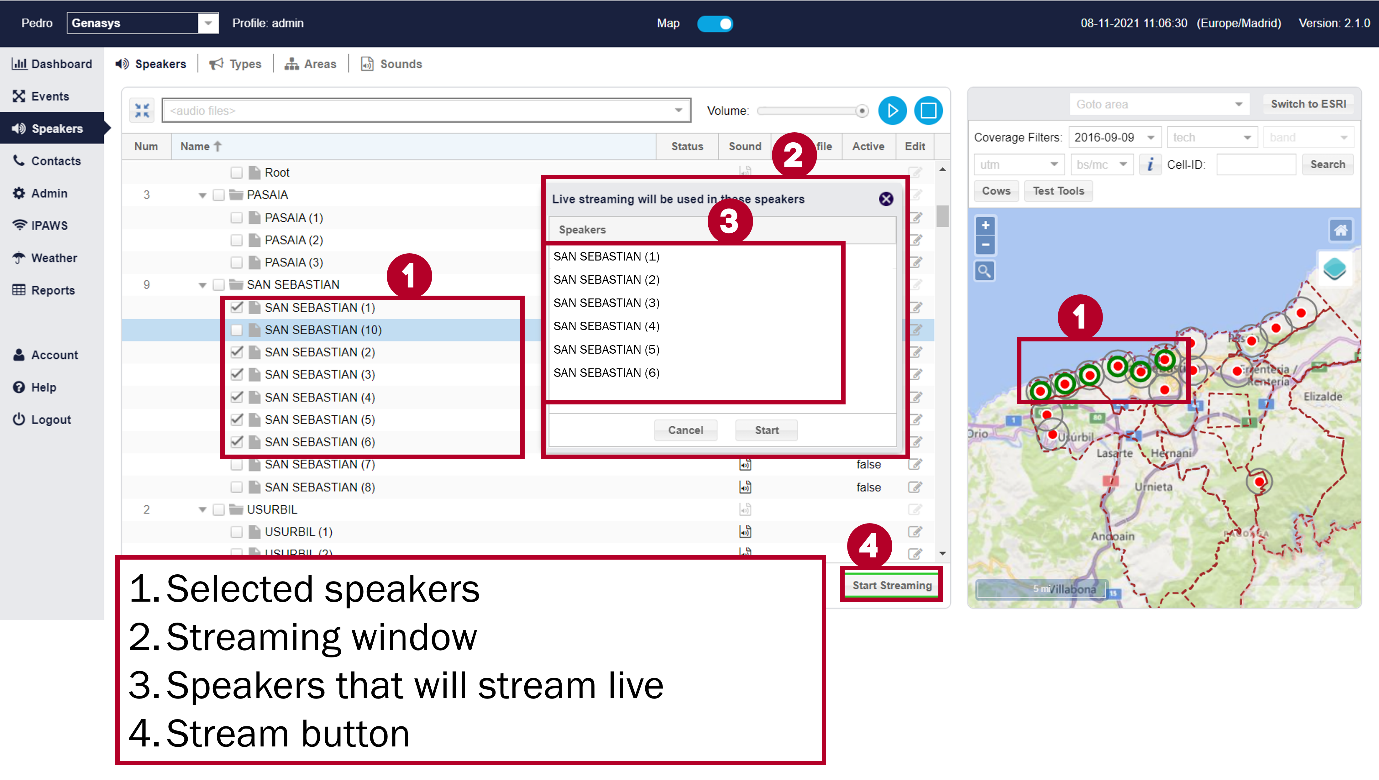
Live streaming microphone audio through speaker
Controlling Speakers
At the bottom of the Speakers page, you will see the following menu.

Speakers Page Bottom Menu
These buttons have the following functions:
- Add Speaker (+): Add a new speaker to GEM.
- Delete Speaker (X): Erase a speaker from GEM. To do this, select the speaker you wish to delete and click this button.
- Only one speaker can be deleted at the same time.
- Deploy Sound: This button commands the speaker to download the selected sound. Once the sound is in the speaker’s memory system it can then be played. Speakers cannot play sounds that are not in their system.
Adding a Speaker
If you would like to add a new speaker, select the Add Speaker button. Upon clicking this button, a window will appear entitled Speaker Details. This window offers several options for configuring the new speaker. This window is detailed in the figure below and the list that follows it.
.png)
Speaker Details Window
Once this window is open, input the appropriate information in the various fields (shown below).
NOTE: Fields marked with * are mandatory.
Fields: Speaker Details Window
Area Name*: Assign this speaker to an area.
Group Name*: Assign this speaker to a group within the selected area.
Speaker Name*: Assign the speaker a name that will be used in GEM.
Latitude and Longitude*: Select the specific coordinates that correspond to the speaker’s location where the speaker is located. There are two ways to set these coordinates:
Manually enter the coordinates in the appropriate boxes.
Press the Locate button at the bottom of the window and click the speaker’s location on the map.
Area Color: Select the color used to denote the speaker’s range.
Opacity: Select the opacity of the area color.
If opacity is left untouched a circle will still appear around the speaker’s location to mark the speaker’s range, but the area will not be colored in.
Speaker Type*: Select the product model for this speaker. The speaker type will determine the speaker’s range.
Range: This section will be filled automatically when Speaker Type is selected.
Sound Buttons: Enables quick access buttons which will play the sounds selected below when you press the corresponding buttons.
Active: Indicate if the physical speaker is deployed at the designated location.
True: The physical speaker is deployed.
False: There is no physical speaker at this location.
Device Server: The server the device is using to connect to the system.
Azimuth: This is the degrees at which a device sends sound. E.g. some speakers will have a 360º azimuth while others may be limited to 60. A speaker with Azimuth 0 in the system is set as a speaker with a 360º hence they will appear as circles in the map.
Through the Locate button you can select where the speaker is registered by clicking on the map. Use the Move button to click and drag the speaker to a new location.
Once the appropriate fields are filled out in the Speaker Details window, either select Save to add this new speaker to GEM or select Cancel to cancel the speaker creation.
Types Page
This page contains information on the different speakers that are available when adding a new speaker into GEM.
In the event that Genasys develops a new type of speaker or ceases to manufacture a certain type, an administrator can add or delete speaker types using the Add and Delete buttons ( ), which are found at the top of the page.
Administrators can also edit existing speaker types. To edit, click the Edit button ( ) found on the right side of the speaker’s row.
When creating or editing a speaker type, you will need to fill out the following fields:
Name: The product name for the speaker. This is how GEM will refer to the speaker.
Range (m): The distance that sound travels from the speaker. Measured in meters.
Azimuth: The direction in which the sound will travel, expressed in degrees.
Most are set to 0, as they have 360° coverage (omnidirectional).
Areas Page
This page allows the user to manage speaker areas and their corresponding groups.
Administrators can add or delete groups and areas using the Add and Delete buttons
( ) or edit them through the Edit button (
 ).
).
NOTE: Be sure you are in the correct table before making changes.
Add a New Area
In this tab you can create areas and groups which are used during alerts and speaker activation. As shown in the Targets section, you can select a predefined area on the map from a drop-down menu. As well as this, speakers in the system must be assigned to a specific area and group in the map. When creating a new area, you must name it in the Area Details window. Then use the map to draw a shape that corresponds to the area.
To draw a shape, press the Draw Shape button in the window and click on the map, creating dots which will then become linked. To complete the shape, either close the shape by clicking on the starting point, or double click which will automatically close the shape using the shortest route possible.
You can also press the Modify Shape button to edit and modify the shape and thus the area. This is recommended when creating very precise areas as it may require time to produce and this way your progress gets saved.
Select Save to add the new area or select Cancel to undo the area.
Add a New Group
When creating a new group, you must name it in the Group Details window. You must also select the area in which the group will be located. Then use the map to draw a shape that corresponds to the group.
Sounds Page
On the sounds page, a user can test alert sounds and view their details. Like speakers, sounds are sorted into two different classifications.
- Sound Categories: A collection of sound files that are all related. Categories can be created and tailored based on the user’s needs.
- Create categories based on location, alert, emergency type, etc.
- Sound Files: The actual audio files that are used and broadcast through speakers. These are sorted and found within the sound categories.
Users can add and delete sound categories and sound files using the add and delete buttons ( ).
).
Both sound categories and sound files can be edited by selecting the Edit button ( ).
).
- Users can rename sound categories.
- Users can change the category, name, and description for sound files.
Users can control sound files using the toolbar found at the top of the Sound Files section.
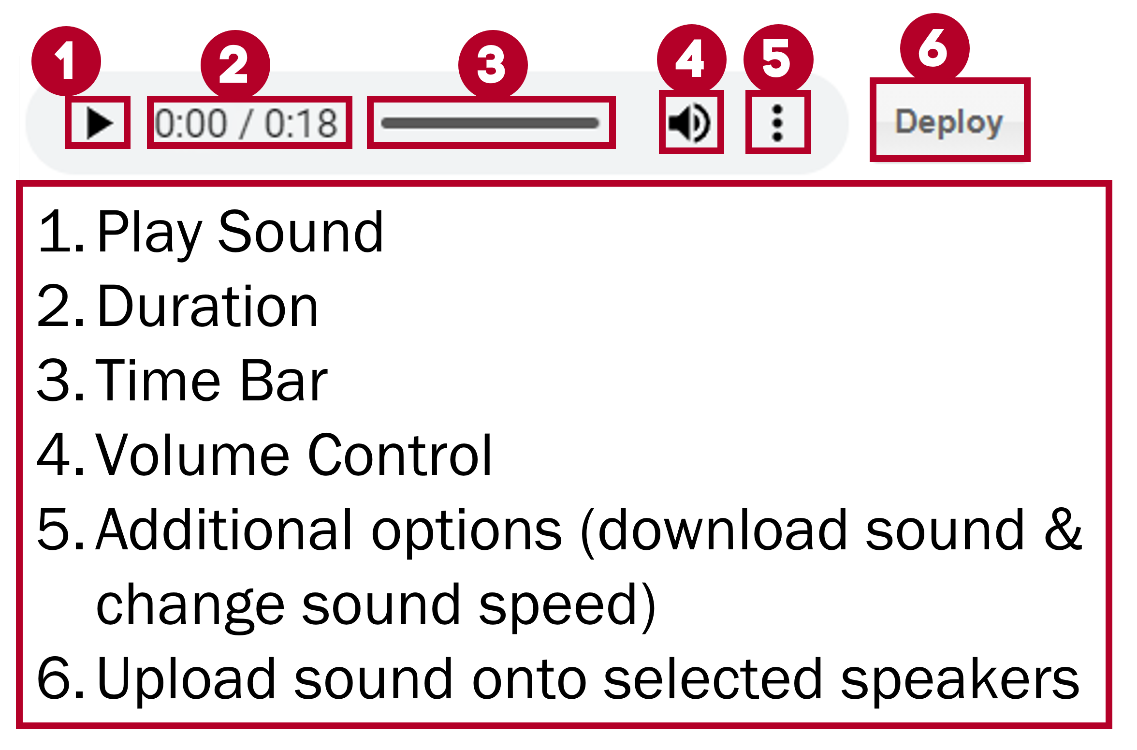
Sound Files Toolbar
- Play: Select the Play button, found on the left side of the toolbar, to begin playback of the selected sound file.
- Once playback begins, a pause symbol will be displayed here. Press this Pause button to pause file playback.
- Duration: Duration is shown as numerical figures and as a bar. Duration tells the user how much of the sound file has played and the total length of the sound file.
- Users can click the bar to jump to specific places in the sound file.
- The total duration is also shown as a column in the Sound Files section.
- Volume: Select the volume button, represented by a speaker symbol, to control the volume level of the sound file being played. Sound volume can be adjusted in real time as speakers are used.
- Download: Select the Download button, represented by three dots, to download the sound file to your computer. Downloading and saving the file will reduce load times for all sound related functions.
- Deploy: Sends the sound file to all activated speakers.
Adding a New Sound Category
Use the Add and Delete buttons ( ) to create new sound categories or delete existing ones.
Pressing the Add New Category button will prompt the Category Details window to appear. Using this window, simply name the category and press Save to create a new category.
Adding a New Sound File
To add a sound file, first make sure that you have selected a sound category (this is the category that the sound file will be assigned to once added). Then, go to the Sound Files section and press the Add a New Sound button (![]() ).
).
This will prompt a window to appear, entitled Sound Details.
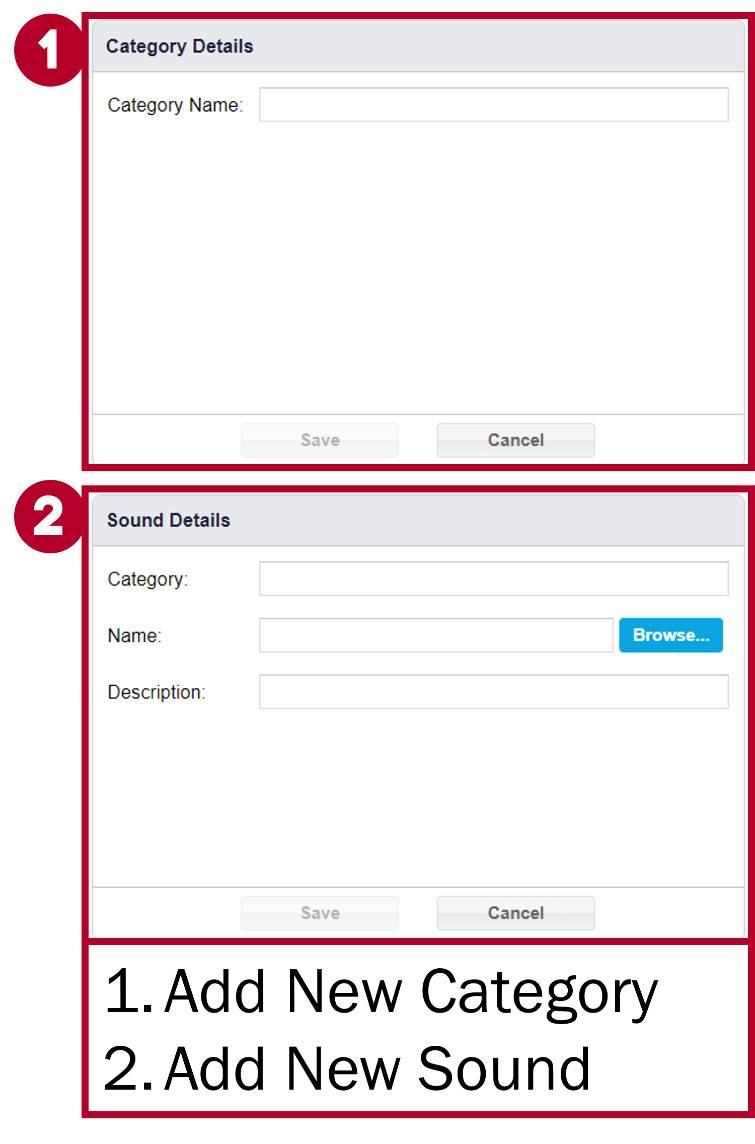
Sound Details Window
Fields: Sound Details Window
Category: The sound category to which the sound will be assigned. User will not be able to change this field, as the sound category must already be selected before this window will appear.
Name: The name that GEM will use to refer to the sound file. The name is automatically generated by the system, as it is tied to the name of the audio file that is selected and uploaded.
- Browse…: Clicking this button will take you to your computer’s files, where you will select and upload the desired sound file.
- Description: Enter additional comments that are relevant to the sound file.
Once all fields are filled out, press Save to add the new file or Cancel to undo.