Contacts
The Contacts section contains important information on the different targets for notification that exist within the GEM system. In this section there are two pages: Contacts and Groups.
Contacts Page
This page contains a large table with contact information on all the targets in GEM. On this page, targets are by default sorted into the following columns based on their contact information:
- First Name
- Last Name
- Phone Number
- Zip Code
- Groups
These columns can be sorted and filtered using drop-down menus found at the header of each column.
You can also use these drop-down menus to select which columns are visible and which are hidden.
- There are eight additional columns that are hidden by default which can be made visible when needed.
- Columns can be restored to their default setting by pressing the Table button (
 ) in the upper-right corner of the page.
You can also search in the active filter for specific contact details. The search will only work for whichever filter is currently active. For example, if your contacts are organized by First Name you can search for a first name and find all the contacts which share that first name.
GEM will keep track of the registration method used to add new contacts. Possible registration options INCLUDE:
- APP - Mobile citizen application
- IMPORT - Imported through a CSV file either from the GUI or an automated process
- WEB - The contact was added from the Admin interface
- PORTAL - The contact joined through the citizens portal
- SMS - Contact was added through a registration SMS sent to their phone
- TEAMS - Auto-provisioned when the Genasys Bot is added to a Team
Groups and Contacts can be restricted by profile. This allows access to sensitive contact data to be restricted. Groups are assigned to profiles from the GUI. Output Channels can be restricted by profile. A user will ony be able to see the channels they have been assigned when creating alerts, this includes IPAWS WEA. Additionally, quick launches, templates, and alerts that contain channels they are not authorized to use will not be visible.
Adding/Editing Contacts
To add a contact, select the Add Contact button (![]() ), found at the top of the page.
), found at the top of the page.
To edit a contact, select the Edit button ( ) found to the right of the contact’s row.
Pressing either of these buttons will bring up the Contact Details window as seen in the figure below. There are several important tabs and fields that exist within this window.
NOTE: When adding a contact, the fields will be blank, but when editing a contact, the fields will be partially or completely filled in.
General Tab of the Contact Details Window
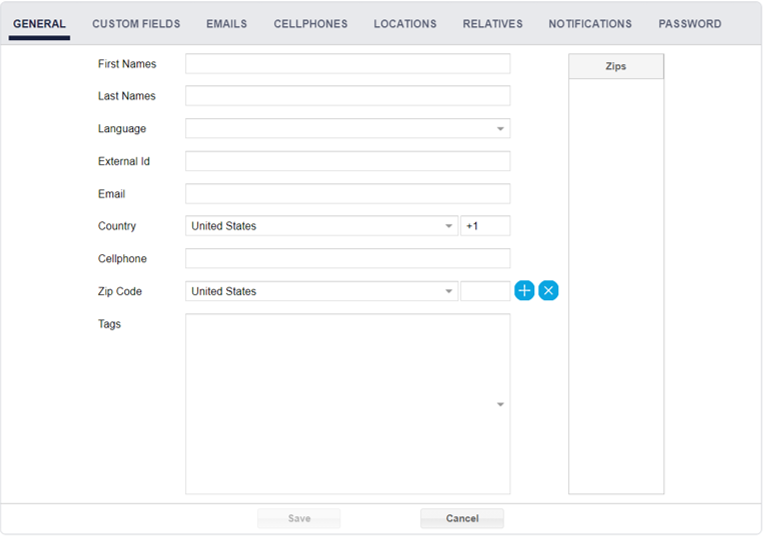
General Tab in the Contact Details Window
Fields: General Tab
- First Names: Contact’s first name.
- Last Names: Contact’s last name.
- Language: Contact’s preferred language. When alerts are sent in multiple languages this will ensure the contact is notified in their preferred language.
- Email: Contact’s email address.
- Country: Contact’s country of residence.
- Once selected, the corresponding country calling code will appear.
- Phone: Contact’s phone number.
- Zip Code: Zip code(s) associated with the phone number.
- For localized emergencies, notifications can be sent to specific zip codes.
- Groups: Include groups that are relevant to the contact. Groups are used to organize contacts and make them easier to contact. E.g. groups could be law enforcement, firefighter, ambulance personnel, etc.
- Ex.) Assign all Madrid contacts the Madrid group.
- Rank/Title/Test: These are examples of custom fields but will not necessarily be included in the final product. For example, both Rank and Title could be company rank or position for a specific client.
When registering or updating a contact, multiple phone numbers and emails can be defined from the new Email and Phone tabs on the Contact Details window.
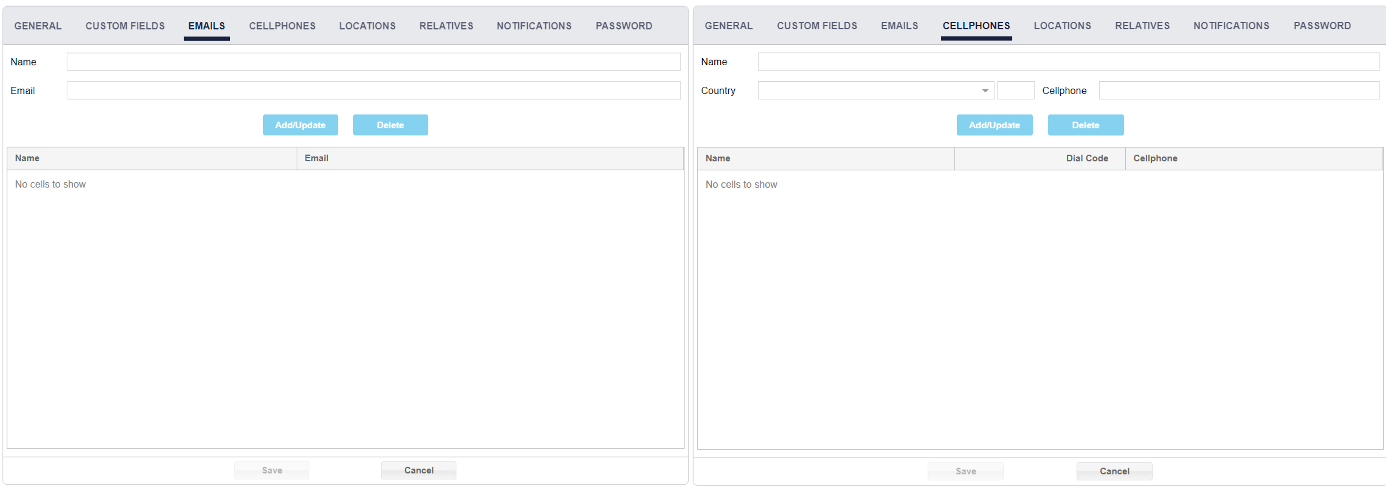
Contact’s Email and Phone tabs in the contacts details window
When an alert is created, a target will be included for each of the contact numbers and email addresses.
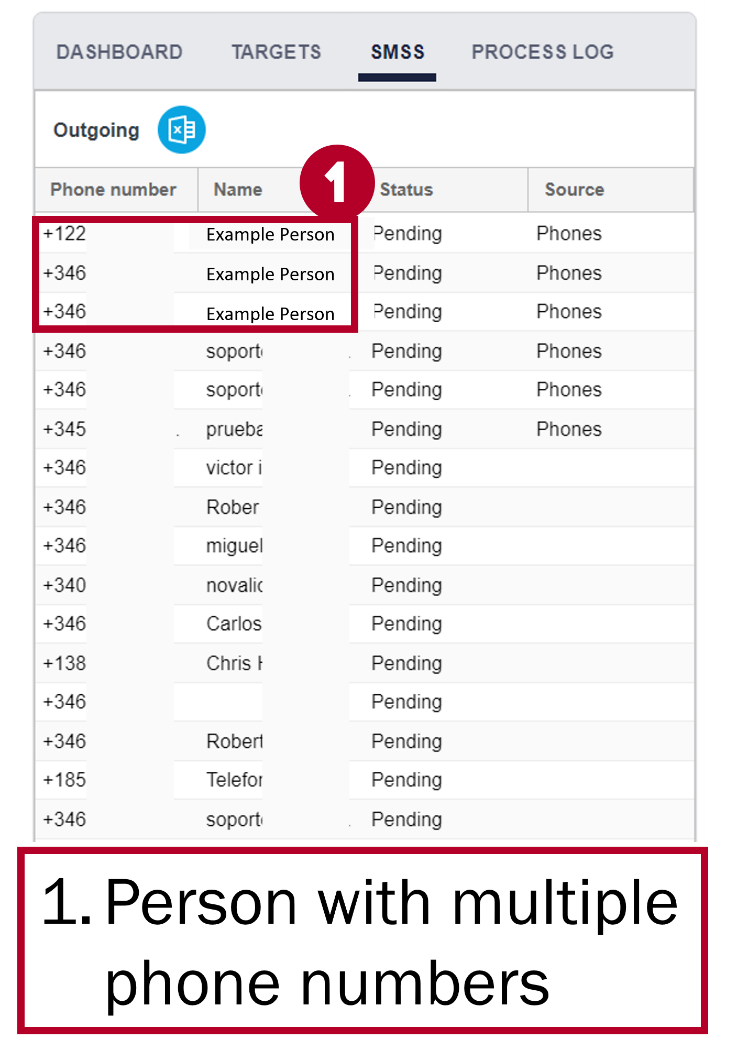
Target included for each contact number and email address
Locations Tab of the Contact Details Window
After filling out the General tab, continue to the Locations tab to input more specific information about where a contact lives or tends to be.
Including location information with a contact ensures contacts are alerted when an emergency occurs near their location.
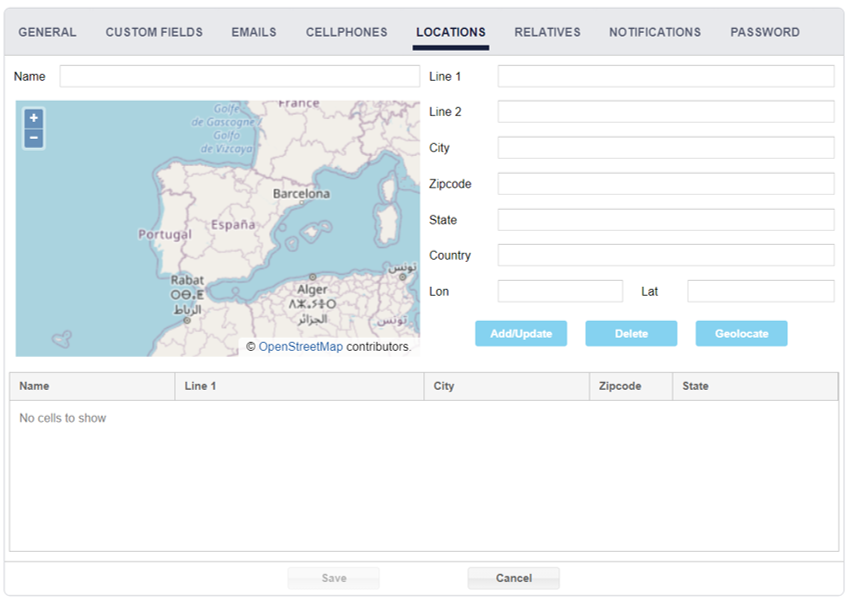
Locations Tab of the Contact Details Window
Fields: Locations Tab
- Name: The name of the location.
- Lon & Lat: The longitude and latitude of the contact’s location.
- Line 1 & 2: The contact’s address lines.
- City: The city where the contact is located.
- Zip Code: The zip code associated with this contact’s address.
- State: The state where the contact is located (if applicable).
- Country: The country where this contact is located.
Once all appropriate fields are filled in, press the Geolocate button (the more information included, the more accurate the geolocation will be).
If you are happy with the geolocation, press Add/Update. This will add the new location to the table at the bottom of the Locations tab.
If the geolocation is not accurate, press Delete. Deleting will erase all fields in the Locations tab.
Users can add multiple locations to one contact when necessary.
Relatives Tab of the Contact Details Window
After filling out the Locations tab, continue to the Relatives Tab.
Through the Relatives tab, users can include people who are close to the contact in the contact’s details. This will allow GEM to reach relatives of the contact if there are problems reaching the contact initially. Relatives can include parents, siblings, a spouse or partner, etc.
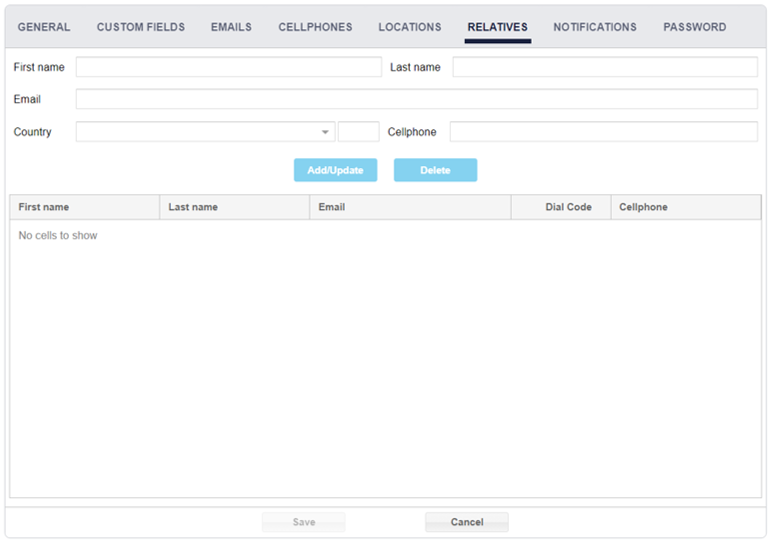
Relatives Tab in the Contact Details Window
Field: Relatives Tab
- First and Last Name: Relative’s full name.
- Email: Relative’s email address.
- Country: Relative’s country of residence.
- After entering the country, the corresponding country calling code will appear in the space between the ‘Country’ field and the ‘Phone’ field.
- Phone: Relative’s phone number.
Once all necessary information has been input, press Add/Update to include this relative to the contact’s list of relatives, which appears in a table at the bottom of this tab.
If users wish to undo any typing in the Relatives tab, they can press Delete.
If it is necessary to change or delete a relative’s information, then click on the desired relative listed in the table, which will load their information into the tab’s fields. The selected contact’s information can then be updated and saved by pressing ‘Add/Update’ or deleted completely by pressing ‘Delete.’
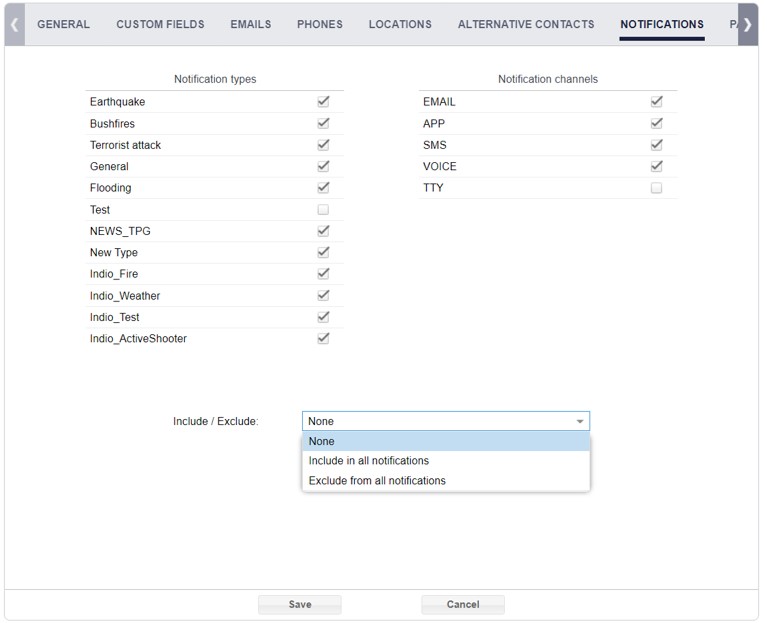
Notifications Tab of the Contact Details Window
After adding relatives to the contact, move to the Notifications Tab. Through this tab, the user can select the types of notifications the contact will receive and the channels through which these notifications will be sent.
Notifications Tab of the Contact Details Window
Fields: Notifications Tab
- Notification Types: The type of crisis or emergency that triggers the notification.
- Notification Channels: The channels used to communicate the notification.
Contacts can set themselves up to be excluded or included in all notifications, but this setting is set to None by default which means contacts will receive notifications as normal. If a contact is set to be excluded from an alert their name will appear greyed out in the contacts window when sending out an alert.
NOTE: Notification settings take precedent over Includelists and Excludelists.
- For example, if a user is on an Excludelist for earthquakes but has notifications turned on for earthquakes, they will receive an alert for an earthquake.
By default, all notification types and channels are selected for a contact.
Password Tab of the Contact Details Window
After completing the Notifications section, move to the Password Tab.
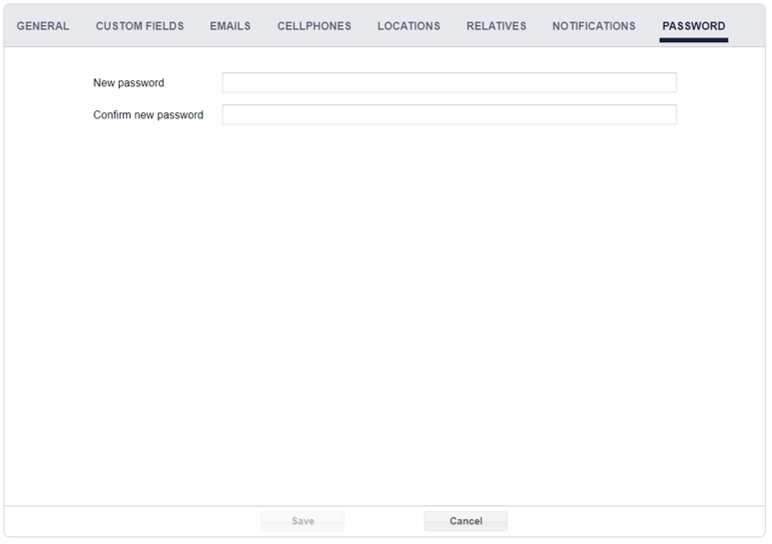
Password Tab of the Contact Details Window
This section is to create or change a password for users in the customer portal.
This portal will change depending on the customer, but they all serve the same function. Examples of portals are rivco.genasys.com/portal and crawfordcounty.genasys.com/portal. Essentially the initial part of the web address changes to the name of each customer, rivco and crawfordcounty in the examples above.
Once you have filled out all fields in the Contact Details Window, press Save to store the new/edited contact in GEM. You can also press ‘Cancel’ at any time to undo the changes to the contact.
Other Tools in the Contacts Page
Along with the Add Contact button, there are other tools available to the user. These tools can be found at the top of the Contacts page and are helpful in managing contacts within GEM.

Tools in the Contact Page
Tools in the Contacts Page (From left to right)
- Add a New Contact: Opens a new and empty contacts details window where you can insert relevant details for a new potential messaging target.
- Delete Selected Contacts: This button allows the user to delete the contact that has been selected on the contacts list.
- Export XLS: This button allows you to export and download contacts (either all, filtered, or selected) as an Excel spreadsheet. The downloaded Excel document will only include columns that are visible when you initiate the download.
- Export CSV: This button downloads a CSV file of contacts. If you have filters on or specific contacts selected the CSV file will only contain the contacts that are selected/filtered in.
- Backup: Downloads an Excel file of all contacts in the system with all columns visible.
- Import Contacts: This button allows users to add contacts by importing formatted CSV or XLS files.
- Put Contacts in Groups: This button allows users to put all visible contacts into groups.
- It is important to use filters properly to ensure that only the appropriate contacts are being grouped together.
- Remove Contacts from Groups: This button allows users to remove contacts from groups.
- It is important to use filters properly to ensure that only the appropriate contacts are being removed from their groups.
- Locate Contact on Map: This button makes the map window on the right zoom in to where the locations listed in a contact’s details.
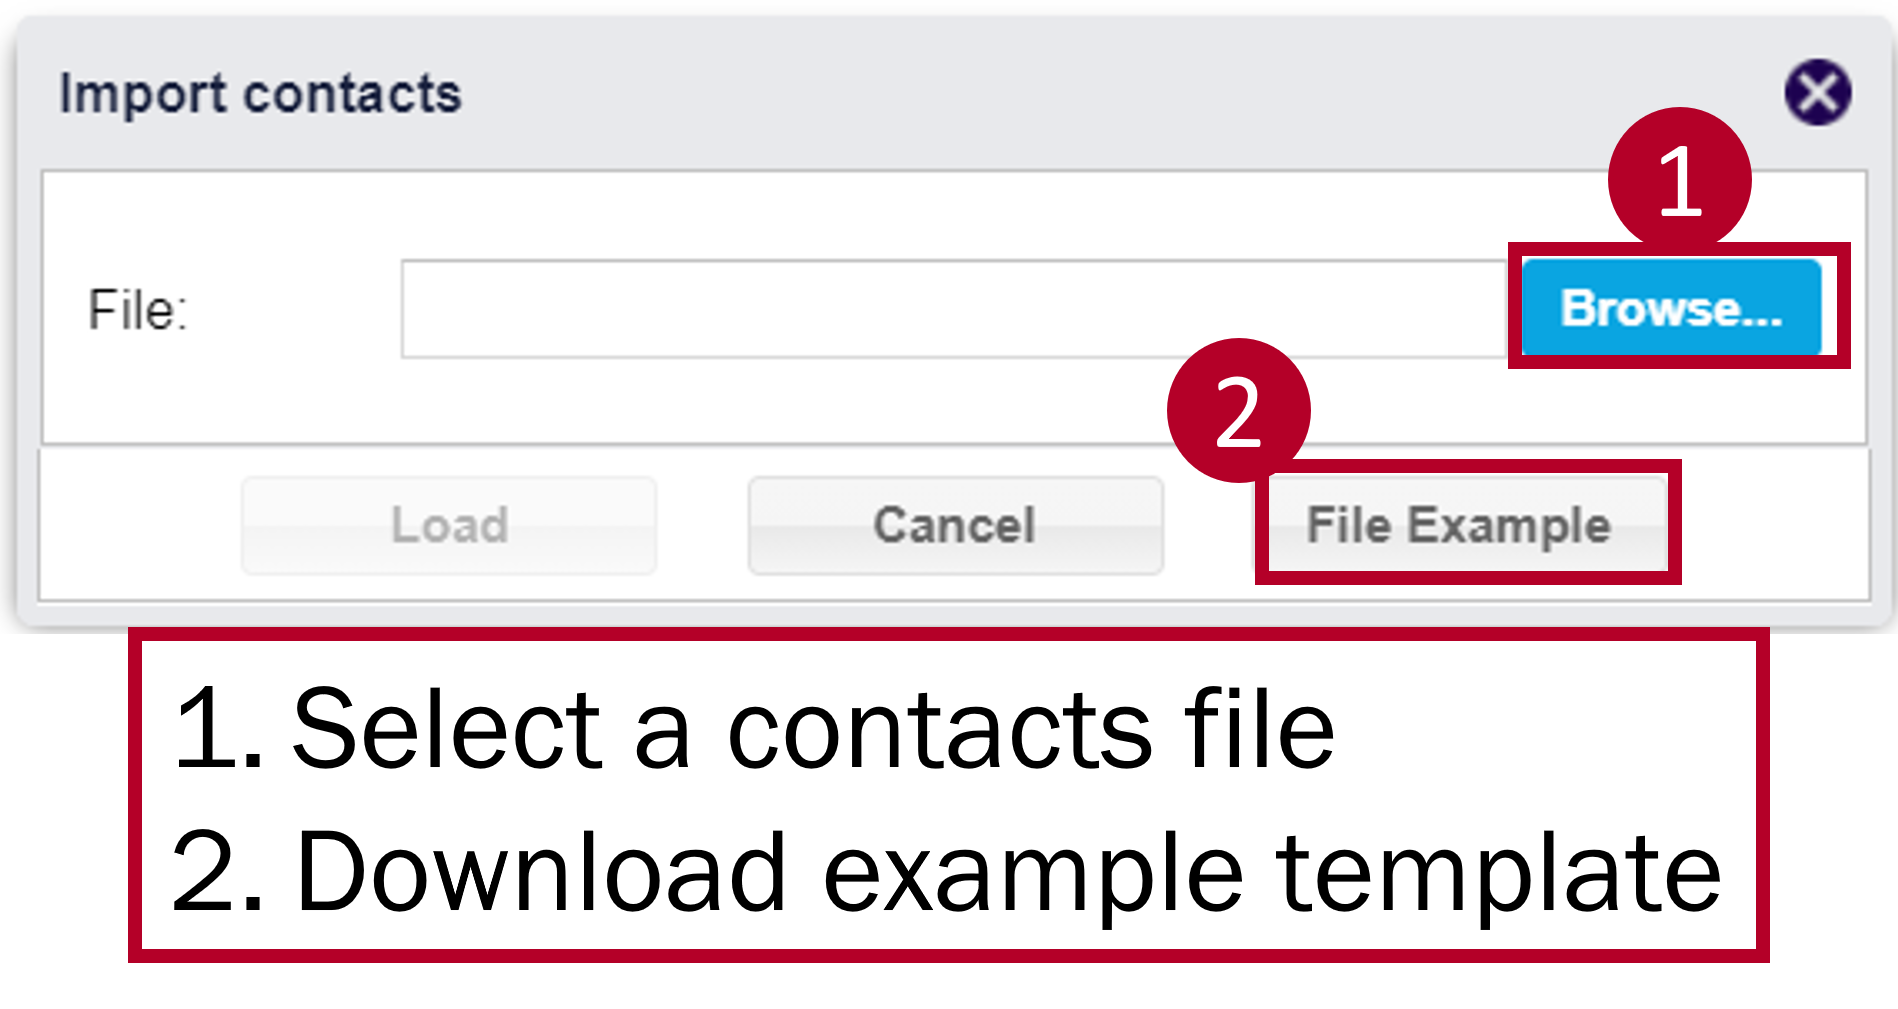
Contact File Import Format
To import contacts, a formatted CSV or XLS file is required which can contain simple types and compound types.
An email or phone number is mandatory. If no country_code or dial_code is included, the system defaults to US.
The first line in the csv file contains a header which defines the import values on the rows below. The file does not require all names below to be used but they must be written exactly as they appear below for the import.
You can also download an example file when you click on the import button and use this as a template to add your own contact information.
Import Contacts Options
The list of available parameters are as follows:
| Name | Description | Format |
| Externalid | External target identifier, generated by the system | Format alphanumeric max length 256 |
| Number | target phone number | Format number max length 16 |
| target email | Format valid email | |
| Active | 1 if is activated, 0 otherwise. By default, is active | Format true or false |
| Firstnames | target first names | Format string max length 256 |
| Surnames | target surnames | Format string max length 256 |
| Lkl | Location coordinates | Format--->“POINT(latitude, longitude)” |
| Precision | Location precision, generated by the phone app when it receives a new location | Format number |
| location_time | Location time, generated by the phone app when it receives a new location | Format date (yyyy-MM-dd HH:mm:ss.SSS) |
| update_time | Target update time, generated by the system, when the target is modified | Format date(yyyy-MM-dd HH:mm:ss.SSS) |
| Battery | Phone battery level, given by the phone app | Format number max length 5 |
| Vendor | Phone vendor. E.g.: “iPhone”, “LG”, etc | Format string max length 256 |
| Model | Phone model. E.g.: “iPhone9,3”, “LM-X525”, etc | Format string max length 256 |
| push_id | Phone push id, generated by the app and used to received notifications | Format string max length 256 |
| op_sys | Phone operating system. E.g.: “iOS”, “Android” | Format string max length 256 |
| verion_op_sys | Phone operating system version. E.g.: “12.4” | Format string max length 256 |
| version_app | Application version. E.g.: “1.0” | Format string max length 256 |
| Latitude | Target latitude | Format string max length 256 |
| Longitude | Target longitude | Format string max length 256 |
| Zipcodes | List of zip codes separated by “;” | Format string max length 256 |
| activation_code | Activation code, is used by the app to activate a new target | Format string max length 256 |
| prefix_number | Phone prefix number | Format string max length 256 |
| country_code | Country code. E.g.: “US”.¡ | Format string max length 256 |
| dial_code | Dial code E.g.:+1 | Format string max length 256 |
| device_id | Device id, sent by the app | Format string max length 256 |
| Group | List of groups | Format composite |
| Address | Target address | Format string max length 256 |
| City | Target city | Format string max length 256 |
| Postcode | Target postcode | Format string max length 256 |
| State | Target state | Format string max length 256 |
| Country | Target country | Format string max length 256 |
| notification_channels | List of notification channels. Explanation and examples below | Format composite |
| Notification_types | List of notification types. Explanation and examples below | Format composite |
| custom_fields | List custom fields. Explanation and examples below | Format composite |
| Individuals | List of contacts that must be notified. Explanation and examples below | Format composite |
| Emails | Contact email list | Format composite |
| Phone Numbers | Contact phone numbers list | Format composite |
For composite types such as locations and individuals, multiple values plus sub-fields are defined as follows:
Locations:
Locations + number + “:”+Name attribute.
E.g. Locations1:name, location1:line1
|
Locations |
Locations: List of locations.(locations1:name)
|
|
|
name: location name |
Format string |
|
|
latitude: location latitude |
Format number |
|
|
longitude: location longitude. |
Format number |
|
|
postcode: location postcode |
Format string |
|
|
state:location state |
Format string |
|
|
city: city state |
Format string |
|
|
line1: address |
Format string |
|
|
line2: address |
Format string |
|
|
country: location country |
Format string |
Location format
Individuals:
Individuals + number + “:”+Name attribute.
Individuals1:name, Individuals1:line1
|
individuals |
List of contacts that must be notified. (Individuals1:line1)
|
|
|
firstname: contact first name. |
Format string max length 256. |
|
|
lastname: contact last name. |
Format string max length 256. |
|
|
email: contact email. |
Format valid email. |
|
|
number: contact phone number. |
Format number max length 16 |
|
|
countrycode: contact country code |
Format string |

Individual format
Format group:
The contacts will have the defined group when marked with a Y in the document. If left empty or N, that group will not be added to that contact.
Format Group
Example:
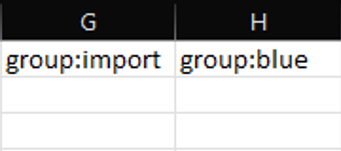
group:red, group:genasys
Y, N
N,Y
Notification Channel:
The contact has the notification channel selected when a Y is used. If left empty or N, the channel will not be added to that contact.
notification_channels + “:”+Name of notification .
Example:
notification_channels:SMS, notification_channels: CAP
Y, N
N,Y
Notification channel types:
'CAP', 'EMAIL', 'FACEBOOK', 'IPAWS', 'PUSH', 'RSS', 'SMS', 'SPEAKER', 'TWITTER', 'VOICE', 'WEB', 'WHATSAPP', 'YOUTUBE', 'CBC'.
Notification Channel
Notification Types:
The notification types have the notification channel selected when a Y is used. If left empty or N, the notification type will not be added to that contact.
notification_ types + “:”+Name of notification .
Example:
notification_types:Earthquake, notification_types:Bushfires
Y, N
N,Y
Notification channel type examples:
Earthquake, Bushfires, Terrorist attack
Notification Type
Custom fields:
List custom fields
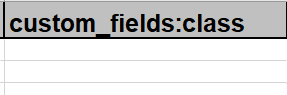
custom_fields + “:” + name
In each row of the contact we will put the value of the custom fields
Example:
custom_fields:action, custom_fields:colour
Custom Fields
Emails:
Multiple emails that contacts can have.
Emails + number + “:” + Name attribute
Example:
emails1:email, email1:alias
|
emails |
List of emails.
|
|
|
email: contact email. |
Format string max length 256. |
|
|
alias: alias email. |
Format string max length 256. |

Emails
Phone numbers:
numbers+ number + “:” + Name attribute
Example:
numbers1:dialcode, numbers1:number
+34,666666666
|
number |
multiple phone number list
|
|
|
alias: contact alias phone number. |
Format string max length 256. |
|
|
countrycode: contact country code E.G: US. |
Format string max length 256. |
|
|
dialcode: contact dial code number. E.g. +34 |
Format string max length 256. |
|
|
number: contact phone number. |
Format number max length 16 |

Numbers
Organizations:
The column is named “org”.
Configuration Parameters
To access sub-orgs, the parent org requires the following options to be activated:
- access_child_nodes
- access_child_node_contacts
Update content in case the contact already exists
- If email or phone number identifiers are blank or empty that field is not valid and will not be used.
- If email or phone number identifiers are defined in the import file but none of them exist in the contact list
Action: create a new contact
- Either email or phone number are defined in the import file and only one of them exists in the Contacts database
Action: update all the fields except the existing email or phone number.
- Both email or phone number are defined in the import file and both of them exists in the Contacts database for the same contacts.
Action: update all the fields except the existing email or phone number.
- Both email or phone number are defined in the import file and both of them exists in the Contacts database but for different contacts.
Action: define this row as error.
Download the sample file in the import contacts window.

File Example Download
Groups Page
In the Groups page of the Contacts section, you will find all the groups available in GEM.
Groups are used organize contacts who share similar qualities, like a location, company, profession, rank etc. Each group has a corresponding color to help identify contacts who share the same group.
Groups and Contacts can be restricted by profile. This allows access to sensitive contact data to be restricted. Groups are assigned to profiles from the GUI.
You can add and delete groups with the Add and Delete Group buttons, ( ) found at the top of the page.
- To add a new group, you simply need to name the group, choose a color for it, and press Save in the Group Details window.
- You can also create sub-groups. The example below shows “Brooklyn 7th Precinct Law Enforcement” as the parent group and several subgroups for different police ranks within. If a user sends a message to the parent group everyone with this group or one of its subgroups will receive a message, but a first responder could choose to only message 7th precinct detectives and officers by selecting the last two subtabs.
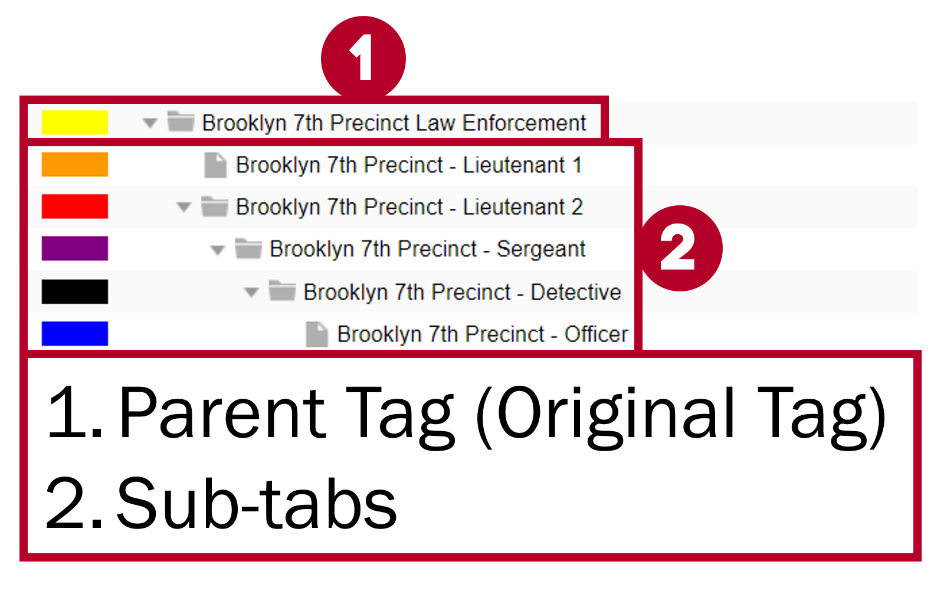
Example groups and subgroups
You can edit existing groups and subgroups using the edit button ( ). This will lead to the Group Details window for the selected group.
Groups can be sorted by using the drop-down menus found at the top of the columns.
Dynamic Groups
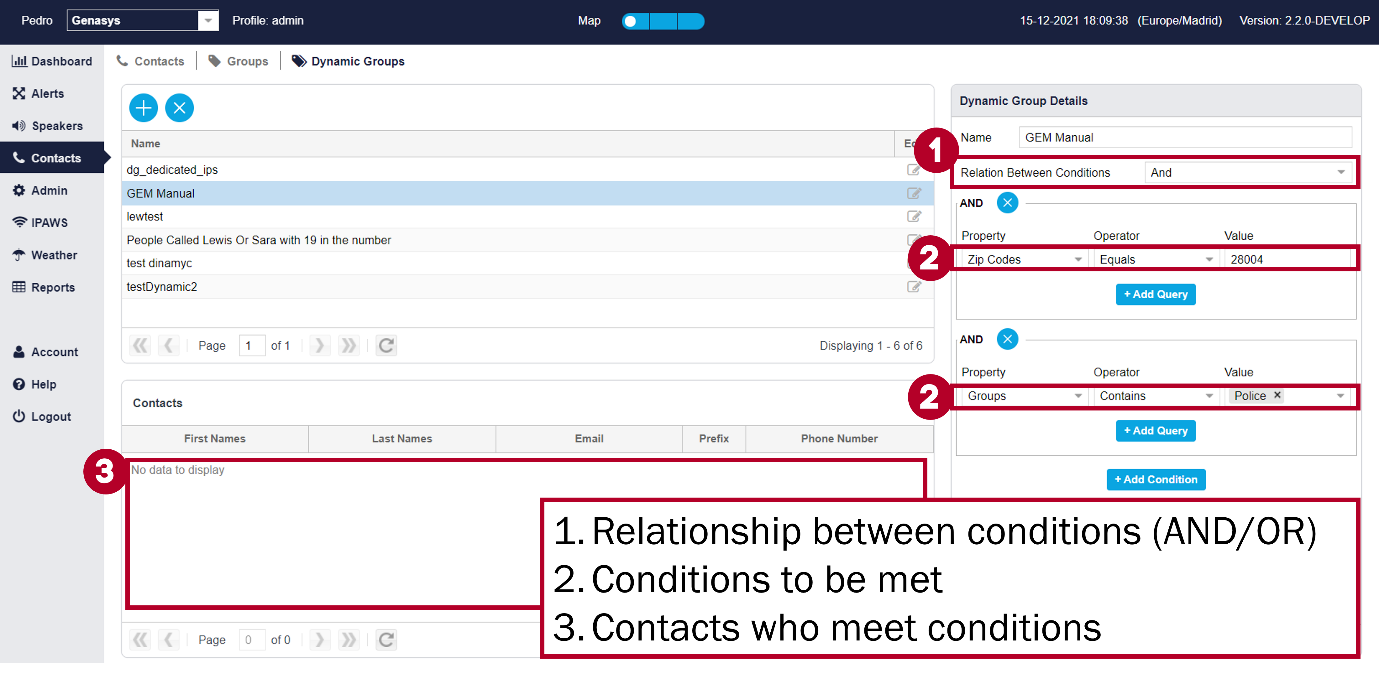
GEM also has the ability to create groups automatically by creating conditions that a contact needs to meet in order to form part of a group. For example, dynamic grouping allows you to group people who have the same ZIP code and or phone number prefix. The combinations are endless.
Dynamic groups
In the example above a contact would need to have the Zip Code 28004 and also be part of the Police Group in order to form part of this dynamic group.
The different properties that can be looked at when creating dynamic groups are:
Created – The date on which a contact was added
Contact Status - Whether a contact is marked as active nor not in the system
Date Modify – The date on which a contact’s details were last edited
Act – Active status for a user (possible options are True and False)
Prefix – Country code for a contact’s phone number
Email – Email address
External Id – External unique identification number (can be used as an alternative to email/number)
First Names – Contact’s first name
Id – Internal unique identifier within the GEM system
Number – Contact’s phone number (excluding prefix)
Language - What is the contact's preferred language
Last Names – Contact’s last name
Groups – Groups in which contacts can be found
Zip Codes – Postal code for a contact’s address
Through the Operator drop down menu, found between Property and Value, you must select the connection between the property and value. It offers the following options:
Exists – Has a value for the indicated property (specifying what the value must be becomes unnecessary. E.g. Property - phone number combined with Operator – Exists will create a group with every contact that has a phone number in the system)
Not Exists – Does not have a value for the indicated property. The inverse to the Exists option.
Equals – The property entered precisely matches the specified value
Not Equals – The property entered can be anything that is not the specified value
Contains – The property has the contents of the value within but may have other differences
Starts With – The property begins with the value specified
Ends With – The property finishes with the value specified
Finally, the value must be included. In the example above the relationship between conditions is set to AND, meaning both conditions must be met. The first condition requires a contact's ZIP code to be 28004 and the second condition requires a contact to be included in the group called Police. If a contact meets both conditions they will be part of this dynamic group. The value in this example was 28004 for condition one and Police for condition two.
Registration Portal
Though the registration portal is not a page found in the Contacts section of GEM, it is important to mention it here because it is how citizens are able to register as contacts in GEM.
All the contact details previously mentioned in the Contacts section are customizable for citizens through the portal. Clients can opt to make certain information, such as location, mandatory for registration.
The ability for citizens to edit their contact information is important because it allows a level of detail that may otherwise be difficult to achieve if contact information was only controlled by GEM users or admins. This allows citizens to add and update their contact details as needed to improve their own safety.
- For example, a user may choose to list their cousin’s address in addition to the address on their driver’s license in their Locations tab because they have been living with their cousin recently.
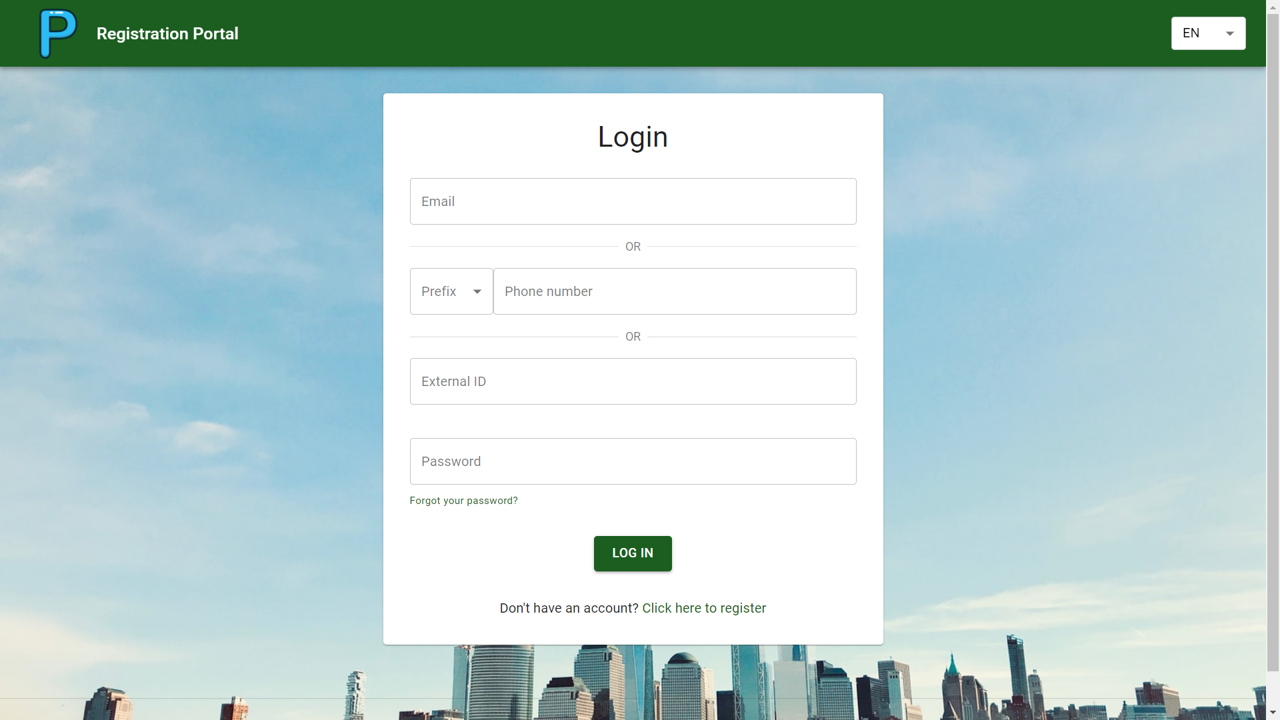
For citizens to register as contacts, they must go to the registration portal web page.
As mentioned prior this page will change based on each client’s name. Examples are:
https://lradmnsdemo.genasys.com/portal/en/register
https://rivco.genasys.com/portal/en/register
https://crawfordcounty.genasys.com/portal/en/register
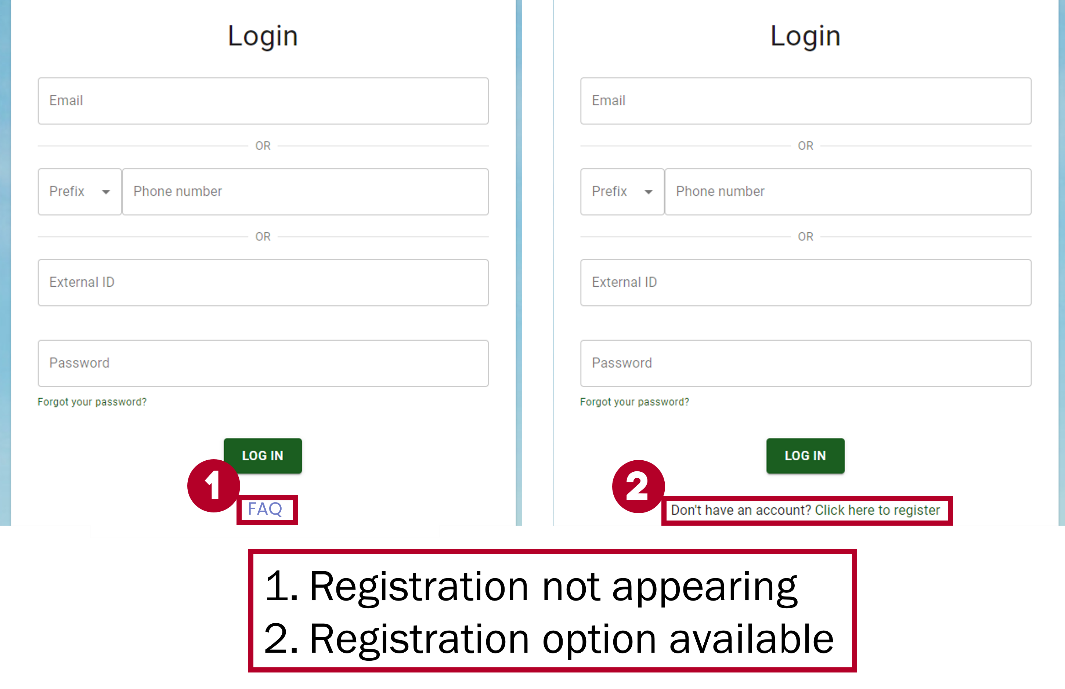
On this page, citizens must register using either an email address or a phone number and then create a password. Note: Corporate entities can disable the register, unsubscribe, and relatives functions.
NOTE: Citizens may also change the display language by clicking on the drop-down menu, (![]() ) found in the upper-right corner of the screen.
) found in the upper-right corner of the screen.
Enable and disable functions
Administrators can force users to change their passwords when necessary by changing the value of the “update_password” attribute and setting it to “true”. If this attribute is set to true the contact will have to change their password the next time they login.
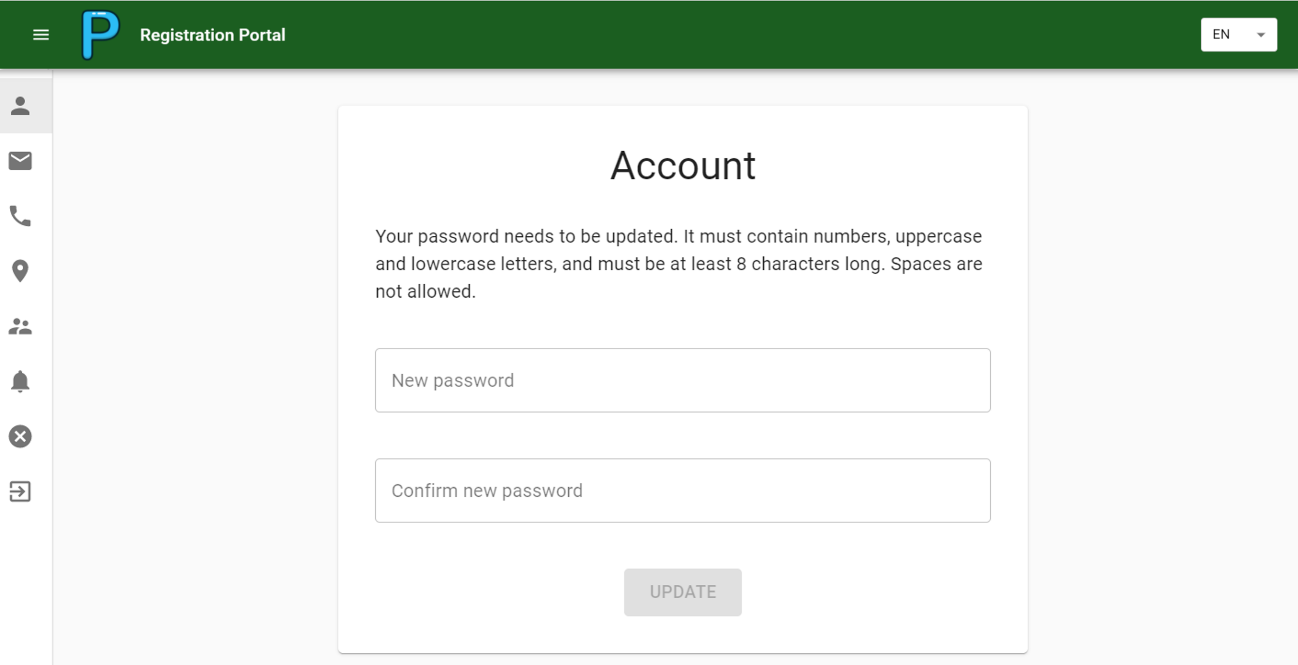
compulsory password update function
As an optional feature clients can have their registration portal set up so that when a new contact registers their email or phone number a confirmation message is sent out to activate their account. If this configuration is in place accounts that have not confirmed their identity through said activation message will not receive emails/SMS through GEM. However, contacts and data added through the Administrator's interface will not require an email or cellphone confirmation.
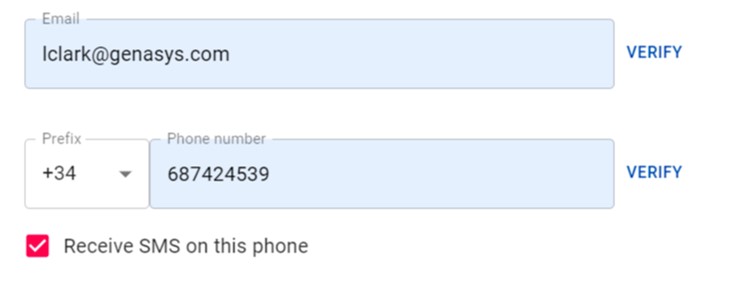
Registration portal account verification and SMS control
To send a verification email or SMS text message simply click on the VERIFY buttons. You can also choose to be unable to receive SMS messages by unticking the "Receive SMS on this phone" check box.
Existing telephones can be enabled/disabled for sms by importing for update with the column "phone_type_SMS", values Y/N.
Once registered, citizens will need to provide information for their account. The figure below shows the Account page, which is found in the Registration Portal.
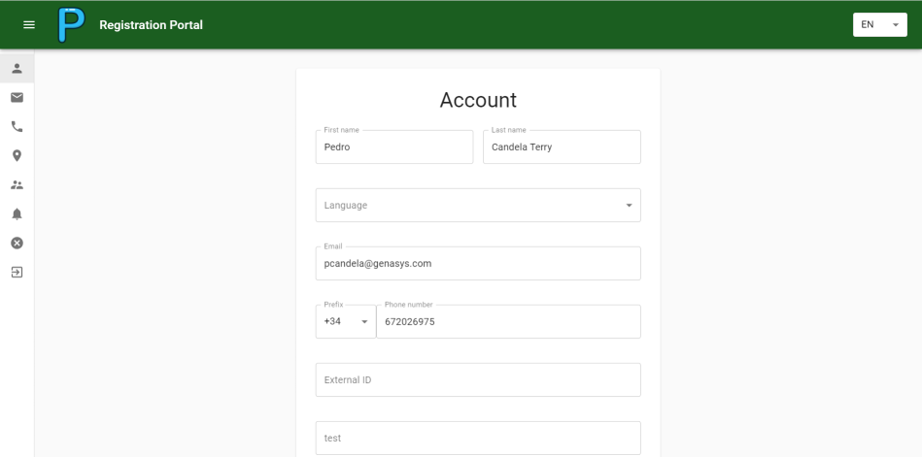
Account Tab of the Registration Portal
Fields: Account Tab of Registration Portal
First & Last Name: Citizen’s full name
Language: Language used in the citizen’s portal.
Prefix: Country calling code for phone numbers.
For example, the USA is +1 and Spain is +34
Phone number: Citizen’s phone number
Rank: Citizen’s rank or department within their organization or company.
Manager, CEO, Sales, etc.
Title: Citizen’s title. This could be honorific prefixes (Mr., Mrs., etc.) or it could be used as an accompaniment to rank (Rank is Manager and Title is Manager of Accounting).
These details can be changed and updated later if a citizen goes back to the Account page.
A citizen may also change their password from this page (if they know their current password). If they have forgotten their password, they would need to contact an admin to change it for them.
On the left side of the Registration Portal, there is a list of the different tabs that citizens can access to customize and edit their contact information.
These tabs match the tabs found in the Contact Details window, seen in Contacts section of this manual.

Citizens’ registration portal menu.
NOTE: The Registration Portal contains one tab that is only available for citizens: Unsubscribe.
For privacy concerns citizens are not forced to be part of the system if they do not want to be. The Unsubscribe tab contains a window that allows a citizen to delete themselves from GEM by entering their password.
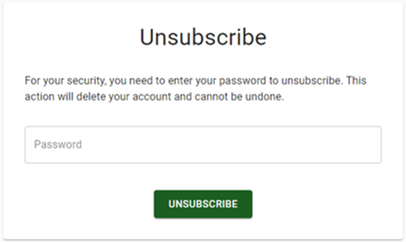
Unsubscribe Window
Unsubscribing is not recommended unless a citizen is absolutely certain and understands that this may severely impact their safety.